

Olympic Weightlifting: The Jerk
Olympic Weightlifting is generally known for the two events, or movements seen in the Olympic Games: the snatch and the clean & jerk. However, when we take those movements and all the assistance exercises, for the purpose of fitness and functioning training, there are actually three movements to consider: the snatch, the clean, and the jerk. Sure, people treat the clean & jerk as one movement, and certainly for good reason, as the Olympic lifts aren’t considered complete until the barbell is over the athlete’s head. What must be understood is that when training in the clean & jerk, the clean serves a different purpose than the jerk and attention should be given to each separately. Doing so will allow for a solid completion once put together to make one single exercise. So how can this be accomplished? Let’s discuss.
The Two Parts
Over the years of coaching Olympic weightlifting, it’s still a common theme that the simplest of all the movements causes the most difficulties. Technically speaking, the jerk is the easiest movement, containing the least amount of moving parts compared to the snatch and clean, as the mechanics change through those lifts. The jerk is a simple straight up and down movement with very little distance to travel, and yet many struggle in making it comfortable. The most common faults are (a) the lifter feeling forward when the weight is overhead and (b) the lifter muscles the bar up (or presses it up) instead of a fluid elbow lock out. Because of this, I always break up the jerk into two simple parts: (1) the dip & drive and (2) the split. If you’ve read any of my previous articles, you know I teach things the simple way, avoiding complication. So when it comes to the jerk, just worry about two things, dip & drive, then split. That’s it! Everything else will fall in line with practice.
The Dip & Drive
The dip & drive (or just a jump) is basically the slight bend of the knee (and I mean slight), followed by a reverse in direction towards the sky by extending upward. The most important thing to remember about the dip & drive is what I refer to as the
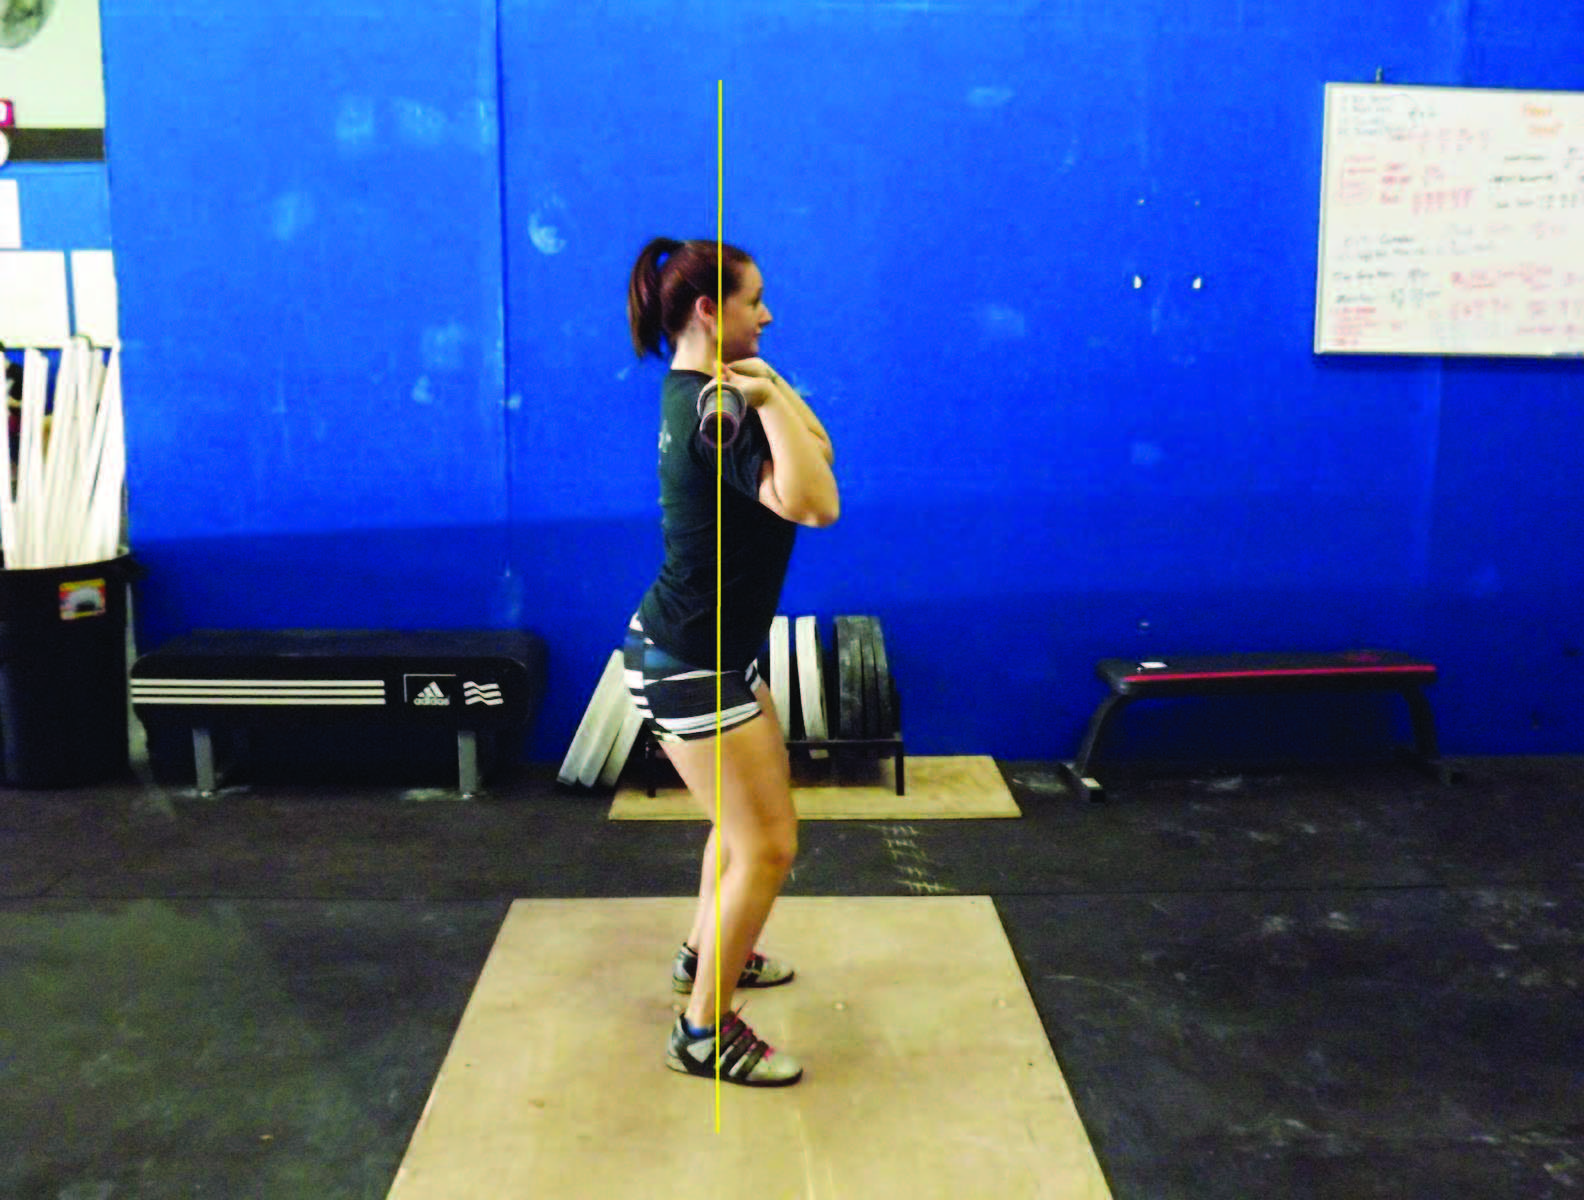
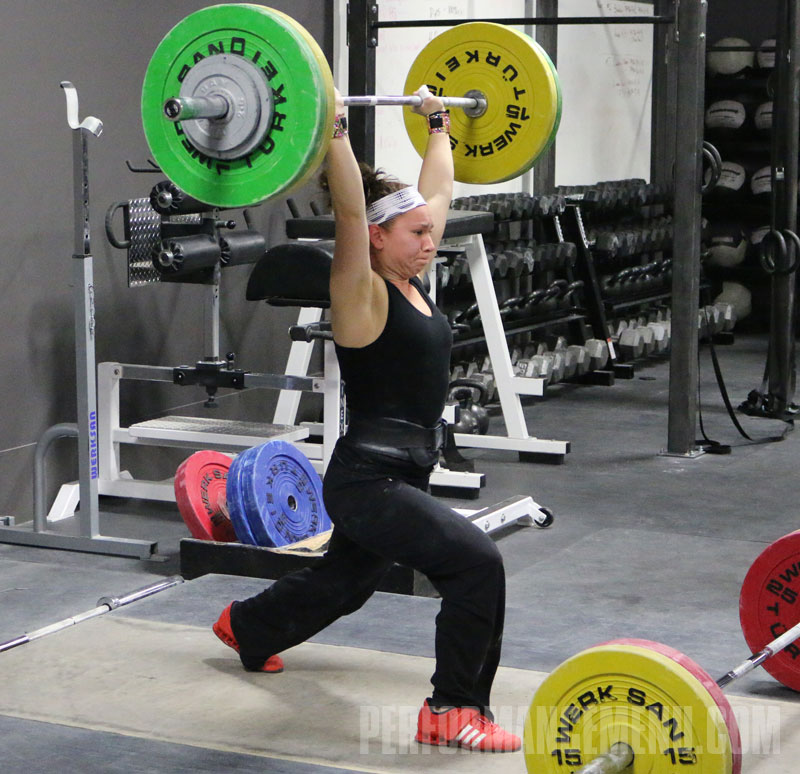
imaginary line of symmetry that runs vertical from your ankle, knee, hip, torso, shoulders, barbell, through your ears and overhead. This is a straight line that you must stay in constant contact with during the execution of the jerk, no matter how heavy it feels. Speaking of heavy, the ability to lift the weight overhead depends completely on the lifter’s ability to propel the bar vertically, with no horizontal movement. Deviating from the imaginary line of symmetry will send the bar moving in a different direction, and thus cause a struggle where there otherwise wouldn’t have been. Stay straight up and down, or else.
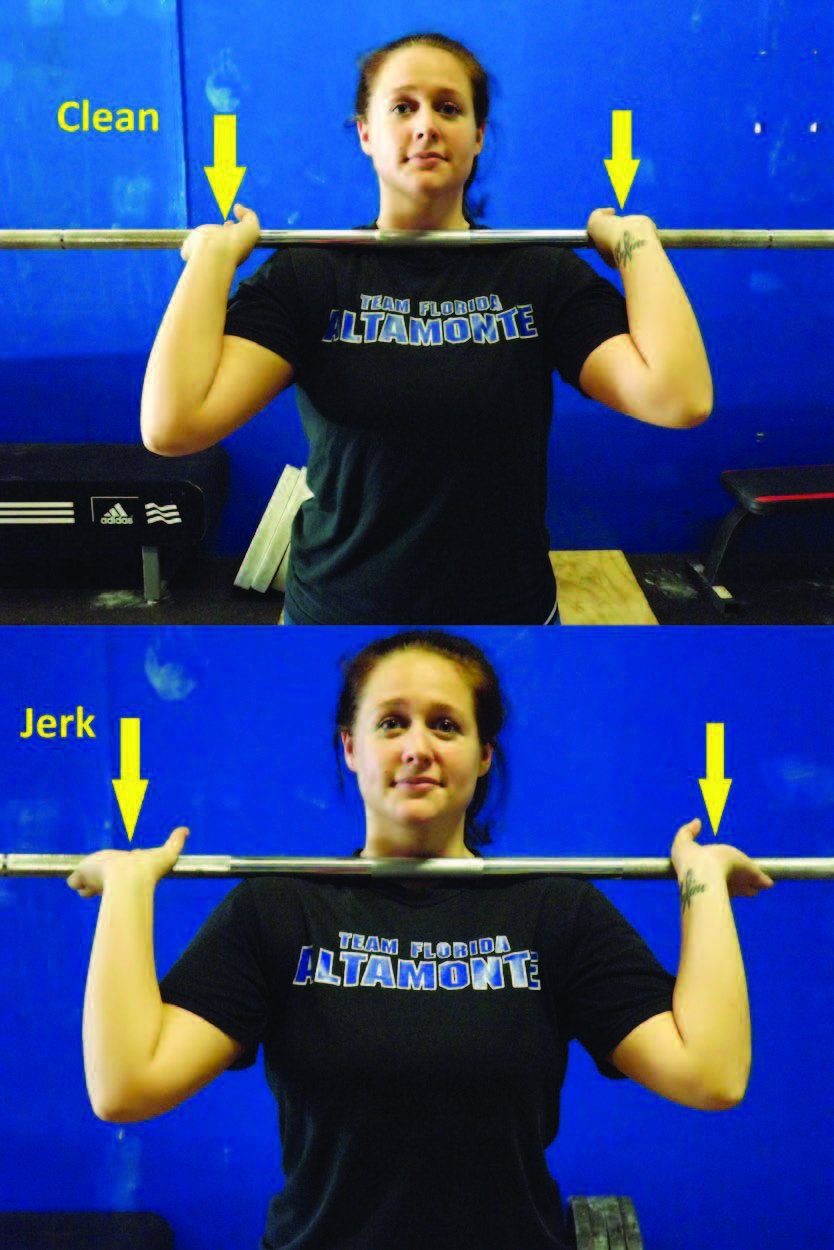
Now that the lifter understands the path their body must take, they should consider the grip of their hands. Yes, it’s completely fine to have a wider grip in the jerk than what was used for the clean. No, it’s not necessary, so don’t feel like you need to run to the gym right now and start modifying your grip. Just know that it is common, and preferred by many lifters. Reasons include the fact that a wider grip may allow greater comfort in the shoulders, a shorter distance to travel overhead and more stability in the overhead position. You’re already top-heavy when in the overhead position, so having a wider grip will put the barbell a little closer to your head, giving you a greater sense of control. Well, how wide should my grip be if I decide to change it, coach? Whatever is comfortable! That’s it! No angle measurement, no degrees to calculate, no inches to determine and no geometry to figure out. Comfort! You’ll know what feels right. Stop thinking so much.
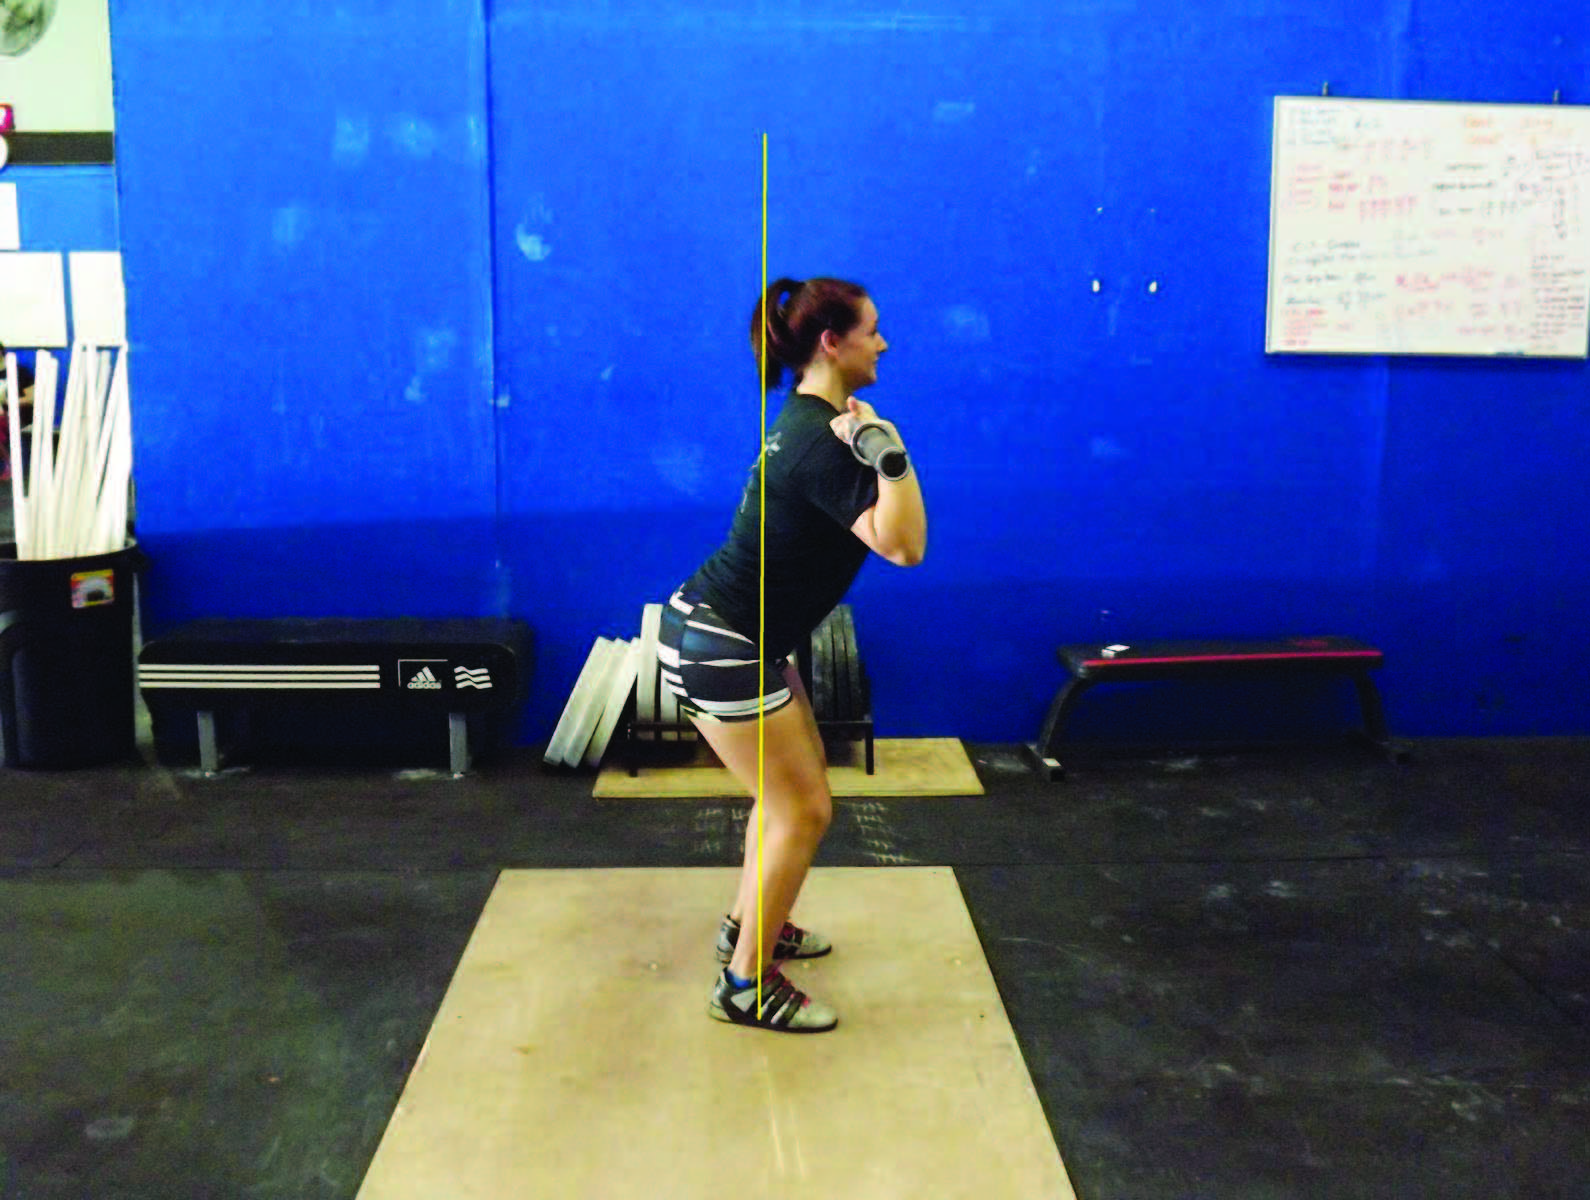
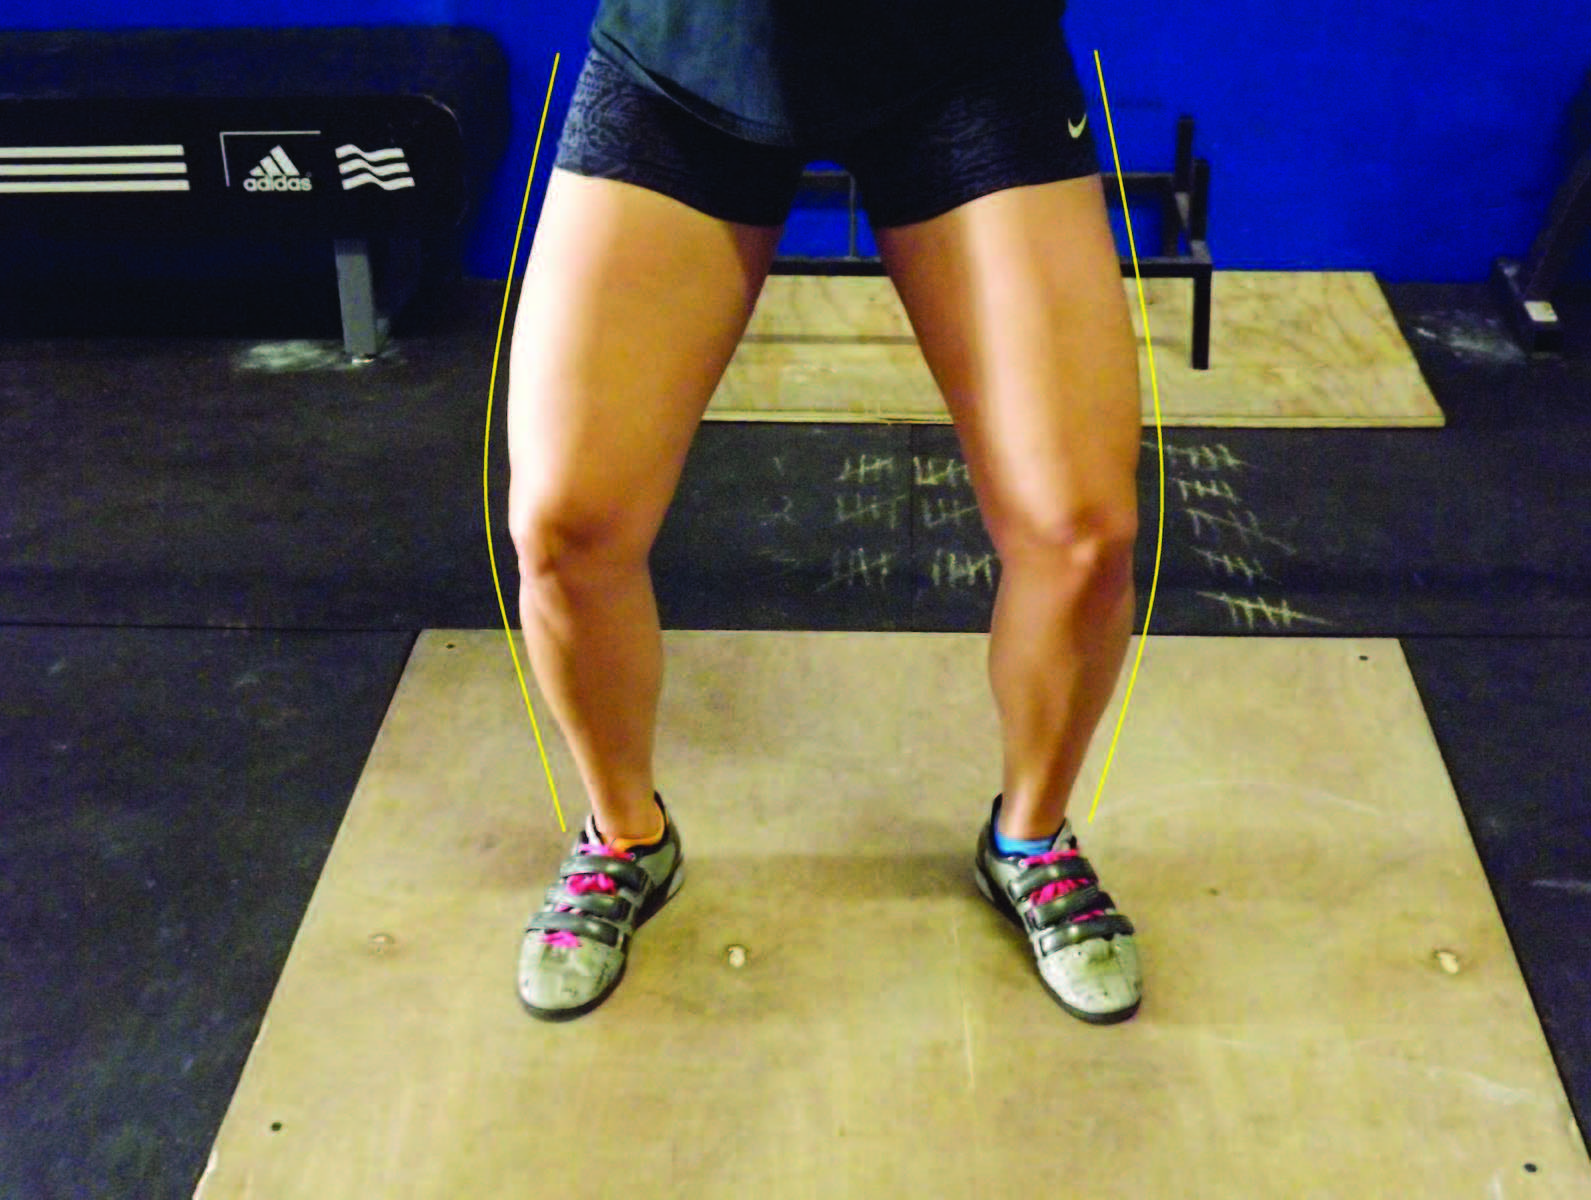
As the dip (or drop) portion is initiated, the lifter needs to stay on his or her heels. We’ve all heard the coaching cue “stay back” or “stay on heels.” What does this mean? It means the combined weight of you and the barbell should be distributed towards the heel of both feet, not towards the balls of the feet and definitely not the toes. How come? Because it is the only way to remain on the imaginary line of symmetry mentioned above. Drifting towards the toes at any point will make you lose contact with the imaginary line of symmetry and will cause you to run forward. Speaking of forward, one trick to keep yourself back on your heels is to allow your knees to bow outward instead of forward over the toes. Letting your knees shift out will keep your hips riding on the imaginary line of symmetry, which will also keep your torso erect. Ah, interesting concept. Keeping your torso erect during the jerk is an absolute must.
We have all heard about the importance of the core in sports and fitness. Core this and core that. What exactly does that mean? Basically the stability of your trunk or torso. CrossFit does a great job of describing this, especially in their Level 1 Coaching Course. They refer to it in terms of your midline stability. In essence, picture your whole body. Now cut off your legs, arms and head, and what you have left are what coaches stress is your core. It’s more than your abs, so if you’re one of those people who do every ab exercise imaginable in order to strengthen your core, you’re missing a ton of other muscle groups such as your chest, upper back, middle of back, lower back and obliques. If you understand this, then you understand that during the dip & drive of the Jerk, this core must remain solid, rigid and unbreakable. To soften it, most often collapsing the chest, will make the weight feel heavier than it really is. If your trunk is stable, like a pillar, you will be able to produce the right amount of force to propel as necessary.
At this point, the athlete is in the drive portion of the jerk. The athlete should only travel a short and shallow depth. As stated in the definition, the dip is a slight bend of the knee. I realize it’s counterintuitive to think a shallow, quick jump can create a ton of vertical energy, but stay with me on this idea. Dipping too low becomes a squat, a squat is slow and static and using it for the purpose of the Jerk ends up looking more like a thruster. Energy is being produced into the barbell catapulting it vertically (yes, still on the imaginary line of symmetry). As it’s traveling past your face into the overhead position, there is one slight obstacle to worry about--the chin. If you’re smiling to yourself while reading this, that means you’ve struck your chin with the barbell at least once before. Ouch. Guess what, me too…although it’s been a long time since. It doesn’t matter, though, because you never forget it. Hopefully you didn’t bite your tongue when you did it and all you suffered is either a mild abrasion or a crushed ego coupled with a little embarrassment. So, I have a trick to teach all athletes. At the moment before you commit to the dip & drive, tilt your chin up. You may still keep your eyes fixated on an object direction in front of you, which helps with balance. Allowing your chin to tilt slightly up with head rotated back, will clear the bar path making the obstacle less of an issue. Do not shift your head or neck back. That’s not quite what I’m saying here, but rather a rotation up. Your head and neck remain in the same spot, horizontally speaking. Plus, some athletes find tilting their chin up, with eyes focused straight, actually helps them feel back on the heels to accomplish the tracking of the line of symmetry. (There’s that term again!)
The last two aspects of the dip & drive are what to do with the arms and ensuring you complete the drive. Remember, the dip is the drop (or slight break of the knees) and the drive is the extension or jump. A common mistake athletes make is they engage their arms too soon in the process of the dip & drive. Energy should be transferred from the hips into the torso then chest and directly into the barbell. Trying to press too soon in the process blunts that powerful energy and inevitably ruins the lift. This is often seen when athletes are executing a heavy lift, in excitement, huffing and puffing, and under duress. They rush the need to apply force on the bar and begin pressing their arms before the rest of the body can finish its job. Try delaying the arms. Let the hips perform the dip & drive thoroughly to its completion at full extension. Then, at the last second, when there’s no more force that can be applied to the bar, split (or catch the bar overhead for those doing push jerks, where there is no split of the feet).
The Split
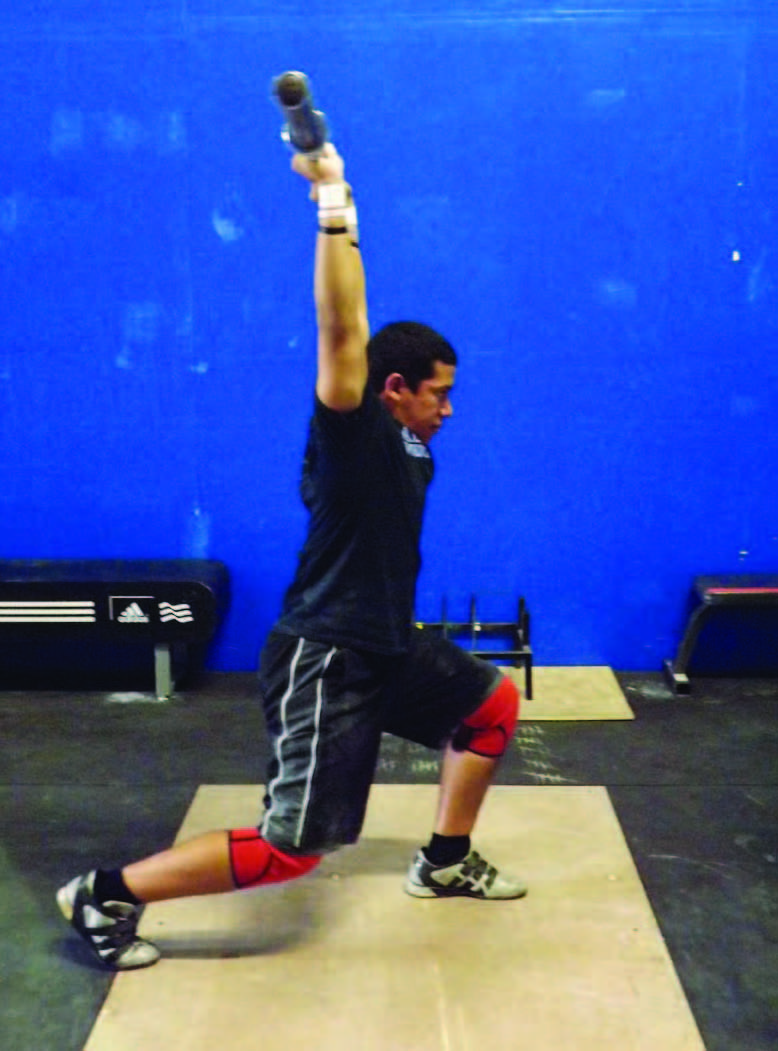
Now there are some important aspects to share about in the split. First, the athlete should do everything he or she can to ensure that their feet hit the ground at the same time they lock out their arms in the overhead position. I often use the term “lock & land” to cue the lifter properly. The elbows and feet should hit simultaneously. Feet placement seems to be a struggle for many people. Which foot should be forward and which should be behind? The answer goes back to my comment regarding grip width. Comfort! Try switching both feet and see. There’s no right or wrong in it; it’s all about comfort. There are many ways to determine which foot you should try first. My answer is what I use consistently in my gym and it’s to ask the athlete to get in a position they would normally be in if asked to run a sprint. Chances are they’ll automatically place one foot in front of the other in preparation for what would be an all-out race. Whatever stance they naturally place themselves in is a good indicator of what they feel powerful in. Start there.
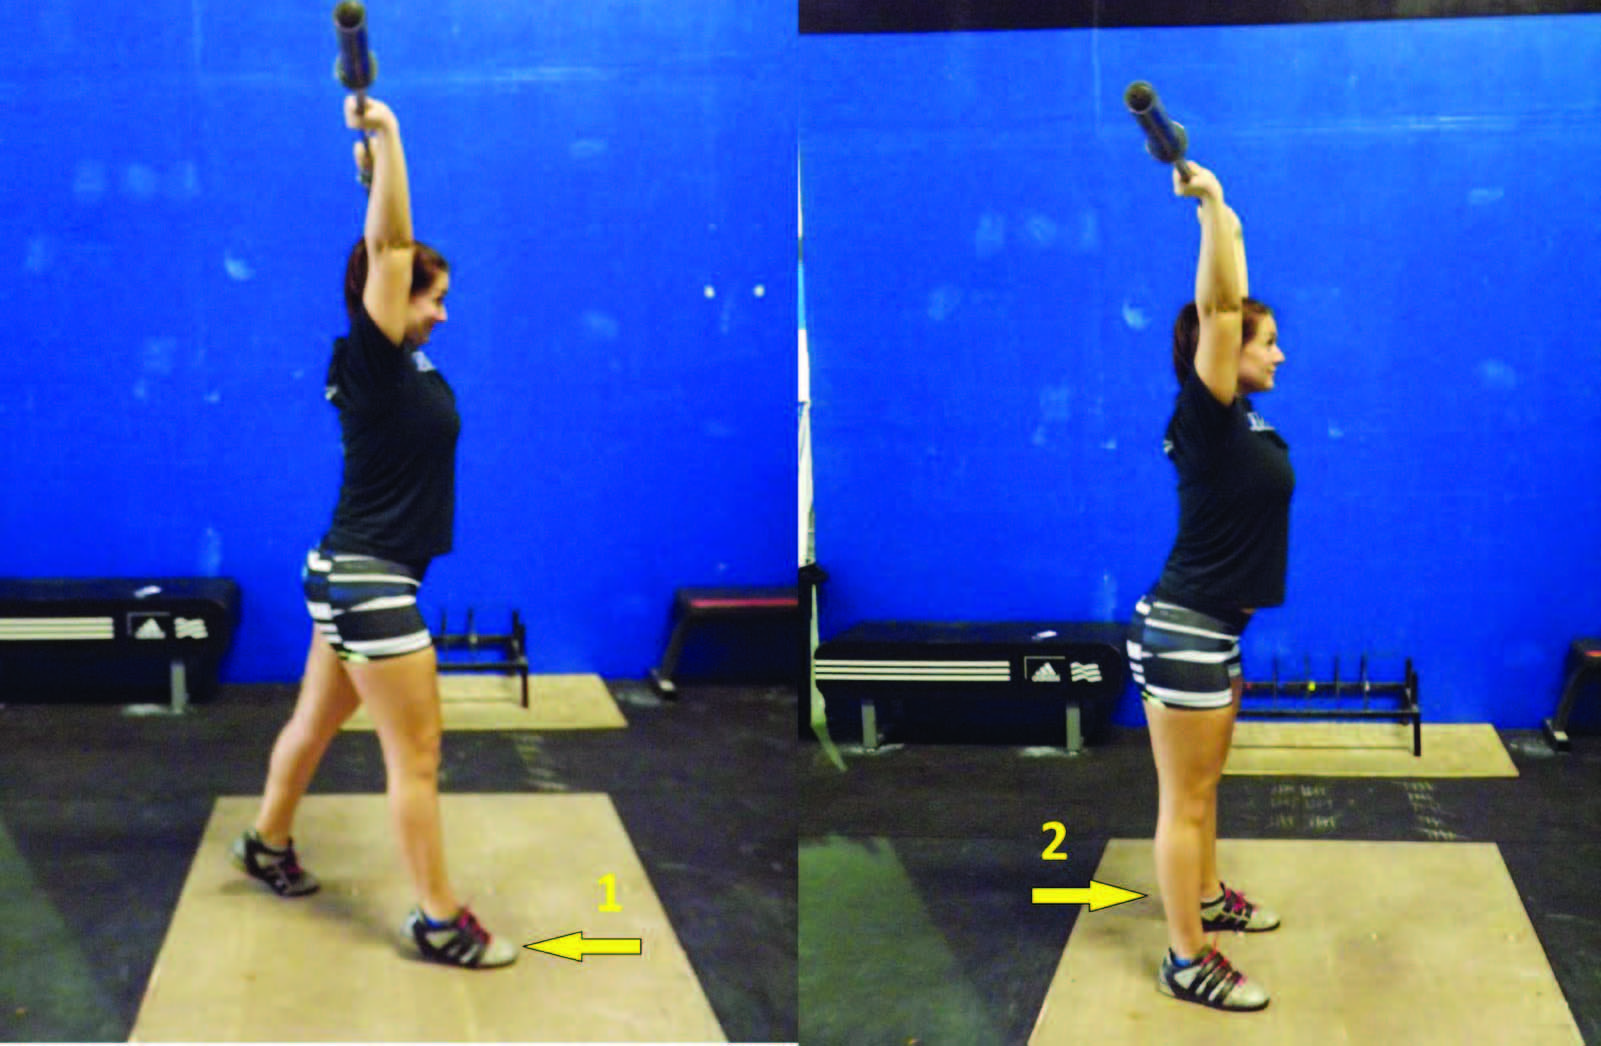
Recovery of the feet is the final stage in this game. Remember, keeping in constant contact with the imaginary line of symmetry, the best way to recover is what I refer to as the “one-two” process. The athlete should return the front foot where it came from first, followed by the back foot. The reason for this recommendation has to do with control. The lifter has more control of their final position if they lead with their front foot than the back. Additionally, it will help stabilize the lifter back onto the imaginary line of symmetry if they had deviated. Once the feet are back together on the same plane, then the weight can be dropped. Primarily as a safety precaution, waiting until you’re back in line to drop the weight will show the athlete has full control of the barbell. The bar should never be dropped intentionally during the split. After all, in the sport of Olympic weightlifting, dropping the barbell any time before the lifter is standing erect, with feet on the same plane, would denote a no-lift or failed attempt.
The Two Parts
Over the years of coaching Olympic weightlifting, it’s still a common theme that the simplest of all the movements causes the most difficulties. Technically speaking, the jerk is the easiest movement, containing the least amount of moving parts compared to the snatch and clean, as the mechanics change through those lifts. The jerk is a simple straight up and down movement with very little distance to travel, and yet many struggle in making it comfortable. The most common faults are (a) the lifter feeling forward when the weight is overhead and (b) the lifter muscles the bar up (or presses it up) instead of a fluid elbow lock out. Because of this, I always break up the jerk into two simple parts: (1) the dip & drive and (2) the split. If you’ve read any of my previous articles, you know I teach things the simple way, avoiding complication. So when it comes to the jerk, just worry about two things, dip & drive, then split. That’s it! Everything else will fall in line with practice.
The Dip & Drive
The dip & drive (or just a jump) is basically the slight bend of the knee (and I mean slight), followed by a reverse in direction towards the sky by extending upward. The most important thing to remember about the dip & drive is what I refer to as the
imaginary line of symmetry that runs vertical from your ankle, knee, hip, torso, shoulders, barbell, through your ears and overhead. This is a straight line that you must stay in constant contact with during the execution of the jerk, no matter how heavy it feels. Speaking of heavy, the ability to lift the weight overhead depends completely on the lifter’s ability to propel the bar vertically, with no horizontal movement. Deviating from the imaginary line of symmetry will send the bar moving in a different direction, and thus cause a struggle where there otherwise wouldn’t have been. Stay straight up and down, or else.
Now that the lifter understands the path their body must take, they should consider the grip of their hands. Yes, it’s completely fine to have a wider grip in the jerk than what was used for the clean. No, it’s not necessary, so don’t feel like you need to run to the gym right now and start modifying your grip. Just know that it is common, and preferred by many lifters. Reasons include the fact that a wider grip may allow greater comfort in the shoulders, a shorter distance to travel overhead and more stability in the overhead position. You’re already top-heavy when in the overhead position, so having a wider grip will put the barbell a little closer to your head, giving you a greater sense of control. Well, how wide should my grip be if I decide to change it, coach? Whatever is comfortable! That’s it! No angle measurement, no degrees to calculate, no inches to determine and no geometry to figure out. Comfort! You’ll know what feels right. Stop thinking so much.
As the dip (or drop) portion is initiated, the lifter needs to stay on his or her heels. We’ve all heard the coaching cue “stay back” or “stay on heels.” What does this mean? It means the combined weight of you and the barbell should be distributed towards the heel of both feet, not towards the balls of the feet and definitely not the toes. How come? Because it is the only way to remain on the imaginary line of symmetry mentioned above. Drifting towards the toes at any point will make you lose contact with the imaginary line of symmetry and will cause you to run forward. Speaking of forward, one trick to keep yourself back on your heels is to allow your knees to bow outward instead of forward over the toes. Letting your knees shift out will keep your hips riding on the imaginary line of symmetry, which will also keep your torso erect. Ah, interesting concept. Keeping your torso erect during the jerk is an absolute must.
We have all heard about the importance of the core in sports and fitness. Core this and core that. What exactly does that mean? Basically the stability of your trunk or torso. CrossFit does a great job of describing this, especially in their Level 1 Coaching Course. They refer to it in terms of your midline stability. In essence, picture your whole body. Now cut off your legs, arms and head, and what you have left are what coaches stress is your core. It’s more than your abs, so if you’re one of those people who do every ab exercise imaginable in order to strengthen your core, you’re missing a ton of other muscle groups such as your chest, upper back, middle of back, lower back and obliques. If you understand this, then you understand that during the dip & drive of the Jerk, this core must remain solid, rigid and unbreakable. To soften it, most often collapsing the chest, will make the weight feel heavier than it really is. If your trunk is stable, like a pillar, you will be able to produce the right amount of force to propel as necessary.
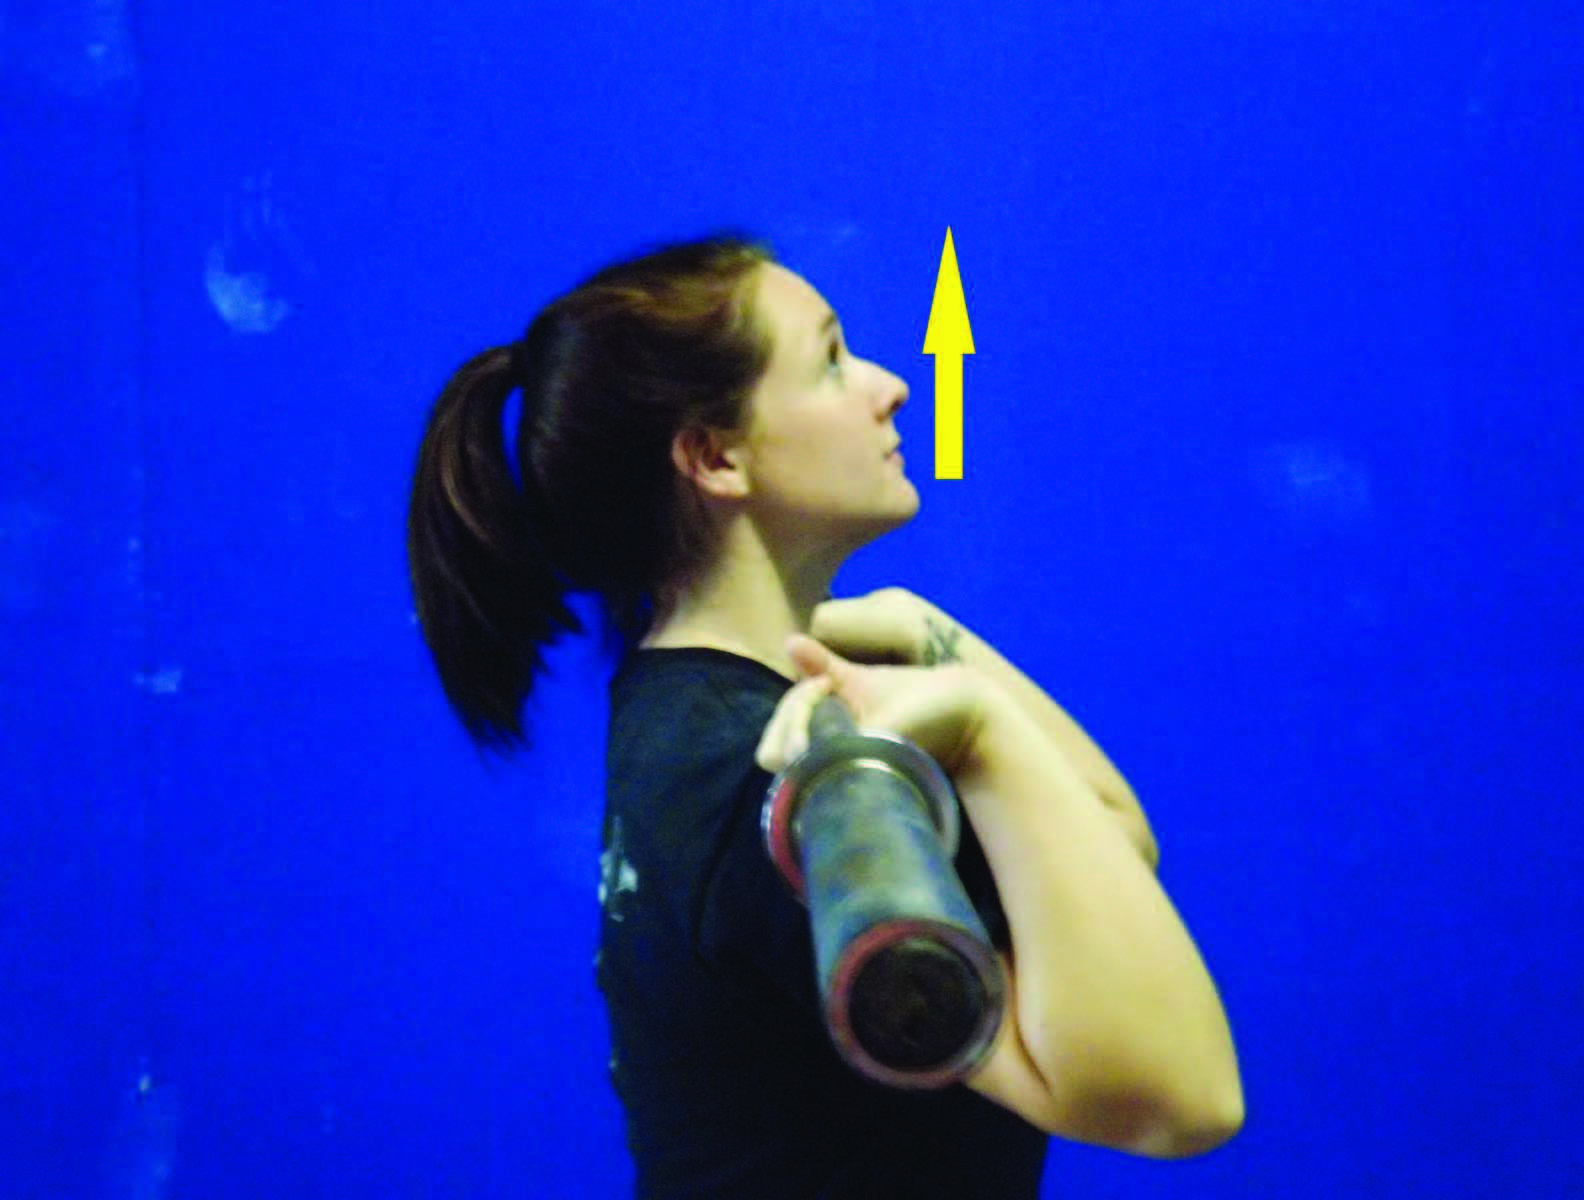
At this point, the athlete is in the drive portion of the jerk. The athlete should only travel a short and shallow depth. As stated in the definition, the dip is a slight bend of the knee. I realize it’s counterintuitive to think a shallow, quick jump can create a ton of vertical energy, but stay with me on this idea. Dipping too low becomes a squat, a squat is slow and static and using it for the purpose of the Jerk ends up looking more like a thruster. Energy is being produced into the barbell catapulting it vertically (yes, still on the imaginary line of symmetry). As it’s traveling past your face into the overhead position, there is one slight obstacle to worry about--the chin. If you’re smiling to yourself while reading this, that means you’ve struck your chin with the barbell at least once before. Ouch. Guess what, me too…although it’s been a long time since. It doesn’t matter, though, because you never forget it. Hopefully you didn’t bite your tongue when you did it and all you suffered is either a mild abrasion or a crushed ego coupled with a little embarrassment. So, I have a trick to teach all athletes. At the moment before you commit to the dip & drive, tilt your chin up. You may still keep your eyes fixated on an object direction in front of you, which helps with balance. Allowing your chin to tilt slightly up with head rotated back, will clear the bar path making the obstacle less of an issue. Do not shift your head or neck back. That’s not quite what I’m saying here, but rather a rotation up. Your head and neck remain in the same spot, horizontally speaking. Plus, some athletes find tilting their chin up, with eyes focused straight, actually helps them feel back on the heels to accomplish the tracking of the line of symmetry. (There’s that term again!)
The last two aspects of the dip & drive are what to do with the arms and ensuring you complete the drive. Remember, the dip is the drop (or slight break of the knees) and the drive is the extension or jump. A common mistake athletes make is they engage their arms too soon in the process of the dip & drive. Energy should be transferred from the hips into the torso then chest and directly into the barbell. Trying to press too soon in the process blunts that powerful energy and inevitably ruins the lift. This is often seen when athletes are executing a heavy lift, in excitement, huffing and puffing, and under duress. They rush the need to apply force on the bar and begin pressing their arms before the rest of the body can finish its job. Try delaying the arms. Let the hips perform the dip & drive thoroughly to its completion at full extension. Then, at the last second, when there’s no more force that can be applied to the bar, split (or catch the bar overhead for those doing push jerks, where there is no split of the feet).
The Split
Now there are some important aspects to share about in the split. First, the athlete should do everything he or she can to ensure that their feet hit the ground at the same time they lock out their arms in the overhead position. I often use the term “lock & land” to cue the lifter properly. The elbows and feet should hit simultaneously. Feet placement seems to be a struggle for many people. Which foot should be forward and which should be behind? The answer goes back to my comment regarding grip width. Comfort! Try switching both feet and see. There’s no right or wrong in it; it’s all about comfort. There are many ways to determine which foot you should try first. My answer is what I use consistently in my gym and it’s to ask the athlete to get in a position they would normally be in if asked to run a sprint. Chances are they’ll automatically place one foot in front of the other in preparation for what would be an all-out race. Whatever stance they naturally place themselves in is a good indicator of what they feel powerful in. Start there.
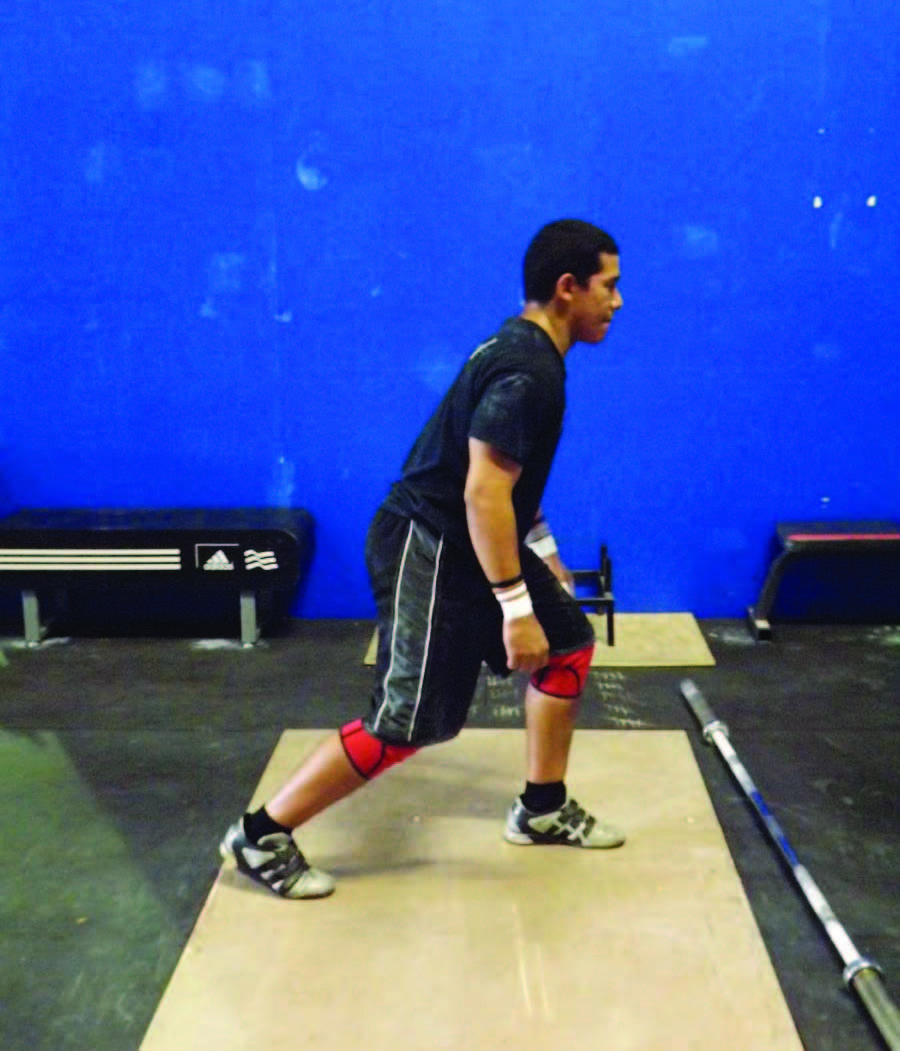
Recovery of the feet is the final stage in this game. Remember, keeping in constant contact with the imaginary line of symmetry, the best way to recover is what I refer to as the “one-two” process. The athlete should return the front foot where it came from first, followed by the back foot. The reason for this recommendation has to do with control. The lifter has more control of their final position if they lead with their front foot than the back. Additionally, it will help stabilize the lifter back onto the imaginary line of symmetry if they had deviated. Once the feet are back together on the same plane, then the weight can be dropped. Primarily as a safety precaution, waiting until you’re back in line to drop the weight will show the athlete has full control of the barbell. The bar should never be dropped intentionally during the split. After all, in the sport of Olympic weightlifting, dropping the barbell any time before the lifter is standing erect, with feet on the same plane, would denote a no-lift or failed attempt.
|
Daniel Camargo is a USAW International Coach and a 22-year veteran in the sport of Olympic Weightlifting. As an athlete Camargo was a 3-time U.S. Junior World Team Member and represented U.S.A. in 9 other international competitions. He also set three junior American Records. Now in his 14th year as a head coach, Camargo has produced several State, Collegiate and National Champions, as well as 12 athletes who themselves represented the United States in international competitions. In 2009, he was selected as Team Leader and Coach of Team USA and spent 10 days in Romania where he led the U.S. Team to the Junior World Weightlifting Championships. |
Search Articles
Article Categories
Sort by Author
Sort by Issue & Date
Article Categories
Sort by Author
Sort by Issue & Date