

Jerk Blocks
Jerk blocks are a somewhat mythical piece of equipment—their numbers are extremely small and there appears to be a constant search for plans to build them. After two years of Aimee busting my chops to build her some, with the new gym and the corresponding space, I found myself with no further excuses to put it off.

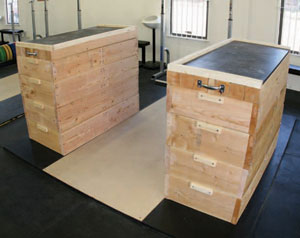
The design I ended up with is not really anything new—build multiple blocks that stack on top of each other to allow adjustment of the final height to accommodate different athletes. This is the same kind of design used at the Olympic Training Center in Colorado Springs. That said, I’ve never seen the inside of their blocks, so I can only assume these are similar.
These blocks are on the small side—they’ll easily fit on a standard 8x8’ platform with 2’ wide rubber on each side—but they’re big enough in our experience. This size makes them a bit more manageable in terms of relocating them to free up the platform on which they normally reside and for changing the height. If you want larger blocks, just adjust the measurements below.
The total cost on the blocks was somewhere around $300, not including the gas for multiple trips to Lowes to compensate for my lack of planning, plus several years off my life.
What You’ll Need
Basically:
An obscene amount of wood, screws and bolts
Specifically:
- (7) 2x10x12
- (4) 2x8x12
- (4) 2x6x12
- (4) 4x4x12
- (2) 2x4x8
- (2) ¾ x 8 x 10 pine
- (4) ¾ x 1 ½ x 8 pine
- (1) 4x6 ¾” rubber horse stall mat (or scraps = (2) 2x4 sections)
- (4) sturdy metal gate handles
- ~280 3” drywall screws
- ~160 1.25” drywall screws
- ~160 3.5” x 5/16” lag screws
Building the Stackers
First thing we need to do is cut the sections for the stackers. We will be building (6) total 10” tall stackers, (2) 8” stackers, and (2) 6” stackers. For each one, we’ll need (2) 48” lengths and (6) 20” lengths. Cut all of these and set aside.

Next we need to cut the tabs that will keep the blocks from sliding when the bar is dropped on them. Rip the 10” pine in half and cut (16) 19.5” lengths. With rough-grit sandpaper, round the corners and edges of one of the long ends. This will make the tabs slide in and out much more easily when stacking the blocks and help prevent any splintering or splitting. Measure 2.5” along the short end and draw a pencil line at this level down the long dimension of the board. Set them aside.
Grab the ¾”x1.5” pine and cut (20) 6” lengths. With rough-grit sandpaper, smooth out the corners and edges of one side. These will be our stacker handles. Set aside.
Assemble the basic frame of each stacker with (2) 48” lengths and (2) 20” lengths—the 20” boards will be inside the 48” boards. Take your time and use a square to make sure the boards are aligned—the little extra time this takes now will save you huge headaches later. Pre-drill and screw together with (3) 3” drywall screws for each joint (top, middle, bottom).
Once this frame is done, measure 12”, 24” and 36” along the length of each 48” side. These will be your markers for the inside boards. At the 12” and 36” marks, align a single 20” board and pre-drill and screw with (3) 3” drywall screws. At the 24” mark, align a pair of 20” boards, pre-drill and screw.
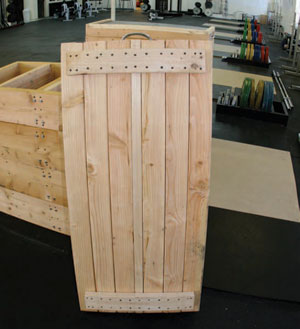
Collect the handles we cut earlier. Pre-drill and screw with 1.5” drywall screws into the top middle of each short side of each stacker. You can measure if you want, but the approximate center will work fine.
With the stacker assembly complete, you can now drill holes for the 3.5” lag screws. Place (2) at each corner and in each end of each center board. You can save time by assembling all the stackers with screws only first, and then drilling out all stackers together, and placing the lag screws together.
To finish the stackers, we need to place the tabs. Set aside one pair of 10” stackers—these will be the bottom blocks and will not have tabs.
Flip the first stacker upside down (handles on the bottom edge) and clamp a tab inside one of the short ends, placing the pencil line we left along the edge of the stacker board—in other words, there should be about 2.5” of the board protruding up. You’ll have about ¼” of space on either side of the tab between it and the long boards of the stacker. Use 1.5” drywall screws to secure the tab—I used (7) screws per tab in a staggered arrangement.
You can now stack these things up while we build the top piece.
Building the Top
The top of the blocks is a heavy chunk that you will find moving endlessly pleasurable. It may be tough to move around, but it will hold anything you can drop on it.
Cut each 4x4x12 into (3) 4” lengths. Cut one of the 2x4x8s in half for (2) 4” lengths. Cut (4) 20” lengths from the other 2x4 (cut these just shy of 20”—more like 19 7/8”).
Lay (6) of these 4x4 sections flat on the floor with (1) of the 2x4 sections in the middle. Use a spare board to align the ends.
Place on of the 6” stackers on top of this assembly and align the corners. Make sure the 4x4s are pushed tightly together. Place one of the 20” 2x4 sections flat against the 4x4s inside the stacker and up against the inside of each short end. We’re just using the stacker as a guide for the placement of these 2x4s—basically place the 2x4 as far toward the ends of the 4x4 assembly as possible. Pre-drill and screw the 2x4 into the 4x4s (and the 2x4 in the middle) with 3” drywall screws. Use (4) screws in a square pattern for each 4x4, and (3) in a line for the outer 4x4s and middle 2x4. Remove the stacker and flip the 4x4 assembly over. Repeat for the other top piece. Sand the bottom edges and corners of the 2x4s down a bit to allow them to slide in and out of the stackers more easily.
Cut from the ¾”x1.5” pine into (8) 22 ¼” and (4) 44 ¾” lengths. Stack (2) of the short pieces along the short edge of the 4x4 assembly, pre-drill and screw. Stack (2) of the long pieces along one long edge of the 4x4 assembly (its ends will be between the short pieces), pre-drill and screw. These will help prevent errant bars from rolling of the blocks too easily.
Cut (2) pieces of the rubber mat to 44 7/8” x 22 7/8”. Slide them onto the 4x4 assemblies inside the pine edges and screw in at the corners (1” drywall screws work fine if you have any around).
Finally, pre-drill and screw the metal gate handles to the center of each short end of each top piece. Use the 3” drywall screws instead of the screws that likely came with the handles—these things will be holding some serious weight.
Stack and Play
Throw the top pieces on the rest of the stack and go to town. Dropping on the blocks will be pretty loud—you can reduce the noise and the bounce of the stackers somewhat by pulling the bar down as it hits rather than just letting it bounce freely. This is a good practice anyway because it ensures you’re hanging onto the bar and less likely to let it bounce in some odd way to either hit you or roll off the blocks and hit someone else.
Why Use Jerk Blocks?
The simplest reason to employ jerk blocks in an athlete’s training is to allow multiple reps at heavier weights. Rep work in the jerk is limited by how much weight an athlete can bring back down to the shoulders from overhead. Often this weight is limited considerably by elbow positioning, upper and lower body strength disparities, or simply poor lowering technique.
I don’t personally believe that athletes should ever eliminate all lowering phases of jerk training, but there are plenty of instances in which block work will allow important training that isn’t otherwise possible.
The design I ended up with is not really anything new—build multiple blocks that stack on top of each other to allow adjustment of the final height to accommodate different athletes. This is the same kind of design used at the Olympic Training Center in Colorado Springs. That said, I’ve never seen the inside of their blocks, so I can only assume these are similar.
These blocks are on the small side—they’ll easily fit on a standard 8x8’ platform with 2’ wide rubber on each side—but they’re big enough in our experience. This size makes them a bit more manageable in terms of relocating them to free up the platform on which they normally reside and for changing the height. If you want larger blocks, just adjust the measurements below.
The total cost on the blocks was somewhere around $300, not including the gas for multiple trips to Lowes to compensate for my lack of planning, plus several years off my life.
What You’ll Need
Basically:
An obscene amount of wood, screws and bolts
Specifically:
- (7) 2x10x12
- (4) 2x8x12
- (4) 2x6x12
- (4) 4x4x12
- (2) 2x4x8
- (2) ¾ x 8 x 10 pine
- (4) ¾ x 1 ½ x 8 pine
- (1) 4x6 ¾” rubber horse stall mat (or scraps = (2) 2x4 sections)
- (4) sturdy metal gate handles
- ~280 3” drywall screws
- ~160 1.25” drywall screws
- ~160 3.5” x 5/16” lag screws
Building the Stackers
First thing we need to do is cut the sections for the stackers. We will be building (6) total 10” tall stackers, (2) 8” stackers, and (2) 6” stackers. For each one, we’ll need (2) 48” lengths and (6) 20” lengths. Cut all of these and set aside.
Next we need to cut the tabs that will keep the blocks from sliding when the bar is dropped on them. Rip the 10” pine in half and cut (16) 19.5” lengths. With rough-grit sandpaper, round the corners and edges of one of the long ends. This will make the tabs slide in and out much more easily when stacking the blocks and help prevent any splintering or splitting. Measure 2.5” along the short end and draw a pencil line at this level down the long dimension of the board. Set them aside.
Grab the ¾”x1.5” pine and cut (20) 6” lengths. With rough-grit sandpaper, smooth out the corners and edges of one side. These will be our stacker handles. Set aside.
Assemble the basic frame of each stacker with (2) 48” lengths and (2) 20” lengths—the 20” boards will be inside the 48” boards. Take your time and use a square to make sure the boards are aligned—the little extra time this takes now will save you huge headaches later. Pre-drill and screw together with (3) 3” drywall screws for each joint (top, middle, bottom).
Once this frame is done, measure 12”, 24” and 36” along the length of each 48” side. These will be your markers for the inside boards. At the 12” and 36” marks, align a single 20” board and pre-drill and screw with (3) 3” drywall screws. At the 24” mark, align a pair of 20” boards, pre-drill and screw.
Collect the handles we cut earlier. Pre-drill and screw with 1.5” drywall screws into the top middle of each short side of each stacker. You can measure if you want, but the approximate center will work fine.
With the stacker assembly complete, you can now drill holes for the 3.5” lag screws. Place (2) at each corner and in each end of each center board. You can save time by assembling all the stackers with screws only first, and then drilling out all stackers together, and placing the lag screws together.
To finish the stackers, we need to place the tabs. Set aside one pair of 10” stackers—these will be the bottom blocks and will not have tabs.
Flip the first stacker upside down (handles on the bottom edge) and clamp a tab inside one of the short ends, placing the pencil line we left along the edge of the stacker board—in other words, there should be about 2.5” of the board protruding up. You’ll have about ¼” of space on either side of the tab between it and the long boards of the stacker. Use 1.5” drywall screws to secure the tab—I used (7) screws per tab in a staggered arrangement.
You can now stack these things up while we build the top piece.
Building the Top
The top of the blocks is a heavy chunk that you will find moving endlessly pleasurable. It may be tough to move around, but it will hold anything you can drop on it.
Cut each 4x4x12 into (3) 4” lengths. Cut one of the 2x4x8s in half for (2) 4” lengths. Cut (4) 20” lengths from the other 2x4 (cut these just shy of 20”—more like 19 7/8”).
Lay (6) of these 4x4 sections flat on the floor with (1) of the 2x4 sections in the middle. Use a spare board to align the ends.
Place on of the 6” stackers on top of this assembly and align the corners. Make sure the 4x4s are pushed tightly together. Place one of the 20” 2x4 sections flat against the 4x4s inside the stacker and up against the inside of each short end. We’re just using the stacker as a guide for the placement of these 2x4s—basically place the 2x4 as far toward the ends of the 4x4 assembly as possible. Pre-drill and screw the 2x4 into the 4x4s (and the 2x4 in the middle) with 3” drywall screws. Use (4) screws in a square pattern for each 4x4, and (3) in a line for the outer 4x4s and middle 2x4. Remove the stacker and flip the 4x4 assembly over. Repeat for the other top piece. Sand the bottom edges and corners of the 2x4s down a bit to allow them to slide in and out of the stackers more easily.
Cut from the ¾”x1.5” pine into (8) 22 ¼” and (4) 44 ¾” lengths. Stack (2) of the short pieces along the short edge of the 4x4 assembly, pre-drill and screw. Stack (2) of the long pieces along one long edge of the 4x4 assembly (its ends will be between the short pieces), pre-drill and screw. These will help prevent errant bars from rolling of the blocks too easily.
Cut (2) pieces of the rubber mat to 44 7/8” x 22 7/8”. Slide them onto the 4x4 assemblies inside the pine edges and screw in at the corners (1” drywall screws work fine if you have any around).
Finally, pre-drill and screw the metal gate handles to the center of each short end of each top piece. Use the 3” drywall screws instead of the screws that likely came with the handles—these things will be holding some serious weight.
Stack and Play
Throw the top pieces on the rest of the stack and go to town. Dropping on the blocks will be pretty loud—you can reduce the noise and the bounce of the stackers somewhat by pulling the bar down as it hits rather than just letting it bounce freely. This is a good practice anyway because it ensures you’re hanging onto the bar and less likely to let it bounce in some odd way to either hit you or roll off the blocks and hit someone else.
Why Use Jerk Blocks?
The simplest reason to employ jerk blocks in an athlete’s training is to allow multiple reps at heavier weights. Rep work in the jerk is limited by how much weight an athlete can bring back down to the shoulders from overhead. Often this weight is limited considerably by elbow positioning, upper and lower body strength disparities, or simply poor lowering technique.
I don’t personally believe that athletes should ever eliminate all lowering phases of jerk training, but there are plenty of instances in which block work will allow important training that isn’t otherwise possible.
| Greg Everett is the owner of Catalyst Athletics, publisher of The Performance Menu Journal and author of Olympic Weightlifting: A Complete Guide for Athletes & Coaches, Olympic Weightlifting for Sports, and The Portable Greg Everett, and is the writer, director, producer, editor, etc of the independent documentary American Weightlifting. Follow him on Facebook here. |
Search Articles
Article Categories
Sort by Author
Sort by Issue & Date
Article Categories
Sort by Author
Sort by Issue & Date