

The New Digs: Catalyst Athletics
New Facility
I’m fortunate enough to have made many mistakes in terms of equipment and facility details previously at NorCal Strength & Conditioning and Mike’s Gym (sorry guys). This allowed me to come into this facility with a very clear idea of what I wanted and how I wanted to arrange and build various things.
The Basics
The facility is 4500 square feet, including a row of four offices along the back wall and two restrooms. I’m not a geometry wiz, and I haven’t simply measured and multiplied, but I estimate that provides us about 3900 square feet of usable gym floor.
The building is one of three on the parcel, and shares two other similarly sized units. Ours is an end suite with a wall and primary signage on a busy street, directly across from a light rail station for those clients with either a swollen civic and environmental consciousness or who are wise enough to funnel their limited finances into training with us rather than purchasing a personal vehicle.
The Gear
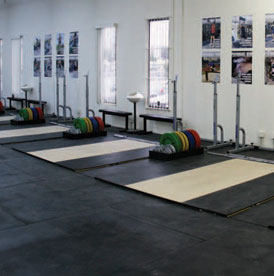
Most importantly, we have six lifting platforms in a single row with plenty of space both between each other and the wall behind them. This allows us to have multiple athletes lifting and loading simultaneously. Each platform is a full eight-feet square, built with ¾-inch MDF and rubber on two layers of ½-inch plywood.

With each platform is a flat bench—used primarily for supporting lifters’ asses—but usable for bench pressing, box jumps and other activities; a Werksan squat rack; at least one each Werksan men’s and women’s bars; and a full set of Werksan bumper plates and iron change.
In between every two platforms is a Muscle Driver chalk stand. We chose these because of the semi-enclosed, gymnastics-style bubble—people slapping chalk all over the floor and equipment pisses me off.
In between platforms are homemade plate racks. These are just simple 2x6 frames with 2x6 dividers between each bumper weight. I also added a small section in the front with dividers for a full set of iron change.
The gym floor is 5x7’ ½” rubber mats. I’ve always used ¾” mats in the past, but decided that because all the heavy weight dropping was going to be done on the platforms and the floor is a solid cement slab, that additional ¼” wasn’t necessary. Laying rubber mats is a bit of an ordeal, but as I mentioned previously, I fortunately had the previous experience of doing it less than ideally to guide me in doing it better. I started in an outside corner, which was the squarest in the building, and I cut the mats along the wall such that I never had four corners meeting—that is, the edges of one column of mats aligned with the middle of the adjacent columns’ mats. This arrangement alone I believe makes a huge difference in terms of your ability to place mats squarely and tightly, and for them to remain in those states through use.
At the office end of the building, we have carpet along the walls to create a clear pathway between offices and restrooms. Here the rubber butts up tightly to the metal carpet edging strip to be held in place. Nearby is an opening for what is our “locker room” (actually a former kitchenette in which we put a large stack of shelves for clients’ gear and a couple benches), and at the far side of the gym is our reception area. Here I glued painted quarter-round wood strips to the floor against the edges of the rubber mats to keep them tightly in place as well as add to aesthetics.
On the reception floor I laid 12” square self-adhesive vinyl tiles. The industrial white tile that was in this half of the building was damaged, way too bright, and surprisingly slippery—basically an ugly lawsuit waiting to happen. These vinyl tiles are extremely tough, they actually resemble real shale quite impressively, they’re quick and easy to install, and at less than a dollar each, remarkably affordable.
In this front corner, I built a large reception counter—very basic and solid 2x4 structure with faux-stone laminate countertops and corrugated metal sheeting along the sides. Again, this is a quick, relatively inexpensive way to create a good-looking reception area. Along with this counter is a large set of shelves to display our books, DVDs and merchandise, and a few reception chairs and small table.
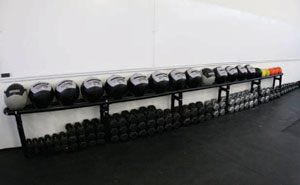
Along the wall opposite our platforms is 32 feet of whiteboard with 1” angle wood along the bottom edge to hold dry-erase pens. Below this is an ABS plastic rack to hold our medicine balls. Ball storage is the classic gym dilemma—they’re relatively large and in large numbers, don’t stack, need to be easily reached, and because various weights look the same, the markings need to be clearly visible. The solution here was simply to elevate them above our dumbbells and kettlebells as simply as possible.
We use Dynamax for soft medicine balls, e.g. wall balls and partner throwing drills, and a mix of D-Balls and Plyoballs for slamming drills. We purchased very few of the latter—we can guarantee eventual breakage of both balls after slamming, and honestly, as fun as they are, ball slams are not important enough to warrant the kind of cost necessary to keep a large stock of usable slamming balls. They’ll be used for private clients only to cut down on wear and tear. I also opted for the semi-bounce rather than no-bounce D-Balls—the difference in bounce is nearly imperceptible, and the semi-bounce balls seem to have the bit more elasticity necessary to extend their lives somewhat.
Below the ball rack are our dumbbells and kettlebells. We use the standard rubber hexhead dumbbells for CrossFit and other conditioning work in which we expect a lot of ground contact and possible dropping—these range from 5 to 50 lbs. From 55 to 100 lbs, we use solid iron hexhead dumbbells. These are used only by our lifters and other strength athletes for more controlled exercises—that is, ones that don’t involve squirreliness to the point of dropping bells on the floor, either intentionally or not. Using hex dumbbells is key for storage—the shape makes them easily stackable directly on the floor. Dumbbell racks are cool, but they just take up valuable space, and the cost of racks for the number of dumbbells we have would be enough to purchase more important gear like bumpers, bars… or more dumbbells.
Our kettlebells are Ader. I’ll admit that my first choice of dumbbell is still Dragondoor for both feel and look—but I’m not stupid enough to spend twice as much money for them as I could for a nearly identical product such as Ader. These bells have smooth handles, a good finish, and are conveniently marked with both kilos and pounds for the metrically hopeless (ours are stored with the kilo side facing out, of course). Again, these just sit on the floor in order of weight.
At the end of our kettlebell collection are our sandbags—of course all Ultimate Sandbags. We have a range of weights and sizes to cut down on weight changes as much as possible. Other bags would be outside—these don’t leak sand everywhere, so we’re not concerned with using them inside.
Next is our collection of CrossFit barbells, bumpers and racks. We use the good old BFS Olympic bars for two basic reasons—they’re dirt cheap, and they hold up surprisingly well. CrossFitters won’t be doing much other than deadlifting, squatting and pressing with them, so there isn’t a lot of opportunity for bending anyway. With these we use HiTemp bumper plates for similar reasons—they’re dirt cheap, and they work more than well enough for CrossFit classes.
Our class squat racks are IronMind Vulcans—not only do we love these racks (the new model is even better than the old ones)—but due to some shenanigans I won’t detail (in order to demonstrate my great maturity), we got a great deal on them. Finally, we have a bunch of iron lb change and plenty of 10 lb HiTech plates.
Along the back wall, we have a rather stout power rack. This rack we got from our pal and PM contributor Mike Gray, who was crafty enough to have it built by one of the Sorinex fabricators. On each side is a rack full of several hundred pounds of iron plates—probably just shy of what Ronnie Coleman curls.
Next is a full spread of plyo boxes from 12 to 42 inches. This gives us some range for lifters and individual athletes, while our flat benches can double as mid-range boxes and steps. Wedged into the corner is a Sorinex glute-ham bench, which is the size of a small horse.
Rounding out the perimeter are some Concept 2 rowers. We opted for the Model D rather than E. My experience with the latter has not exactly impressed me. I had to replace parts on several occasions on a single rower that was used minimally—and performing surgery on one of those things is like trying to dissect and reassemble an insect inside a bowl of thumbtacks.
In the corner next to the reception area is our pull-up bar structure. Thankfully I save building this for last, because had it been the first project I undertook, it’s quite possible I would have abandoned the business. The structure is simple, and morphed numerous times from my original plans for various reasons, including the fact that our building is littered with conduit and similar items that are invariably precisely where you need them not to be. What we ended up with is three 4x4 posts along one wall with a fourth on the other. Between these posts are 6-foot 1” galvanized pipe (with an outside diameter of about 1.3”), each at a different height to accommodate clients’ reaches.
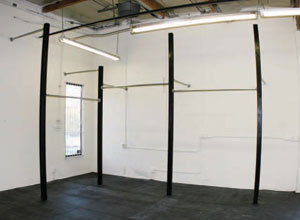
Running from each post back to the wall is a 4-foot pipe. The three along the main wall are all at the same height—all higher than the 6-foot pipes to improve stability, but also to serve as additional pull-up bars for taller individuals. Taller folks tend to be heavier, so the shorter bar is a little more solid.
Behind the single 6-foot bar side, the 4-foot pipe nearest the corner is at about 10 feet, and the final one at the end is near the top of the 12-foot post. From these two we’ve hung rings for muscle ups and other ring skills improved by higher attachment points. The initial plan called for additional beams above the side-by-side 6-foot pipes to hang rings from inside the cage at 12 feet. This became impossible on one side because of a light fixture in the way, and the other, I opted to skip because I was on the margin of suicide after spending two days on a ladder drilling into the cement walls. As it turns out, there’s a wooden beam in the ceiling above each spot from which I can hang rings with far less work.
The Trimmings
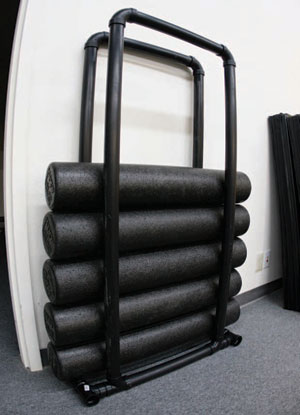
We threw in a few more little things that make a big difference. This includes racks for iron change and HiTech plates built into the walls to store things more economically, bar racks to store bars vertically against the walls, and a foam roller rack. These are simple things that can be built for little money but save a lot of space and hassle.
Come in and See Us
If you’re in the area, come in and check the place out. We love visitors. Also, we lift on Saturdays at 11:00 am, and this is an open day for visitors to come snatch and clean & jerk with us and our lifters. Just make sure to call or email first to make sure we’re not traveling on a particular Saturday.
I’m fortunate enough to have made many mistakes in terms of equipment and facility details previously at NorCal Strength & Conditioning and Mike’s Gym (sorry guys). This allowed me to come into this facility with a very clear idea of what I wanted and how I wanted to arrange and build various things.
The Basics
The facility is 4500 square feet, including a row of four offices along the back wall and two restrooms. I’m not a geometry wiz, and I haven’t simply measured and multiplied, but I estimate that provides us about 3900 square feet of usable gym floor.
The building is one of three on the parcel, and shares two other similarly sized units. Ours is an end suite with a wall and primary signage on a busy street, directly across from a light rail station for those clients with either a swollen civic and environmental consciousness or who are wise enough to funnel their limited finances into training with us rather than purchasing a personal vehicle.
The Gear
Most importantly, we have six lifting platforms in a single row with plenty of space both between each other and the wall behind them. This allows us to have multiple athletes lifting and loading simultaneously. Each platform is a full eight-feet square, built with ¾-inch MDF and rubber on two layers of ½-inch plywood.
With each platform is a flat bench—used primarily for supporting lifters’ asses—but usable for bench pressing, box jumps and other activities; a Werksan squat rack; at least one each Werksan men’s and women’s bars; and a full set of Werksan bumper plates and iron change.
In between every two platforms is a Muscle Driver chalk stand. We chose these because of the semi-enclosed, gymnastics-style bubble—people slapping chalk all over the floor and equipment pisses me off.
In between platforms are homemade plate racks. These are just simple 2x6 frames with 2x6 dividers between each bumper weight. I also added a small section in the front with dividers for a full set of iron change.
The gym floor is 5x7’ ½” rubber mats. I’ve always used ¾” mats in the past, but decided that because all the heavy weight dropping was going to be done on the platforms and the floor is a solid cement slab, that additional ¼” wasn’t necessary. Laying rubber mats is a bit of an ordeal, but as I mentioned previously, I fortunately had the previous experience of doing it less than ideally to guide me in doing it better. I started in an outside corner, which was the squarest in the building, and I cut the mats along the wall such that I never had four corners meeting—that is, the edges of one column of mats aligned with the middle of the adjacent columns’ mats. This arrangement alone I believe makes a huge difference in terms of your ability to place mats squarely and tightly, and for them to remain in those states through use.
At the office end of the building, we have carpet along the walls to create a clear pathway between offices and restrooms. Here the rubber butts up tightly to the metal carpet edging strip to be held in place. Nearby is an opening for what is our “locker room” (actually a former kitchenette in which we put a large stack of shelves for clients’ gear and a couple benches), and at the far side of the gym is our reception area. Here I glued painted quarter-round wood strips to the floor against the edges of the rubber mats to keep them tightly in place as well as add to aesthetics.
On the reception floor I laid 12” square self-adhesive vinyl tiles. The industrial white tile that was in this half of the building was damaged, way too bright, and surprisingly slippery—basically an ugly lawsuit waiting to happen. These vinyl tiles are extremely tough, they actually resemble real shale quite impressively, they’re quick and easy to install, and at less than a dollar each, remarkably affordable.
In this front corner, I built a large reception counter—very basic and solid 2x4 structure with faux-stone laminate countertops and corrugated metal sheeting along the sides. Again, this is a quick, relatively inexpensive way to create a good-looking reception area. Along with this counter is a large set of shelves to display our books, DVDs and merchandise, and a few reception chairs and small table.
Along the wall opposite our platforms is 32 feet of whiteboard with 1” angle wood along the bottom edge to hold dry-erase pens. Below this is an ABS plastic rack to hold our medicine balls. Ball storage is the classic gym dilemma—they’re relatively large and in large numbers, don’t stack, need to be easily reached, and because various weights look the same, the markings need to be clearly visible. The solution here was simply to elevate them above our dumbbells and kettlebells as simply as possible.
We use Dynamax for soft medicine balls, e.g. wall balls and partner throwing drills, and a mix of D-Balls and Plyoballs for slamming drills. We purchased very few of the latter—we can guarantee eventual breakage of both balls after slamming, and honestly, as fun as they are, ball slams are not important enough to warrant the kind of cost necessary to keep a large stock of usable slamming balls. They’ll be used for private clients only to cut down on wear and tear. I also opted for the semi-bounce rather than no-bounce D-Balls—the difference in bounce is nearly imperceptible, and the semi-bounce balls seem to have the bit more elasticity necessary to extend their lives somewhat.
Below the ball rack are our dumbbells and kettlebells. We use the standard rubber hexhead dumbbells for CrossFit and other conditioning work in which we expect a lot of ground contact and possible dropping—these range from 5 to 50 lbs. From 55 to 100 lbs, we use solid iron hexhead dumbbells. These are used only by our lifters and other strength athletes for more controlled exercises—that is, ones that don’t involve squirreliness to the point of dropping bells on the floor, either intentionally or not. Using hex dumbbells is key for storage—the shape makes them easily stackable directly on the floor. Dumbbell racks are cool, but they just take up valuable space, and the cost of racks for the number of dumbbells we have would be enough to purchase more important gear like bumpers, bars… or more dumbbells.
Our kettlebells are Ader. I’ll admit that my first choice of dumbbell is still Dragondoor for both feel and look—but I’m not stupid enough to spend twice as much money for them as I could for a nearly identical product such as Ader. These bells have smooth handles, a good finish, and are conveniently marked with both kilos and pounds for the metrically hopeless (ours are stored with the kilo side facing out, of course). Again, these just sit on the floor in order of weight.
At the end of our kettlebell collection are our sandbags—of course all Ultimate Sandbags. We have a range of weights and sizes to cut down on weight changes as much as possible. Other bags would be outside—these don’t leak sand everywhere, so we’re not concerned with using them inside.
Next is our collection of CrossFit barbells, bumpers and racks. We use the good old BFS Olympic bars for two basic reasons—they’re dirt cheap, and they hold up surprisingly well. CrossFitters won’t be doing much other than deadlifting, squatting and pressing with them, so there isn’t a lot of opportunity for bending anyway. With these we use HiTemp bumper plates for similar reasons—they’re dirt cheap, and they work more than well enough for CrossFit classes.
Our class squat racks are IronMind Vulcans—not only do we love these racks (the new model is even better than the old ones)—but due to some shenanigans I won’t detail (in order to demonstrate my great maturity), we got a great deal on them. Finally, we have a bunch of iron lb change and plenty of 10 lb HiTech plates.
Along the back wall, we have a rather stout power rack. This rack we got from our pal and PM contributor Mike Gray, who was crafty enough to have it built by one of the Sorinex fabricators. On each side is a rack full of several hundred pounds of iron plates—probably just shy of what Ronnie Coleman curls.
Next is a full spread of plyo boxes from 12 to 42 inches. This gives us some range for lifters and individual athletes, while our flat benches can double as mid-range boxes and steps. Wedged into the corner is a Sorinex glute-ham bench, which is the size of a small horse.
Rounding out the perimeter are some Concept 2 rowers. We opted for the Model D rather than E. My experience with the latter has not exactly impressed me. I had to replace parts on several occasions on a single rower that was used minimally—and performing surgery on one of those things is like trying to dissect and reassemble an insect inside a bowl of thumbtacks.
In the corner next to the reception area is our pull-up bar structure. Thankfully I save building this for last, because had it been the first project I undertook, it’s quite possible I would have abandoned the business. The structure is simple, and morphed numerous times from my original plans for various reasons, including the fact that our building is littered with conduit and similar items that are invariably precisely where you need them not to be. What we ended up with is three 4x4 posts along one wall with a fourth on the other. Between these posts are 6-foot 1” galvanized pipe (with an outside diameter of about 1.3”), each at a different height to accommodate clients’ reaches.
Running from each post back to the wall is a 4-foot pipe. The three along the main wall are all at the same height—all higher than the 6-foot pipes to improve stability, but also to serve as additional pull-up bars for taller individuals. Taller folks tend to be heavier, so the shorter bar is a little more solid.
Behind the single 6-foot bar side, the 4-foot pipe nearest the corner is at about 10 feet, and the final one at the end is near the top of the 12-foot post. From these two we’ve hung rings for muscle ups and other ring skills improved by higher attachment points. The initial plan called for additional beams above the side-by-side 6-foot pipes to hang rings from inside the cage at 12 feet. This became impossible on one side because of a light fixture in the way, and the other, I opted to skip because I was on the margin of suicide after spending two days on a ladder drilling into the cement walls. As it turns out, there’s a wooden beam in the ceiling above each spot from which I can hang rings with far less work.
The Trimmings
We threw in a few more little things that make a big difference. This includes racks for iron change and HiTech plates built into the walls to store things more economically, bar racks to store bars vertically against the walls, and a foam roller rack. These are simple things that can be built for little money but save a lot of space and hassle.
Come in and See Us
If you’re in the area, come in and check the place out. We love visitors. Also, we lift on Saturdays at 11:00 am, and this is an open day for visitors to come snatch and clean & jerk with us and our lifters. Just make sure to call or email first to make sure we’re not traveling on a particular Saturday.
| Greg Everett is the owner of Catalyst Athletics, publisher of The Performance Menu Journal and author of Olympic Weightlifting: A Complete Guide for Athletes & Coaches, Olympic Weightlifting for Sports, and The Portable Greg Everett, and is the writer, director, producer, editor, etc of the independent documentary American Weightlifting. Follow him on Facebook here. |
Search Articles
Article Categories
Sort by Author
Sort by Issue & Date
Article Categories
Sort by Author
Sort by Issue & Date