

Handstand Walking
When we discuss handstand walking in this article, we are not talking about the aimless staggering that I often see. We are talking about controlled walking. And just as a child must learn to stand before they can walk, so must we learn to hold a handstand in a relatively controlled manner before we learn to properly walk on our hands.
Let me take you through all the various drills and cues that I use for teaching a handstand, and you’ll see handstand walking as a natural progression--one that will come about much easier if we take time to build the proper foundation.
Position
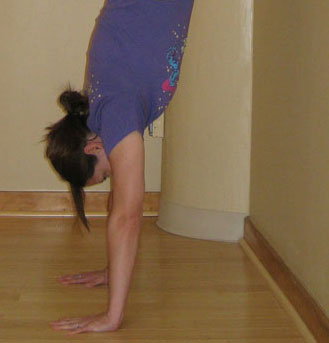
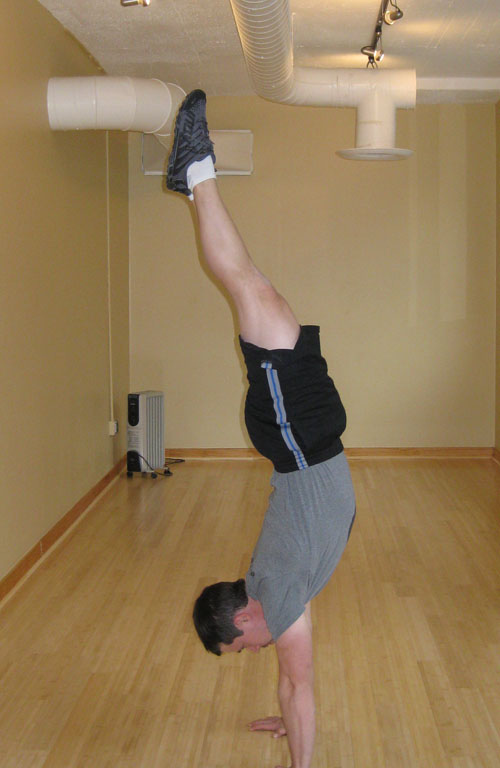
The first thing I’d like to discuss is a simple positional drill to work on in order to build up endurance in the shoulders and align the body efficiently. You will start by walking up a wall with your chest facing it.
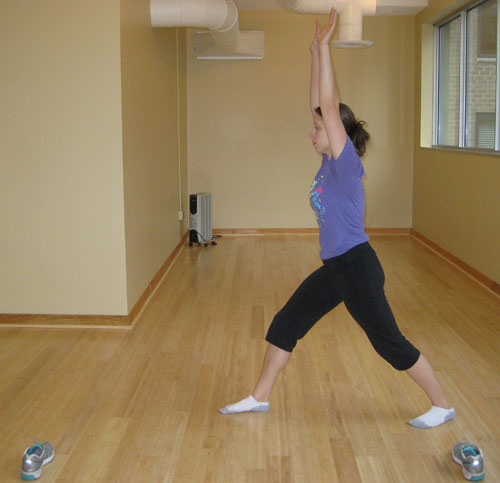
When viewed from the side, your body should be in a relatively straight line, with shoulders open and midsection flexed and stabilized into a line. Keep the legs and hips tight as well. If your overhead mobility is lacking--which in turn closes off your shoulders--then work with soft tissue techniques and stretching to open them back up. Time spent on overhead mobility will increase your efficiency and pay off greatly when walking.
Even if you have absolutely no balance in the handstand, you should be able to complete this drill successfully. When you first start off, you can place your hands farther from the wall so that your body is at enough of an angle where falling off the wall is nearly impossible.
As you feel more comfortable, you can start to move your hands in even closer to the wall. The eventual goal is to be able to put the heel of your hands about three to four inches from the wall. You may use a teammate or coach to spot you when you first try this. They can simply put their hands right near your calves, and push you back to the wall if you start to fall.
Now, if you are able to successfully get three to four inches from the wall, and you are in a good line, then the only thing touching the wall should be your toes. If you are touching with your legs, hips, and/or chest against the wall, then check to make sure that you have not collapsed in the shoulders and/or body. Video from the side becomes invaluable in this case.
Spotting during this drill is also encouraged if an athlete is uncomfortable falling out safely. I also recommend that athletes give themselves “enough gas in the tank” to come down safely and not collapse onto their heads. Stupid advice, I know, but it bears repeating to your athletes.
Balance
Alongside feeling comfortable with the position of the handstand, we can also work balance. The point of balance in a handstand, and where you will feel the weight during a walk, is in the fingers and knuckles. Just as walking on your heels is awkward and inefficient, walking or balance on the heel of your hands causes similar problems.
The drill I prefer for teaching balance is called the frogstand, also known as the crow pose in yoga. You will put your hands down on the ground, shoulder-width apart like the previous drills. You will then squat down and tuck yourself into a ball, placing your legs on the outside of your arms, feet still on the ground. Then you will shift forward--flexing mainly from the wrists, less from the elbows--until you are able to pick your feet off the ground.
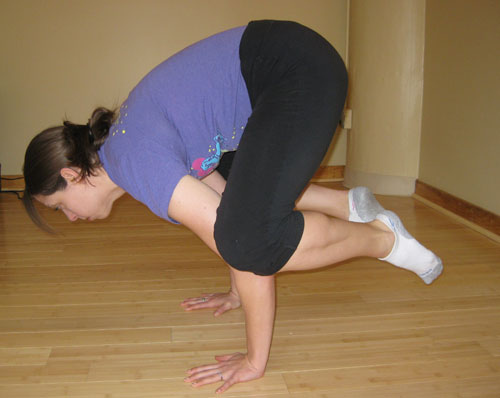
The balance you are fighting for in this crow pose is identical to the balance you will need in a handstand. Knowing where this balance is and how to control it in your handstand will allow you to eventually learn to overbalance and begin walking. (Quick definition: Overbalancing is when you are falling towards your backside…as opposed to underbalancing, which is when you are falling back to your feet.)
There is always the possibility of inadvertently overbalancing in this position and falling, so one may place a mat in front of themselves and drop onto one shoulder, or a spotter can kneel down beside the athlete and place their hand on front of the athlete’s shoulder--catching and pushing them back if they should overbalance.
It should be noted that the fingers are facing forward, fingers spread out comfortably. While I see people handstand walking with their fingers directly to the side, this makes as much sense to me as walking on my feet with my toes turned out to the side. Penguins are not known for their strong and graceful walk, so we’ll avoid emulating them here.
Advanced Balance Drills
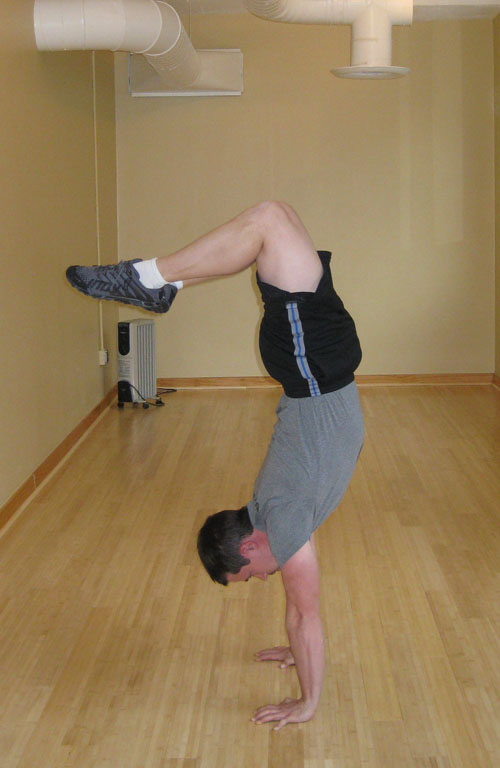
The next balance drill will combine the chest to wall drill we learned in the first exercise with the crow pose we learned in the last exercise.
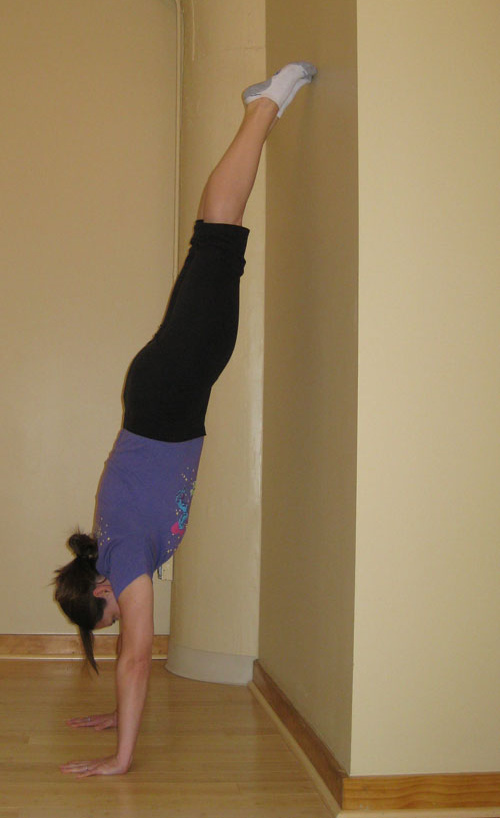
We will start by walking back up the wall, chest facing it. Even if you can move your hands in very close, I want you to keep your hands a foot and a half to two feet from the wall. Once there, get your body in a straight line--toes pointed, midsection tight, shoulders open.
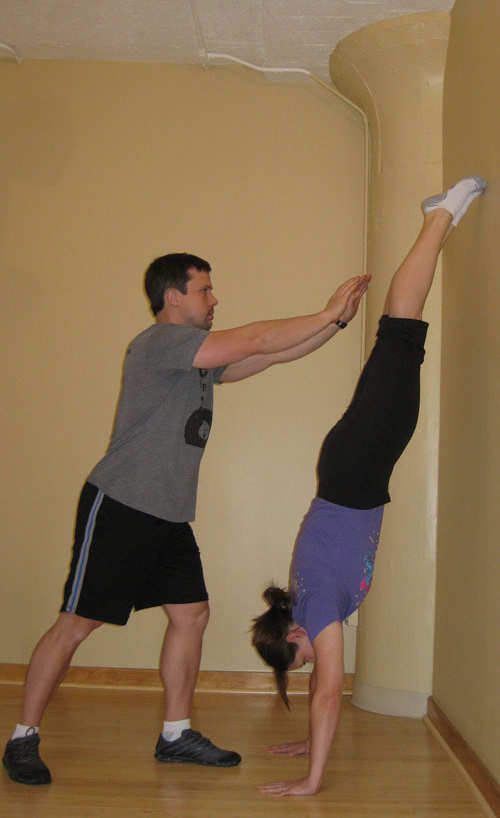
From this solid position, pick either leg and start to split it off the wall. Keep everything tight and controlled, and move slowly. If you are uncomfortable falling out of a handstand, then it is highly recommended that you have a spotter. The spotter can perform a similar duty as before--putting their hands up at your calves to push you back toward the wall if you should overbalance. I recommend that the spotter keep up both hands very close to the athlete and err on the side of too much spotting at first. The spotter will eventually learn how to help the athlete just enough.
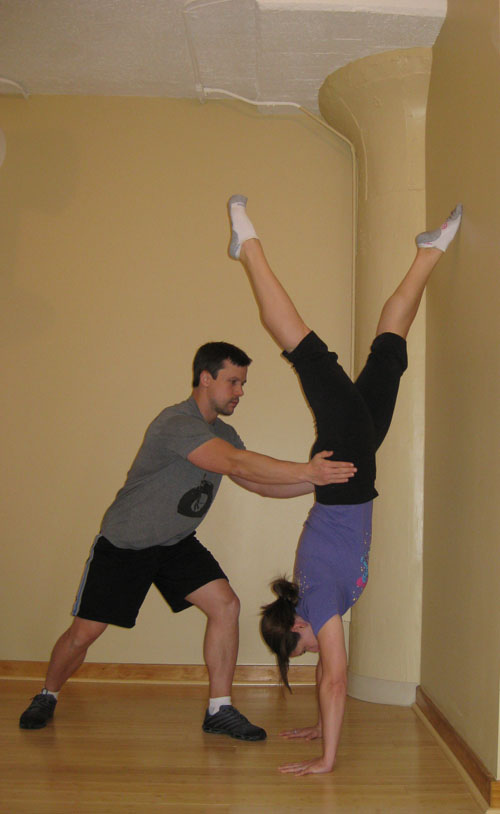
If you keep your body tight, and keep your shoulders open, then the leg splitting off the wall should gently lift the other leg off the wall, and rock your weight onto your hands--just like we rocked weight onto our hands in the crow pose. You will now find yourself off the wall in a handstand with your legs split slightly. Keep the legs in this split position for now. Breath! Keep tight! Maintain balance!
If you are unable to shift off the wall, recheck your initial position. Oftentimes when viewed from the side, I will see an athlete who has collapsed their shoulders and body. This will sink too much weight to the wall and make a light balance nearly impossible. The shift off the wall should feel effortless.
Learning to Fall
Learning to fall correctly is for the athlete’s own safety, and so that they can practice all of these drills without a spotter. The drill we will use here will build directly off the previous drill.
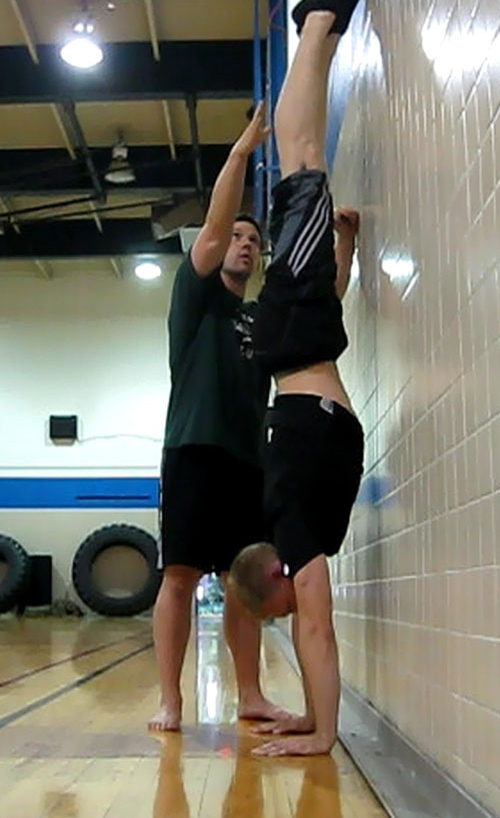
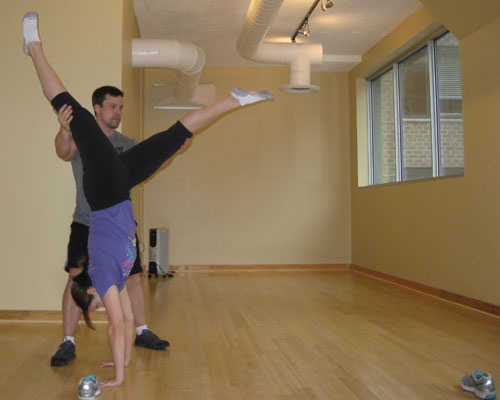
Get up in the chest to wall position, with hands a foot and a half to two feet from the wall once again. Split the legs as before, with the spotter grabbing on either side of your hips. If the athlete overbalances (i.e., falls away from the wall), then the spotter will twist the athlete’s hips so that the athlete’s feet and legs will drop in a position 90 degrees from the start. This is called a pirouette, and I find it to be the most universally useful way to fall down out of a handstand.
Whichever leg is first to come off the wall is the side that the athlete will turn toward, as their hips are already biased that way. The spotters should spot at the hips, but squat down and back slightly themselves, as many athletes will have a tendency to loosen their legs and flail when they first learn to fall. Getting kicked in the head is never fun.
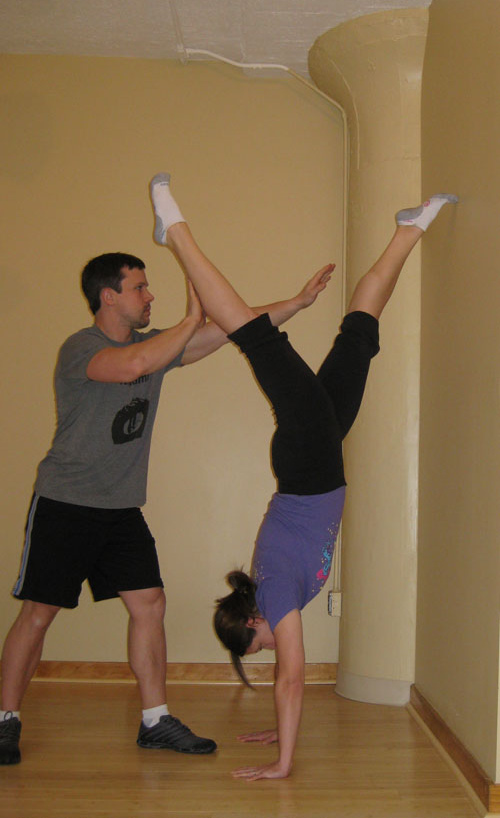
In the picture above, the athlete’s left leg is coming off the wall first, so the spotter will turn the athlete’s legs and hips to that side (the athlete’s left, the spotter’s right). When the athlete’s feet come down, she will be 90 degrees from her original position, and facing away from the camera.
Learning to kick
Just as important as learning to fall, learning to kick in a consistent, efficient manner will allow you to start off strong with any handstand walk.
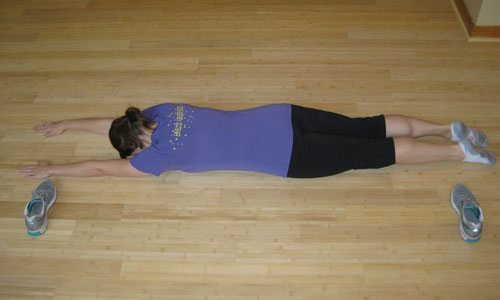
The first thing I do for any athlete is measure out a distance individual to each person. I do this by having them lie prone with their arms stretched over the head. I then take their shoes and place them in line with their wrists and ankles.
This gives us an individualized and consistent distance from which to practice our kicking technique. Just as grabbing a bar in a different place for every snatch or clean will slow down consistency and progress, putting your hands or feet down just anywhere when learning to kick will slow the learning process.
Once the measurements are laid down, the athlete will stand on one line, stretch their arms over their head in a good position, and take a big step forward.
The athlete’s goal is to then lever their arms and torso down and their back leg up, all while keeping the shoulders strong and open, and keeping the midsection solid as well. If they step far and keep their shoulders open, then their hands should reach the other line that you have marked out. If they close up their body and fail to keep a good position, then they will oftentimes fall far short of the other line. Closing the shoulder angle during this drill is common.
When successfully done, the kick will be smooth and effortless. I suggest a spotter stand right behind your second line, placing their arm up and catching your legs if you kick too hard. I also suggest not making an enemy of your spotter, and start by kicking up very lightly at first. Perhaps you only get halfway up, but you should be able to keep a good position in the shoulders, with the back leg strong, straight, and tight.
As the athlete becomes more confident in their kick, they can kick harder until they are completely upside-down. Again, use of a spotter at this point is encouraged in order to build confidence. Also note that the spotter is standing on the opposite side to which the athlete would pirouette out.
Just as when we split our legs off the wall before, the athlete should kick up and maintain that split position. This will lower the athlete’s center of gravity and prove much more forgiving to balance. Once the athlete has successfully kicked upside-down, the spotter can simply keep the athlete in balance by lightly tapping their legs one way or another.
Once the athlete is able to consistently kick up under control, as well as consistently fall safely off the wall, then a spotter is no longer needed and the athlete may practice on their own in the open.
In addition, the split leg position we have worked with may be transitioned into a regular, legs together handstand. The athlete can simply find the balance in the split position, and then bring their legs together while maintaining balance. Kicks can bring the legs up and together, as opposed to keeping them split open.
Handstand walking drills and specifics
At this point, the athlete should feel comfortable kicking and falling out of a handstand, as well as balancing in a handstand for a reasonable period of time. Consistent 10 to 20-second handstand holds in the open as a minimum should be encouraged before time spent on specific handstand walking drills is truly productive.
Learning to shift weight from hand to hand is important to handstand walking, and I believe that many are familiar with shoulder taps up against a wall.
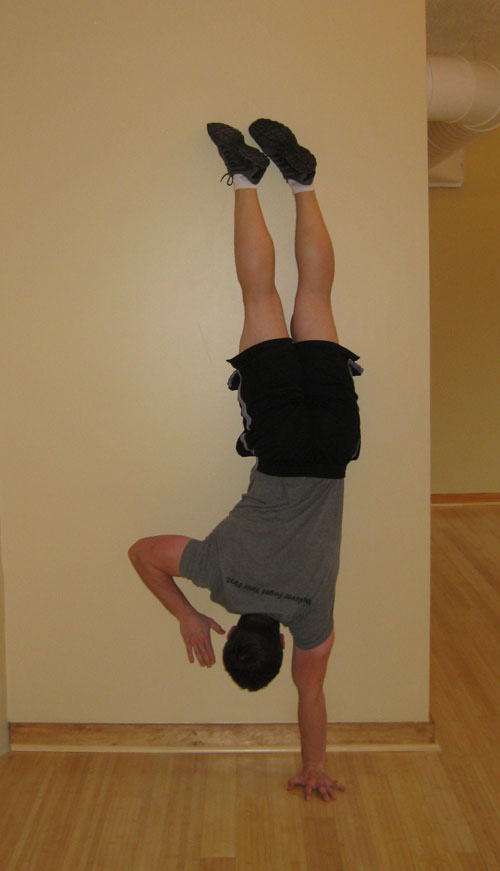
The athlete positions themselves chest to wall, and then shifts weight side to side, alternately lifting their hand up high enough to touch the same-side shoulder.
If one is able to shift and hold their weight on their one arm for the time it takes to touch their shoulder, then it bodes well that they should be able to shift and hold their weight sufficiently enough in a handstand walk.
But I want to point out how far we’ve gone before I’ve even mentioned these shoulder taps. Many an athlete will start out with this drill. It feels productive and mimics handstand walking, but their time would be much better spent with first learning a better handstand! Working shoulder taps with no actual ability to balance away from the walls will find an athlete soon stalled.
Assuming good handstand balance, and the ability to shoulder tap, the handstand walking should come fairly natural past that. One must simply overbalance the body, shift weight and step a hand forward. Just as with walking on our own two feet, everything becomes a series of controlled falls.
As mentioned before, the fingers will be facing forward. I find this to be the most advantageous way to control your handstand walk. Not only can you grab into the ground and slow yourself down if need be, but you can also press off into the ground hard with your fingers when looking to accelerate.
As for the elbows, I will look to keep mine as locked as possible when supporting weight. Just as you wouldn’t take a step with one foot and lunge forward, you want to avoid excessive bend in the elbows when shifting and supporting. If this becomes a problem, then work on more shoulder taps!
Now a static handstand will find an athlete’s head tucked in slightly and body in a relatively straight line. This is an efficient position. When one starts walking though, this optimal alignment may disappear.
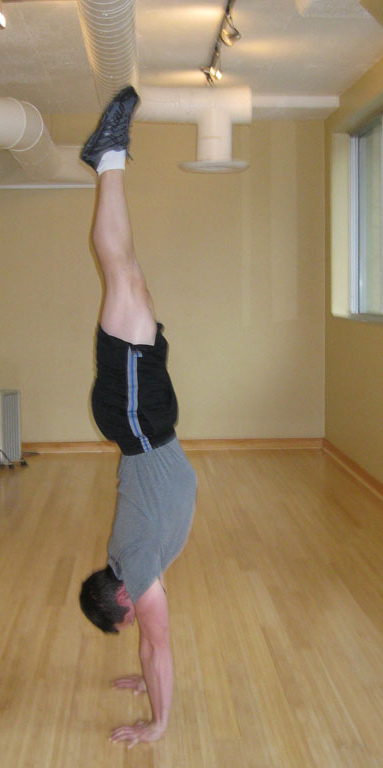
First off, an athlete’s head will most likely be sticking out a bit more than usual. This is to help them look at the ground and see where they are going. Because the spine follows the head, the cervical extension will tend to close off the shoulder angle. This closed-off shoulder angle will then need a hyperextended back to curve the body around to balance itself. You will therefore often see a “banana’d” handstand.
This is not always a terrible thing, if the athlete can keep their legs tight, and stretch them into an overbalanced position. This stretch with the legs will lean their body into a fast walk, much like a sprinter will lean into a run to start.
Others will prefer a position with their legs flopped over. This position will again keep the head out, and the legs bent down will lower their center of gravity and help with balance.
Only through practice will one find which variation works best for them. In either case, one must keep the legs and body as tight as possible. Legs that are moving about uncontrollably will sap energy and distance in a handstand walk, just as waving your arms around wildly will make for one inefficient (and funny) run.
In any of these variations, improved shoulder mobility will help tremendously. Having a more open shoulder will align the arms and torso into a better line. When the shoulders get tired, they will not be as quick to close off and pull the body backwards (as may have happened on your chest to wall drills).
So get to working on that handstand balance--stand before you walk! And do everything you can to open up those shoulders!
Let me take you through all the various drills and cues that I use for teaching a handstand, and you’ll see handstand walking as a natural progression--one that will come about much easier if we take time to build the proper foundation.
Position
The first thing I’d like to discuss is a simple positional drill to work on in order to build up endurance in the shoulders and align the body efficiently. You will start by walking up a wall with your chest facing it.
When viewed from the side, your body should be in a relatively straight line, with shoulders open and midsection flexed and stabilized into a line. Keep the legs and hips tight as well. If your overhead mobility is lacking--which in turn closes off your shoulders--then work with soft tissue techniques and stretching to open them back up. Time spent on overhead mobility will increase your efficiency and pay off greatly when walking.
Even if you have absolutely no balance in the handstand, you should be able to complete this drill successfully. When you first start off, you can place your hands farther from the wall so that your body is at enough of an angle where falling off the wall is nearly impossible.
As you feel more comfortable, you can start to move your hands in even closer to the wall. The eventual goal is to be able to put the heel of your hands about three to four inches from the wall. You may use a teammate or coach to spot you when you first try this. They can simply put their hands right near your calves, and push you back to the wall if you start to fall.
Now, if you are able to successfully get three to four inches from the wall, and you are in a good line, then the only thing touching the wall should be your toes. If you are touching with your legs, hips, and/or chest against the wall, then check to make sure that you have not collapsed in the shoulders and/or body. Video from the side becomes invaluable in this case.
Spotting during this drill is also encouraged if an athlete is uncomfortable falling out safely. I also recommend that athletes give themselves “enough gas in the tank” to come down safely and not collapse onto their heads. Stupid advice, I know, but it bears repeating to your athletes.
Balance
Alongside feeling comfortable with the position of the handstand, we can also work balance. The point of balance in a handstand, and where you will feel the weight during a walk, is in the fingers and knuckles. Just as walking on your heels is awkward and inefficient, walking or balance on the heel of your hands causes similar problems.
The drill I prefer for teaching balance is called the frogstand, also known as the crow pose in yoga. You will put your hands down on the ground, shoulder-width apart like the previous drills. You will then squat down and tuck yourself into a ball, placing your legs on the outside of your arms, feet still on the ground. Then you will shift forward--flexing mainly from the wrists, less from the elbows--until you are able to pick your feet off the ground.
The balance you are fighting for in this crow pose is identical to the balance you will need in a handstand. Knowing where this balance is and how to control it in your handstand will allow you to eventually learn to overbalance and begin walking. (Quick definition: Overbalancing is when you are falling towards your backside…as opposed to underbalancing, which is when you are falling back to your feet.)
There is always the possibility of inadvertently overbalancing in this position and falling, so one may place a mat in front of themselves and drop onto one shoulder, or a spotter can kneel down beside the athlete and place their hand on front of the athlete’s shoulder--catching and pushing them back if they should overbalance.
It should be noted that the fingers are facing forward, fingers spread out comfortably. While I see people handstand walking with their fingers directly to the side, this makes as much sense to me as walking on my feet with my toes turned out to the side. Penguins are not known for their strong and graceful walk, so we’ll avoid emulating them here.
Advanced Balance Drills
The next balance drill will combine the chest to wall drill we learned in the first exercise with the crow pose we learned in the last exercise.
We will start by walking back up the wall, chest facing it. Even if you can move your hands in very close, I want you to keep your hands a foot and a half to two feet from the wall. Once there, get your body in a straight line--toes pointed, midsection tight, shoulders open.
From this solid position, pick either leg and start to split it off the wall. Keep everything tight and controlled, and move slowly. If you are uncomfortable falling out of a handstand, then it is highly recommended that you have a spotter. The spotter can perform a similar duty as before--putting their hands up at your calves to push you back toward the wall if you should overbalance. I recommend that the spotter keep up both hands very close to the athlete and err on the side of too much spotting at first. The spotter will eventually learn how to help the athlete just enough.
If you keep your body tight, and keep your shoulders open, then the leg splitting off the wall should gently lift the other leg off the wall, and rock your weight onto your hands--just like we rocked weight onto our hands in the crow pose. You will now find yourself off the wall in a handstand with your legs split slightly. Keep the legs in this split position for now. Breath! Keep tight! Maintain balance!
If you are unable to shift off the wall, recheck your initial position. Oftentimes when viewed from the side, I will see an athlete who has collapsed their shoulders and body. This will sink too much weight to the wall and make a light balance nearly impossible. The shift off the wall should feel effortless.
Learning to Fall
Learning to fall correctly is for the athlete’s own safety, and so that they can practice all of these drills without a spotter. The drill we will use here will build directly off the previous drill.
Get up in the chest to wall position, with hands a foot and a half to two feet from the wall once again. Split the legs as before, with the spotter grabbing on either side of your hips. If the athlete overbalances (i.e., falls away from the wall), then the spotter will twist the athlete’s hips so that the athlete’s feet and legs will drop in a position 90 degrees from the start. This is called a pirouette, and I find it to be the most universally useful way to fall down out of a handstand.
Whichever leg is first to come off the wall is the side that the athlete will turn toward, as their hips are already biased that way. The spotters should spot at the hips, but squat down and back slightly themselves, as many athletes will have a tendency to loosen their legs and flail when they first learn to fall. Getting kicked in the head is never fun.
In the picture above, the athlete’s left leg is coming off the wall first, so the spotter will turn the athlete’s legs and hips to that side (the athlete’s left, the spotter’s right). When the athlete’s feet come down, she will be 90 degrees from her original position, and facing away from the camera.
Learning to kick
Just as important as learning to fall, learning to kick in a consistent, efficient manner will allow you to start off strong with any handstand walk.
The first thing I do for any athlete is measure out a distance individual to each person. I do this by having them lie prone with their arms stretched over the head. I then take their shoes and place them in line with their wrists and ankles.
This gives us an individualized and consistent distance from which to practice our kicking technique. Just as grabbing a bar in a different place for every snatch or clean will slow down consistency and progress, putting your hands or feet down just anywhere when learning to kick will slow the learning process.
Once the measurements are laid down, the athlete will stand on one line, stretch their arms over their head in a good position, and take a big step forward.
The athlete’s goal is to then lever their arms and torso down and their back leg up, all while keeping the shoulders strong and open, and keeping the midsection solid as well. If they step far and keep their shoulders open, then their hands should reach the other line that you have marked out. If they close up their body and fail to keep a good position, then they will oftentimes fall far short of the other line. Closing the shoulder angle during this drill is common.
When successfully done, the kick will be smooth and effortless. I suggest a spotter stand right behind your second line, placing their arm up and catching your legs if you kick too hard. I also suggest not making an enemy of your spotter, and start by kicking up very lightly at first. Perhaps you only get halfway up, but you should be able to keep a good position in the shoulders, with the back leg strong, straight, and tight.
As the athlete becomes more confident in their kick, they can kick harder until they are completely upside-down. Again, use of a spotter at this point is encouraged in order to build confidence. Also note that the spotter is standing on the opposite side to which the athlete would pirouette out.
Just as when we split our legs off the wall before, the athlete should kick up and maintain that split position. This will lower the athlete’s center of gravity and prove much more forgiving to balance. Once the athlete has successfully kicked upside-down, the spotter can simply keep the athlete in balance by lightly tapping their legs one way or another.
Once the athlete is able to consistently kick up under control, as well as consistently fall safely off the wall, then a spotter is no longer needed and the athlete may practice on their own in the open.
In addition, the split leg position we have worked with may be transitioned into a regular, legs together handstand. The athlete can simply find the balance in the split position, and then bring their legs together while maintaining balance. Kicks can bring the legs up and together, as opposed to keeping them split open.
Handstand walking drills and specifics
At this point, the athlete should feel comfortable kicking and falling out of a handstand, as well as balancing in a handstand for a reasonable period of time. Consistent 10 to 20-second handstand holds in the open as a minimum should be encouraged before time spent on specific handstand walking drills is truly productive.
Learning to shift weight from hand to hand is important to handstand walking, and I believe that many are familiar with shoulder taps up against a wall.
The athlete positions themselves chest to wall, and then shifts weight side to side, alternately lifting their hand up high enough to touch the same-side shoulder.
If one is able to shift and hold their weight on their one arm for the time it takes to touch their shoulder, then it bodes well that they should be able to shift and hold their weight sufficiently enough in a handstand walk.
But I want to point out how far we’ve gone before I’ve even mentioned these shoulder taps. Many an athlete will start out with this drill. It feels productive and mimics handstand walking, but their time would be much better spent with first learning a better handstand! Working shoulder taps with no actual ability to balance away from the walls will find an athlete soon stalled.
Assuming good handstand balance, and the ability to shoulder tap, the handstand walking should come fairly natural past that. One must simply overbalance the body, shift weight and step a hand forward. Just as with walking on our own two feet, everything becomes a series of controlled falls.
As mentioned before, the fingers will be facing forward. I find this to be the most advantageous way to control your handstand walk. Not only can you grab into the ground and slow yourself down if need be, but you can also press off into the ground hard with your fingers when looking to accelerate.
As for the elbows, I will look to keep mine as locked as possible when supporting weight. Just as you wouldn’t take a step with one foot and lunge forward, you want to avoid excessive bend in the elbows when shifting and supporting. If this becomes a problem, then work on more shoulder taps!
Now a static handstand will find an athlete’s head tucked in slightly and body in a relatively straight line. This is an efficient position. When one starts walking though, this optimal alignment may disappear.
First off, an athlete’s head will most likely be sticking out a bit more than usual. This is to help them look at the ground and see where they are going. Because the spine follows the head, the cervical extension will tend to close off the shoulder angle. This closed-off shoulder angle will then need a hyperextended back to curve the body around to balance itself. You will therefore often see a “banana’d” handstand.
This is not always a terrible thing, if the athlete can keep their legs tight, and stretch them into an overbalanced position. This stretch with the legs will lean their body into a fast walk, much like a sprinter will lean into a run to start.
Others will prefer a position with their legs flopped over. This position will again keep the head out, and the legs bent down will lower their center of gravity and help with balance.
Only through practice will one find which variation works best for them. In either case, one must keep the legs and body as tight as possible. Legs that are moving about uncontrollably will sap energy and distance in a handstand walk, just as waving your arms around wildly will make for one inefficient (and funny) run.
In any of these variations, improved shoulder mobility will help tremendously. Having a more open shoulder will align the arms and torso into a better line. When the shoulders get tired, they will not be as quick to close off and pull the body backwards (as may have happened on your chest to wall drills).
So get to working on that handstand balance--stand before you walk! And do everything you can to open up those shoulders!
| Jim Bathurst runs BeastSkills.com, a website that provides progressive tutorials for difficult bodyweight exercises. His gymnastics seminars have been requested internationally. Despite his reputation for bodyweight expertise, he enjoys barbell lifting tremendously and competes in Powerlifting and Olympic lifting. His best lifts are respectable, depending on what gym he is in. |
Search Articles
Article Categories
Sort by Author
Sort by Issue & Date
Article Categories
Sort by Author
Sort by Issue & Date