

Mobility: Where to Start and How to Progress
Working on your mobility is just like working on anything else: if you’d like to get better at it, training specificity matters, training frequency and exposure matter, and good information combined with a dash of common sense will serve your programming better than following someone’s tip of the day or trying out sweet moves you saw on Instagram.
That statement seems fairly obvious, but this next one may not. The order in which you stretch your tissues is also important. In other words, it’s not all about consistency and frequency, but also understanding how to select the appropriate exercises and how to properly order them in your training program.
We should be working from the deepest tissues to the more superficial tissues.
The joint capsules are the first priority, the first place you should seek to restore and strengthen full movement, before moving on to single joint and then multi-joint exercises.
Before I offer the red and blue pills, let me clarify the difference between flexibility and mobility.
Flexibility is simply how bendy you are. What size box could I stuff you into? If I push on your limbs, how far do they go? This defines their range of motion. Being really flexible without the strength to control that flexibility is a little bit dangerous. It’s also not very useful to be generally flexible, unless you’re just a human showroom floor model.
Mobility is usable flexibility, or controlled flexibility—bendiness you can do stuff with. If you have good mobility, you don’t need gravity, momentum, walls, floors, bands, boxes, or S&M practitioners to help you assume the position. Mobility is a standing split; flexibility is a split on the floor. Flexible hip flexion is knees-to-ribs with a flat back in the bottom of a squat, weighted squat, or lunge stretch; mobile hip flexion is pulling your knee to your ribs with a flat back and neutral pelvis while standing on the other foot. So we’re talking Bambi vs. Baryshnikov here.
Assess the mobility requirements for the movements you train
The first step in determining the right mobility exercises to train requires an evaluation of the movements needed for your sport or endeavor. This not only includes what you do in training or on the field or court but also injury prevention.
Set your goals based on what range of motion and degree of control is needed to be good at what you do and reduce your risk of injury. Only dancers need to be as mobile as dancers. An athlete that jumps and lands and makes quick direction changes need way better ankles than a swimmer or somebody locked in a ski boot.
From a joint health and longevity perspective, having the mobility to perform a movement or exercise should precede any attempt at training the exercise, so make sure you have good-enough ankle dorsiflexion and hip flexion before training overhead squats or pistols.
Evaluate your mobility: do you have the prerequisites for the movements you train?
The first thing to test for movement is the joint capsule. If you are missing flexibility in your shoulder capsule (internal and external rotation), it’s vitally important to your shoulder that you restore movement to the joint capsule before worrying about flexion and extension of the shoulder, and/or dealing with the more superficial tissues around or across multiple joints.
Capsules have mechanoreceptors that sense movement first. Sensing first at the extremes of movement helps the body to initiate a reflex, if necessary, to ward off possible injury. When capsules are tight, this signal is conveyed despite the quality of the superficial tissues.
Many therapists will recommend that you NOT stretch the capsule and avoid positions like the Sleeper Stretch with the warning that it will weaken the capsule. This policy reminds me of the South Park episode, “Gnomes Know Business.” Every night, the gnomes go out and diligently collect underpants. The boys follow them back to their underground lair and ask them what’s up with the underpants, to which one replies, “Step 1: collect underpants, Step 3: PROFIT!” Naturally, the boys ask, “What’s step 2?” to which the gnome professes ignorance. So he asks the other gnomes, “Hey what’s step 2?” and they all just chime back in, “Step 1: collect underpants, Step 3: PROFIT!”
If in Step 1, you test and notice that you lack capacity for normal, healthy movement in the capsule, and you decide that it would be good for you to have Step 3 (a shoulder that does its job), why would you then avoid dealing with it like you would a homeless guy off his meds in a dark alley? If you don’t have a means to address the tight capsule itself, then you don’t have a Step 2 and you’ll never really arrive at Step 3: profiting from a good shoulder! There is no natural range of motion that should be entirely avoided unless it is painful and sensitive to begin with, in which case, you should seek the help of a physical therapist.
If your game involves repetitive demands on internal and/or external rotation and you have a viciously tight shoulder capsule, then you have big trouble in little China. How happy do you think that shoulder will be after a pitching career or training jerks and snatches for years on end?
After the capsule is assessed, we move on to assessing range of motion in single joints and then multi-joints. This would get pretty lengthy and complicated if I went through the whole body explaining each stretch and position, so I’m going to give you the concept and let you play with it.
Capsule stretches target the deepest tissues by trying to maximize the range a single joint is capable of while keeping in mind it’s intended motion: does it hinge, rotate, pivot, or glide?
To passively stretch the capsule and deepest tissues, lessen tension in the surrounding joints as much as possible by allowing them to stay relaxed and bent. So, if I want to stretch the capsule of my finger’s first knuckle, the wrist stays relaxed, and the other finger joints stay relaxed, too. In other words, the greater the tension stretching tissues across multiple joints, the more superficial the stretch.
Save the superficial stretches until you have the range you need in capsules and deeper tissues. If you’re always doing multi-joint stretches, you’re never targeting the end range of deeper tissues.
When you stretch a capsule, you will still be hitting some of the superficial tissues, which is totally fine and unavoidable. There is no way ever to only target or avoid single muscles, tissues, or capsules in training. It’s just not possible. It’s all connected, man.
Test the difference between active and passive range, set goals, and come up with a plan
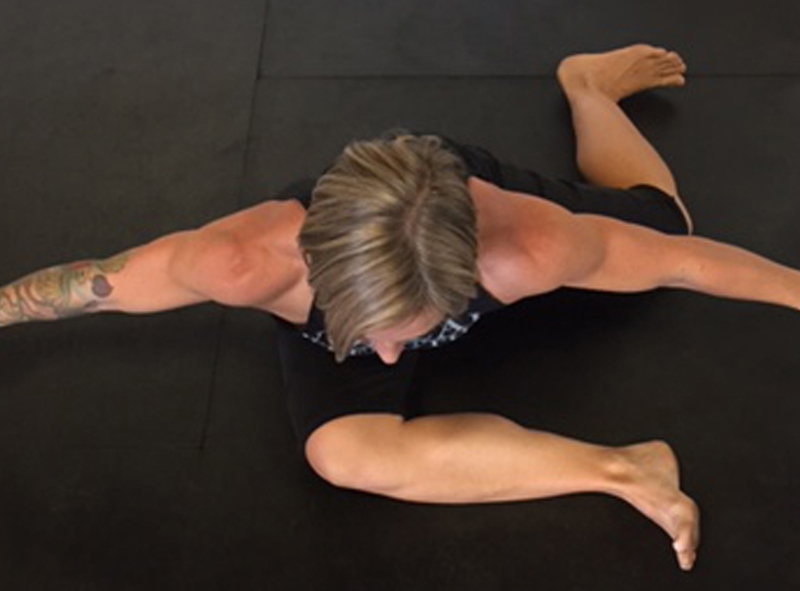
The next diagnostic step is to determine the difference between active and passive range for any and all of the positions you stretch. Try out the shoulder internal and external rotation stretches depicted above and see how close you can come to these positions without assistance from your top hand or the yoga block. The key to this testing is to produce the position without using gravity, props, momentum, or other external forces. If there is a big discrepancy in passive flexibility and active strength, fixing this is also a priority.
Once you have assessed your deficits in flexibility and mobility, you can then set goals for improvements in the joints that fall short prioritizing the ones you use and need the most. Now you need to figure out what to do and in what order to bridge the gap without wasting any time, remembering that the goal is to create mobility, not just flexibility.
If your capsules are tight, plan to stretch and strengthen them. If they are not tight but the passive and active range are very different, then prioritize strengthening the end range. If the capsules are good to go in both, but the superficial tissues need work, then focus on multi-joint exercises.
How to strengthen end range
You could invest a big chunk of time doing your passive stretches and then join a class of something that works end range strength, like ballet or gymnastics, but that’s ultra time-consuming. Luckily, there’s a faster way.
The very smart fellow responsible for developing the Functional Range Conditioning methods (FRC) and much of what I’ve talked about here, Dr. Andreo Spina, has created the perfect system for strengthening end range. He layers an exercise he calls PAILs/RAILs on top of your everyday passive stretches. This stands for Progressive and Regressive Angular Isometric Loading.
Translated into action, the system is essentially ramping up tension in the tissues being stretched into a full body contraction over five to 10 seconds, progressively working up to what feels like a max effort AGAINST the position you are stretching. As with any training program (dash of common sense) don’t f-ing max out on day one.
If you are pushing down on your bottom wrist in a passive sleeper stretch for PAILs, you gradually ramp up pressure throughout the body and into the stretching arm to apply force against being stretched, so INTO the top hand. Don’t change the position of the stretch. Hold the tension at a high level or max for 10 seconds, and then slowly relax without losing the stretch position.
Next up, you RAIL driving force the opposite way. Everything happens the same, ramping tension up throughout the body and into the stretching arm, except you try to pull your bottom arm away from the support hand and towards the ground. After holding this for 10 seconds, slowly relax.
The PAILs/RAILs contractions are sandwiched by one to two minutes of passive stretching. Stretch for one to two minutes, go through the PAILs/RAILs sequence, and then as much as you want to roll around and complain, don’t: just stay in the damn stretch. In fact, don’t just return to the passive stretch but DEEPEN it and hold for another one to two minutes. If short on time, I like to favor the second passive stretch as the longer stretch.
You may be wondering why the whole body is contracting along with the specific joint. By doing this, you make the specific part work harder. Any max effort contraction is enhanced if the whole body is supporting it. Imagine trying to do a 1RM squat with a relaxed face, neck, and arms. You’ll do a lot better if you fire up all you got, dragon face and all.
Step 6: Maintain your new range
Once you get the range you want, you can maintain it by using it. Just two reps every day will do the trick. The FRC maintenance method is called “CARs,” which stands for Controlled Articular Rotations. You can find video demos of the series online with a quick Google search. For more information on FRC from Dr. Andreo Spina, check out his YouTube channel.
Recap
That statement seems fairly obvious, but this next one may not. The order in which you stretch your tissues is also important. In other words, it’s not all about consistency and frequency, but also understanding how to select the appropriate exercises and how to properly order them in your training program.
We should be working from the deepest tissues to the more superficial tissues.
The joint capsules are the first priority, the first place you should seek to restore and strengthen full movement, before moving on to single joint and then multi-joint exercises.
Before I offer the red and blue pills, let me clarify the difference between flexibility and mobility.
Flexibility is simply how bendy you are. What size box could I stuff you into? If I push on your limbs, how far do they go? This defines their range of motion. Being really flexible without the strength to control that flexibility is a little bit dangerous. It’s also not very useful to be generally flexible, unless you’re just a human showroom floor model.
Mobility is usable flexibility, or controlled flexibility—bendiness you can do stuff with. If you have good mobility, you don’t need gravity, momentum, walls, floors, bands, boxes, or S&M practitioners to help you assume the position. Mobility is a standing split; flexibility is a split on the floor. Flexible hip flexion is knees-to-ribs with a flat back in the bottom of a squat, weighted squat, or lunge stretch; mobile hip flexion is pulling your knee to your ribs with a flat back and neutral pelvis while standing on the other foot. So we’re talking Bambi vs. Baryshnikov here.
Assess the mobility requirements for the movements you train
The first step in determining the right mobility exercises to train requires an evaluation of the movements needed for your sport or endeavor. This not only includes what you do in training or on the field or court but also injury prevention.
Set your goals based on what range of motion and degree of control is needed to be good at what you do and reduce your risk of injury. Only dancers need to be as mobile as dancers. An athlete that jumps and lands and makes quick direction changes need way better ankles than a swimmer or somebody locked in a ski boot.
From a joint health and longevity perspective, having the mobility to perform a movement or exercise should precede any attempt at training the exercise, so make sure you have good-enough ankle dorsiflexion and hip flexion before training overhead squats or pistols.
Evaluate your mobility: do you have the prerequisites for the movements you train?
The first thing to test for movement is the joint capsule. If you are missing flexibility in your shoulder capsule (internal and external rotation), it’s vitally important to your shoulder that you restore movement to the joint capsule before worrying about flexion and extension of the shoulder, and/or dealing with the more superficial tissues around or across multiple joints.
Capsules have mechanoreceptors that sense movement first. Sensing first at the extremes of movement helps the body to initiate a reflex, if necessary, to ward off possible injury. When capsules are tight, this signal is conveyed despite the quality of the superficial tissues.
Many therapists will recommend that you NOT stretch the capsule and avoid positions like the Sleeper Stretch with the warning that it will weaken the capsule. This policy reminds me of the South Park episode, “Gnomes Know Business.” Every night, the gnomes go out and diligently collect underpants. The boys follow them back to their underground lair and ask them what’s up with the underpants, to which one replies, “Step 1: collect underpants, Step 3: PROFIT!” Naturally, the boys ask, “What’s step 2?” to which the gnome professes ignorance. So he asks the other gnomes, “Hey what’s step 2?” and they all just chime back in, “Step 1: collect underpants, Step 3: PROFIT!”
If in Step 1, you test and notice that you lack capacity for normal, healthy movement in the capsule, and you decide that it would be good for you to have Step 3 (a shoulder that does its job), why would you then avoid dealing with it like you would a homeless guy off his meds in a dark alley? If you don’t have a means to address the tight capsule itself, then you don’t have a Step 2 and you’ll never really arrive at Step 3: profiting from a good shoulder! There is no natural range of motion that should be entirely avoided unless it is painful and sensitive to begin with, in which case, you should seek the help of a physical therapist.
If your game involves repetitive demands on internal and/or external rotation and you have a viciously tight shoulder capsule, then you have big trouble in little China. How happy do you think that shoulder will be after a pitching career or training jerks and snatches for years on end?
After the capsule is assessed, we move on to assessing range of motion in single joints and then multi-joints. This would get pretty lengthy and complicated if I went through the whole body explaining each stretch and position, so I’m going to give you the concept and let you play with it.
Capsule stretches target the deepest tissues by trying to maximize the range a single joint is capable of while keeping in mind it’s intended motion: does it hinge, rotate, pivot, or glide?
To passively stretch the capsule and deepest tissues, lessen tension in the surrounding joints as much as possible by allowing them to stay relaxed and bent. So, if I want to stretch the capsule of my finger’s first knuckle, the wrist stays relaxed, and the other finger joints stay relaxed, too. In other words, the greater the tension stretching tissues across multiple joints, the more superficial the stretch.
Save the superficial stretches until you have the range you need in capsules and deeper tissues. If you’re always doing multi-joint stretches, you’re never targeting the end range of deeper tissues.
When you stretch a capsule, you will still be hitting some of the superficial tissues, which is totally fine and unavoidable. There is no way ever to only target or avoid single muscles, tissues, or capsules in training. It’s just not possible. It’s all connected, man.
Test the difference between active and passive range, set goals, and come up with a plan
The next diagnostic step is to determine the difference between active and passive range for any and all of the positions you stretch. Try out the shoulder internal and external rotation stretches depicted above and see how close you can come to these positions without assistance from your top hand or the yoga block. The key to this testing is to produce the position without using gravity, props, momentum, or other external forces. If there is a big discrepancy in passive flexibility and active strength, fixing this is also a priority.
Once you have assessed your deficits in flexibility and mobility, you can then set goals for improvements in the joints that fall short prioritizing the ones you use and need the most. Now you need to figure out what to do and in what order to bridge the gap without wasting any time, remembering that the goal is to create mobility, not just flexibility.
If your capsules are tight, plan to stretch and strengthen them. If they are not tight but the passive and active range are very different, then prioritize strengthening the end range. If the capsules are good to go in both, but the superficial tissues need work, then focus on multi-joint exercises.
How to strengthen end range
You could invest a big chunk of time doing your passive stretches and then join a class of something that works end range strength, like ballet or gymnastics, but that’s ultra time-consuming. Luckily, there’s a faster way.
The very smart fellow responsible for developing the Functional Range Conditioning methods (FRC) and much of what I’ve talked about here, Dr. Andreo Spina, has created the perfect system for strengthening end range. He layers an exercise he calls PAILs/RAILs on top of your everyday passive stretches. This stands for Progressive and Regressive Angular Isometric Loading.
Translated into action, the system is essentially ramping up tension in the tissues being stretched into a full body contraction over five to 10 seconds, progressively working up to what feels like a max effort AGAINST the position you are stretching. As with any training program (dash of common sense) don’t f-ing max out on day one.
If you are pushing down on your bottom wrist in a passive sleeper stretch for PAILs, you gradually ramp up pressure throughout the body and into the stretching arm to apply force against being stretched, so INTO the top hand. Don’t change the position of the stretch. Hold the tension at a high level or max for 10 seconds, and then slowly relax without losing the stretch position.
Next up, you RAIL driving force the opposite way. Everything happens the same, ramping tension up throughout the body and into the stretching arm, except you try to pull your bottom arm away from the support hand and towards the ground. After holding this for 10 seconds, slowly relax.
The PAILs/RAILs contractions are sandwiched by one to two minutes of passive stretching. Stretch for one to two minutes, go through the PAILs/RAILs sequence, and then as much as you want to roll around and complain, don’t: just stay in the damn stretch. In fact, don’t just return to the passive stretch but DEEPEN it and hold for another one to two minutes. If short on time, I like to favor the second passive stretch as the longer stretch.
You may be wondering why the whole body is contracting along with the specific joint. By doing this, you make the specific part work harder. Any max effort contraction is enhanced if the whole body is supporting it. Imagine trying to do a 1RM squat with a relaxed face, neck, and arms. You’ll do a lot better if you fire up all you got, dragon face and all.
Step 6: Maintain your new range
Once you get the range you want, you can maintain it by using it. Just two reps every day will do the trick. The FRC maintenance method is called “CARs,” which stands for Controlled Articular Rotations. You can find video demos of the series online with a quick Google search. For more information on FRC from Dr. Andreo Spina, check out his YouTube channel.
Recap
- Assess the mobility requirements for the movements you train.
- Evaluate yourself- test capsule first and then move on if the capsule is good, but not until it’s good.
- Test the difference between active and passive range.
- Set goals for improvements in the joints that fall short, prioritizing the ones you use and need the most.
- Create a mobility training program, and follow the order capsule-single joint-multi joint.
- Maintain your new range.
- Profit.
| Sarah Strange is a certified FRC Mobility Specialist and the Director of Programming at NorCal Strength & Conditioning in Chico, CA. She is a former Pilates instructor, CrossFit gym owner, and ballet dancer. |
Search Articles
Article Categories
Sort by Author
Sort by Issue & Date
Article Categories
Sort by Author
Sort by Issue & Date