

The Jerk: Part 1
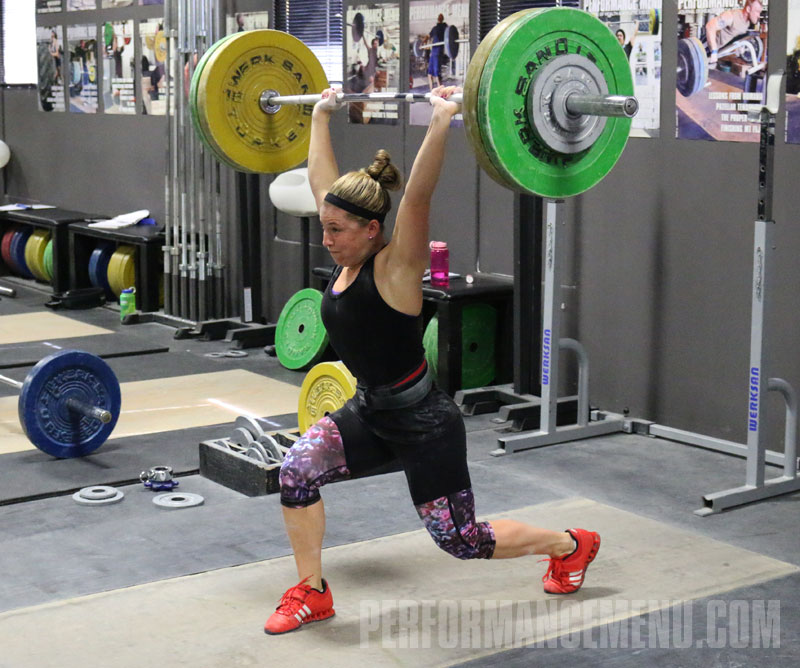
The jerk completes the clean & jerk by bringing the bar from its racked position on the athlete’s shoulders to its final position locked out overhead. There are three basic styles of jerking—the split jerk, power jerk, and squat jerk—but the split is by far the most common due to its greater stability and margin of error. Which style an athlete uses will ultimately be determined by the athlete’s preference, strengths and weaknesses, and possibly injuries or other physical limitations.
As has been mentioned previously, the jerk uses and entry and aggressive exit into and out of the power position just as the pulls of the snatch and clean do in order to impart vertical force to the barbell. Instead of achieving this entrance through the scoop, the jerk arrives at the power position through a simple and clear dip of the knees. While the snatch and clean are both sequences of pulling the barbell up and pulling the athlete down, the jerk is instead driving the barbell up and pushing the athlete down.
Foot Positions
Just as in the snatch and clean, there are two foot positions for the jerk—the drive position and the receiving position. As has been mentioned previously, because the leg and hip action during the second pulls of the snatch and clean are essentially the same as in the jerk, it should be no surprise that the drive position for the jerk is the same as the pulling position for the clean and snatch. You’ll of course recall that this position is one in which the feet are directly under the hips and rotated externally to a small degree, orienting the legs approximately vertically.
There are, as always, exceptions to this rule. It’s rare for an athlete to prefer a narrower foot placement, but slightly wider stances are fairly common. These wider stances are generally the same as the squat width—the feet are simply left unadjusted following the recovery from the clean. In this wider stance, the knees are driven out to the sides slightly more than with the narrower stance. This seems to reduce the disadvantage of longer legs somewhat and may also reduce knee discomfort during the dip.
The receiving position will depend on the style of jerk. If the athlete decides to power or squat jerk, it will be identical to the squat stance or slightly wider. Much more likely is the split position, which provides greater stability in all directions and allows the lifter to achieve a deeper receiving position with less demand for flexibility and an easier recovery.
The Split Position
In teaching the athlete the receiving position for the split jerk, the first order of business is determining which leg the athlete will lead with. There are a number of ways to do this, and most are unnecessary. Nearly invariably athletes will know intuitively which leg they’ll feel more comfortable with in front before ever having performed a split jerk. If this is not the case with a certain athlete, simply instruct him or her to perform walking lunges and provide no further detail. The athlete will unconsciously step out with the dominant leg to start the exercise—this will be his or her lead leg in the split jerk.
Next we need to dial in the receiving position. Instruct the athlete to enter a lunge position with the dominant leg forward. The width of the feet should be approximately the same as it is in the athlete’s squat stance—we need to maintain the same lateral stability here as we do when receiving a snatch or clean. In fact, lateral stability in the jerk is even more critical because the combined center of gravity of the lifter and barbell is higher off the platform and consequently more difficult to stabilize.
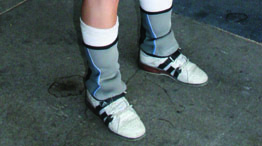
The athlete’s lead foot will be flat on the floor with the weight focused near the heel, while the back heel will be elevated with the weight driving through the balls of the foot. Both feet should be internally rotated slightly—toes oriented toward the midline—although this is not as important for the lead leg. If the rear foot is not turned in, it will often be forced out when the weight is received, flattening the foot on the platform and subjecting the ankle to undue stress. In addition to the injury risk, this will rapidly destabilize the lifter and can be the cause of a missed jerk.
The depth of the feet should be adjusted until the shin of the lead leg is approximately vertical and the thigh is between about a 20- and 40-degree angle to the floor. The back knee must remain bent—this relieves tension on the ankle, allowing the heel to remain elevated, and prevents hyperextension of the knee upon receipt of the weight. The depth of the hips in the split during an actual lift will be determined by how high the lifter is able to elevate the bar and consequently how far underneath it he or she must push him or herself in order to receive it with extended arms. This depth can be considered a default position for light jerking and should be adjusted according to the demands of increasing weight.
The lifter’s pelvis and spine should remain in their neutral alignment and be oriented vertically—the torso should not be leaning either forward or backward. Just as in the receipt of the snatch or clean, the more vertical the torso, the better it will be able to support a load.
If the foot and leg placement and the torso position are correct, the lifter’s weight will be properly centered over his or her base and the position perfectly stable.
Footwork Drill
Once the athlete has become familiar with the correct split position, the transition from the drive to the receiving position can be drilled just as it was for the snatch and clean. The lifter will start in the drive position with his or her hands on the hips. From here, he or she will move the feet as quickly as possible to the receiving position. Just as with the snatch and clean footwork drill, there should be as little elevation of the feet from the platform as possible—they are lifted only to replace them in the split position. An audible clap of the shoes against the platform should result—again, not because the feet have been lifted high off the platform, but because of the speed and force with which they are driven into position.
Breathing
Breath control in the jerk has a profound effect on the outcome of the lift, but it’s often neglected by athletes and coaches. At the root of breathing for the jerk is the idea of abdominal bracing, the stabilization of the torso through the tightening of the abdominals in an expanded position. Probably because of our common habit of sucking in the stomach for appearance reasons, most athletes will assume that this kind of abdominal hollowing is the appropriate way to stabilize the spine when lifting, when in fact it provides very little stability for structural lifting.
Consider two aluminum cans of your beverage of choice—one is full and still sealed, the other open and empty. Which can will be able to support more downward force, and which will be more resilient to any lateral shifting of that force? The full sealed one, of course.
This should be a clear illustration of what is demanded of the torso when supporting loads and transmitting force from the body to the bar. Abdominal hollowing can be likened to denting in the bottom of the empty can slightly—this encourages collapse. On the contrary, expanding the abdominals and filling all possible space with air pressure creates a wide and stable base for the torso.
Tightening the abdominal musculature while expanding them is difficult for most athletes without practice. The athlete should inhale deeply, expanding the stomach to allow the lungs to fill as completely as possible. Once the full breath has been taken and the stomach pushed out as much as possible, the athlete should then tighten the surrounding musculature while maintaining the expansion. This may feel like pushing the abs down. Again, this usually requires practice for athlete to master.
The Press
Our first step in teaching the movement of the jerk is the press. This will familiarize the athlete with the movement of the arms and torso as well as the overhead position.
Depending on the strength of the athlete, a PVC bar, light training bar, or regulation bar can be used. Weight will provide better positional feedback for the athlete.
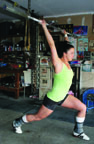
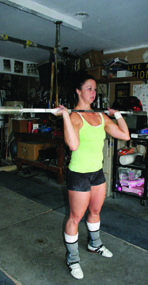
The lifter should place the bar across the back of the shoulders as he or she would for a high-bar back squat with the hands gripping just outside shoulder width. The elbows should be oriented down as much as possible and neutral upright posture should be maintained. Allowing the elbows to point backward will encourage the upper back to roll forward.
In this starting position, the bar is positioned in the same vertical plane in which it will need to remain as it’s pressed overhead—this is the reason for performing the first presses from behind the neck.
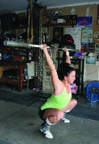
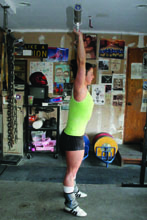
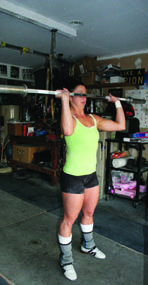
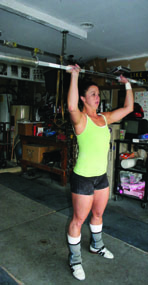
The athlete will simply press the bar straight up, actively elevating the shoulders and extending the elbows completely at the end of the movement. The bar should remain over the mid to rear of the foot when viewed from the lifter’s side. Adjust the bar as needed to bring it into its correct position and have the athlete remain here for a few seconds both to familiarize him or her with the feeling of the position as well as encourage a habit of continuing to actively drive the bar up when overhead. Now the athlete can perform a series of presses behind the neck at a controlled, deliberate pace, focusing on a vertical bar path and an active position overhead. Continue adjusting the bar overhead and providing verbal cues as needed.
Next we’ll bring the bar to the front. While the purpose of the press behind the neck was to familiarize the athlete with the proper overhead position, the purpose of the press is to teach the athlete how to correctly move the bar from the shoulders to its final position.
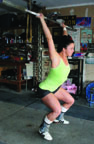
The hand placement will remain the same—just outside shoulder width. At this point, we’re not too concerned with racking the bar on the shoulders, although if the athlete does so without being instructed to, even better. For now, we want the elbows down with the forearms approximately vertical and supporting the bar strongly.
Viewing the athlete from the side, we can see now that the bar is a couple inches in front of the plane in which it will have to reside overhead. The athlete must press the bar in as straight a line as possible into its final position. In order to do this, the head must be pulled back out of the way. Ideally this is done not by tilting the head back, but by pulling it and the neck back as the bar passes by. Once the bar has passed the head, the lifter must push his or her head through the arms in order to achieve the overhead position he or she learned when pressing behind the neck. This will allow the body to support the load directly over the feet. The press should be practiced until the bar path consistently remains straight and direct and the overhead position is correct and stable.
.jpg)
Next Time
Next month we’ll continue with the progression to the full split jerk.
As has been mentioned previously, the jerk uses and entry and aggressive exit into and out of the power position just as the pulls of the snatch and clean do in order to impart vertical force to the barbell. Instead of achieving this entrance through the scoop, the jerk arrives at the power position through a simple and clear dip of the knees. While the snatch and clean are both sequences of pulling the barbell up and pulling the athlete down, the jerk is instead driving the barbell up and pushing the athlete down.
Foot Positions
Just as in the snatch and clean, there are two foot positions for the jerk—the drive position and the receiving position. As has been mentioned previously, because the leg and hip action during the second pulls of the snatch and clean are essentially the same as in the jerk, it should be no surprise that the drive position for the jerk is the same as the pulling position for the clean and snatch. You’ll of course recall that this position is one in which the feet are directly under the hips and rotated externally to a small degree, orienting the legs approximately vertically.
There are, as always, exceptions to this rule. It’s rare for an athlete to prefer a narrower foot placement, but slightly wider stances are fairly common. These wider stances are generally the same as the squat width—the feet are simply left unadjusted following the recovery from the clean. In this wider stance, the knees are driven out to the sides slightly more than with the narrower stance. This seems to reduce the disadvantage of longer legs somewhat and may also reduce knee discomfort during the dip.
The receiving position will depend on the style of jerk. If the athlete decides to power or squat jerk, it will be identical to the squat stance or slightly wider. Much more likely is the split position, which provides greater stability in all directions and allows the lifter to achieve a deeper receiving position with less demand for flexibility and an easier recovery.
The Split Position
In teaching the athlete the receiving position for the split jerk, the first order of business is determining which leg the athlete will lead with. There are a number of ways to do this, and most are unnecessary. Nearly invariably athletes will know intuitively which leg they’ll feel more comfortable with in front before ever having performed a split jerk. If this is not the case with a certain athlete, simply instruct him or her to perform walking lunges and provide no further detail. The athlete will unconsciously step out with the dominant leg to start the exercise—this will be his or her lead leg in the split jerk.
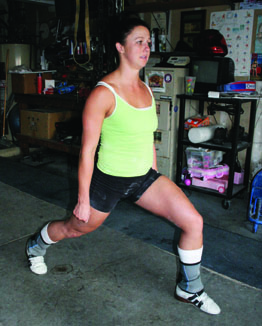
Next we need to dial in the receiving position. Instruct the athlete to enter a lunge position with the dominant leg forward. The width of the feet should be approximately the same as it is in the athlete’s squat stance—we need to maintain the same lateral stability here as we do when receiving a snatch or clean. In fact, lateral stability in the jerk is even more critical because the combined center of gravity of the lifter and barbell is higher off the platform and consequently more difficult to stabilize.
The athlete’s lead foot will be flat on the floor with the weight focused near the heel, while the back heel will be elevated with the weight driving through the balls of the foot. Both feet should be internally rotated slightly—toes oriented toward the midline—although this is not as important for the lead leg. If the rear foot is not turned in, it will often be forced out when the weight is received, flattening the foot on the platform and subjecting the ankle to undue stress. In addition to the injury risk, this will rapidly destabilize the lifter and can be the cause of a missed jerk.
The depth of the feet should be adjusted until the shin of the lead leg is approximately vertical and the thigh is between about a 20- and 40-degree angle to the floor. The back knee must remain bent—this relieves tension on the ankle, allowing the heel to remain elevated, and prevents hyperextension of the knee upon receipt of the weight. The depth of the hips in the split during an actual lift will be determined by how high the lifter is able to elevate the bar and consequently how far underneath it he or she must push him or herself in order to receive it with extended arms. This depth can be considered a default position for light jerking and should be adjusted according to the demands of increasing weight.
The lifter’s pelvis and spine should remain in their neutral alignment and be oriented vertically—the torso should not be leaning either forward or backward. Just as in the receipt of the snatch or clean, the more vertical the torso, the better it will be able to support a load.
If the foot and leg placement and the torso position are correct, the lifter’s weight will be properly centered over his or her base and the position perfectly stable.
Footwork Drill
Once the athlete has become familiar with the correct split position, the transition from the drive to the receiving position can be drilled just as it was for the snatch and clean. The lifter will start in the drive position with his or her hands on the hips. From here, he or she will move the feet as quickly as possible to the receiving position. Just as with the snatch and clean footwork drill, there should be as little elevation of the feet from the platform as possible—they are lifted only to replace them in the split position. An audible clap of the shoes against the platform should result—again, not because the feet have been lifted high off the platform, but because of the speed and force with which they are driven into position.
Breathing
Breath control in the jerk has a profound effect on the outcome of the lift, but it’s often neglected by athletes and coaches. At the root of breathing for the jerk is the idea of abdominal bracing, the stabilization of the torso through the tightening of the abdominals in an expanded position. Probably because of our common habit of sucking in the stomach for appearance reasons, most athletes will assume that this kind of abdominal hollowing is the appropriate way to stabilize the spine when lifting, when in fact it provides very little stability for structural lifting.
Consider two aluminum cans of your beverage of choice—one is full and still sealed, the other open and empty. Which can will be able to support more downward force, and which will be more resilient to any lateral shifting of that force? The full sealed one, of course.
This should be a clear illustration of what is demanded of the torso when supporting loads and transmitting force from the body to the bar. Abdominal hollowing can be likened to denting in the bottom of the empty can slightly—this encourages collapse. On the contrary, expanding the abdominals and filling all possible space with air pressure creates a wide and stable base for the torso.
Tightening the abdominal musculature while expanding them is difficult for most athletes without practice. The athlete should inhale deeply, expanding the stomach to allow the lungs to fill as completely as possible. Once the full breath has been taken and the stomach pushed out as much as possible, the athlete should then tighten the surrounding musculature while maintaining the expansion. This may feel like pushing the abs down. Again, this usually requires practice for athlete to master.
The Press
Our first step in teaching the movement of the jerk is the press. This will familiarize the athlete with the movement of the arms and torso as well as the overhead position.
Depending on the strength of the athlete, a PVC bar, light training bar, or regulation bar can be used. Weight will provide better positional feedback for the athlete.
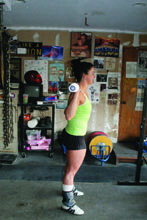
The lifter should place the bar across the back of the shoulders as he or she would for a high-bar back squat with the hands gripping just outside shoulder width. The elbows should be oriented down as much as possible and neutral upright posture should be maintained. Allowing the elbows to point backward will encourage the upper back to roll forward.
In this starting position, the bar is positioned in the same vertical plane in which it will need to remain as it’s pressed overhead—this is the reason for performing the first presses from behind the neck.
The athlete will simply press the bar straight up, actively elevating the shoulders and extending the elbows completely at the end of the movement. The bar should remain over the mid to rear of the foot when viewed from the lifter’s side. Adjust the bar as needed to bring it into its correct position and have the athlete remain here for a few seconds both to familiarize him or her with the feeling of the position as well as encourage a habit of continuing to actively drive the bar up when overhead. Now the athlete can perform a series of presses behind the neck at a controlled, deliberate pace, focusing on a vertical bar path and an active position overhead. Continue adjusting the bar overhead and providing verbal cues as needed.
Next we’ll bring the bar to the front. While the purpose of the press behind the neck was to familiarize the athlete with the proper overhead position, the purpose of the press is to teach the athlete how to correctly move the bar from the shoulders to its final position.
The hand placement will remain the same—just outside shoulder width. At this point, we’re not too concerned with racking the bar on the shoulders, although if the athlete does so without being instructed to, even better. For now, we want the elbows down with the forearms approximately vertical and supporting the bar strongly.
Viewing the athlete from the side, we can see now that the bar is a couple inches in front of the plane in which it will have to reside overhead. The athlete must press the bar in as straight a line as possible into its final position. In order to do this, the head must be pulled back out of the way. Ideally this is done not by tilting the head back, but by pulling it and the neck back as the bar passes by. Once the bar has passed the head, the lifter must push his or her head through the arms in order to achieve the overhead position he or she learned when pressing behind the neck. This will allow the body to support the load directly over the feet. The press should be practiced until the bar path consistently remains straight and direct and the overhead position is correct and stable.
Next Time
Next month we’ll continue with the progression to the full split jerk.
| Greg Everett is the owner of Catalyst Athletics, publisher of The Performance Menu Journal and author of Olympic Weightlifting: A Complete Guide for Athletes & Coaches, Olympic Weightlifting for Sports, and The Portable Greg Everett, and is the writer, director, producer, editor, etc of the independent documentary American Weightlifting. Follow him on Facebook here. |
Search Articles
Article Categories
Sort by Author
Sort by Issue & Date
Article Categories
Sort by Author
Sort by Issue & Date