

The Jerk: Part 2
The Push Press
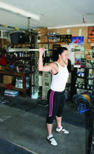
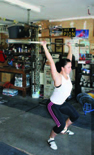
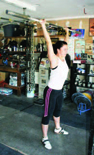
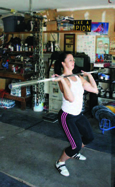
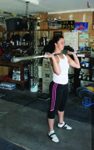
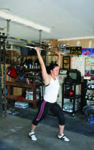
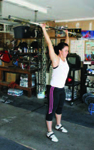
The push press is an intermediate movement combining elements of the press and the jerk. As a lift itself, it’s an excellent strength builder, allowing the athlete to press greater loads overhead with the assistance of more of the body than the arms and shoulders. As a progression toward the jerk, it introduces the lifter to the idea of initiating an upward drive of the bar with a dip and subsequent drive of the legs and hips, as well as the timing of transitioning between driving with the legs to pressing with the arms.
As we did with the press, we’ll first perform the push press from behind the neck. Again, this allows a vertical bar path to the overhead position, giving the athlete an opportunity to focus first on the dip and drive of the lift without being concurrently concerned with the bar path from the front.
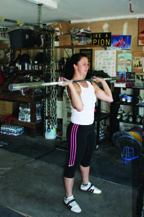
With the bar racked securing on the back of the shoulders, the hands placed just outside shoulder width, and the feet in the drive position, the athlete needs to prepare for the dip and drive by taking in air and stabilizing the torso in the manner described earlier. This pressurization of the stomach is critical for success—an unstable torso will succumb to the tendency to collapse forward, shifting the athlete’s weight to the toes and redirecting the path of the bar forward, resulting in anything from a difficult to a failed lift.
The athlete will not be able to maintain a perfectly vertical torso with the bar behind the neck; this placement will necessitate a slight forward lean. However, this angle must be maintained throughout the dip and drive, which will keep the path of the bar vertical.
After filling the torso with air and tightening down the surrounding musculature, the athlete should pause a second or two to ensure stabilization has been achieved. Often a rush to commence the lift immediately after the breath or even as the breath is being finished will greatly reduce stability.
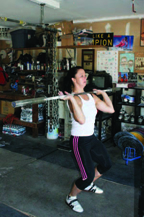
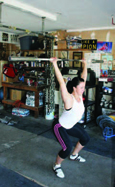
Once the lifter is stable, he or she will dip into the power position by bending at the knees only. As was discussed previously in regards to the power position, the actual depth will vary among athletes. There will be a point at which the athlete feels a fairly abrupt loss of strength—the ideal depth of the dip is just above this point. Because the transition from the eccentric dip to the concentric drive must be as rapid as possible, entering into a mechanically weak position is for obvious reasons ill advised.
The speed of the dip must balance the need to generate a stretch-shortening response to increase the subsequent concentric movement and the need to prevent separation of the bar from the lifter. If the dip is too quick, the lifter will drop out from underneath the bar. If the created space is significant enough, the bar will actually still be traveling down as the athlete is driving back up. Since it’s clearly more difficult to accelerate a downward traveling bar upward, the dip must be controlled to prevent this.
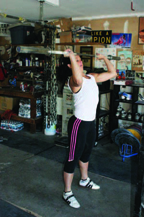
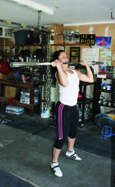
The transition must be powerful and the lifter must fight to prevent the torso from dropping forward. Once the direction has been reversed, the athlete will drive straight up with the legs and hips, attempting to achieve maximal acceleration of the bar. As the legs and hips near full extension, the arms must be brought in to continue the bar’s path upward. Timing this transition is key—pressing too early with the arms will prevent the full transfer of leg and hip power to the bar and leave more work to the weaker arms and shoulders, while waiting too long before initiating the press will mean needing to accelerate the bar after it has started slowing down following the powerful leg drive.
Athletes may rise onto their toes at the end of the leg extension. As was discussed earlier in regards to ankle extension in the pulls of the snatch and clean, this extension is neither necessary nor significantly helpful and potentially troublesome in terms of balance. It should be avoided as much as is possible without the avoidance limiting surrounding performance. If a lifter habitually extends the ankles in the push press in the absence of any other technique faults, it can be considered benign and should be left alone.
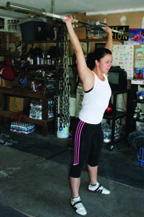
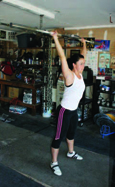
Overhead, the lifter must continue to attempt to drive the bar up even after the arms have reached full extension.

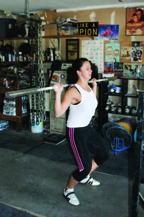
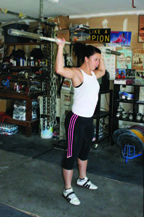
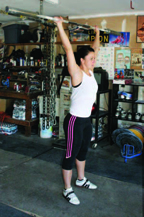
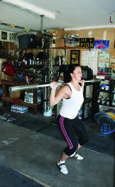
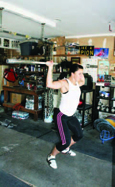
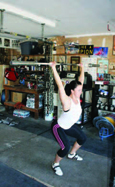
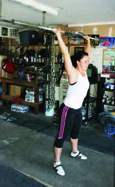
Push press behind the neck
Once the athlete can demonstrate competence with the push press behind the neck—meaning correct breathing, a solid dip, quick transition, and vertical bar path—we can move the bar to the front rack position.
The first order of business is establishing a new rack position that will be used for the push press and the jerk. At this point we have two—that of the clean and that of the press. For the clean, our priority is securing the bar on the shoulders and connecting it to the torso as closely as possible in order to support the load during recovery. For the press, our priority is placing the arms into the strongest position to drive the bar overhead. Because the push press and the jerk require both a secure connection to the torso and the ability to press the bar, we need to find a balance between the two rack positions.
We start with the clean rack because positioning the bar on the shoulders must take precedence over an advantageous pressing position of the arms. If the bar is not connected tightly to the torso, the transfer of power from the legs to the bar will be limited by the inability of the arms to withstand the forces and maintain the bar’s exact position relative to the torso—in other words, when the athlete transitions from the dip to drive of the legs, a bar held primarily in the arms will continue descending after the legs have begun extending again. This robs a great deal of the power generated by the legs from the bar and typically results in a shift of balance that does not bode well for a successful lift even if adequate force is transferred to the bar.
From the clean rack position, the athlete should essentially push the hands in as deeply under the bar and drop the elbows as near to vertical as possible without compromising the security of the bar’s position on the shoulders. For most athletes, the resulting position will have the elbows and hands near midpoint between their position in the clean and press racks—the actual positions will vary depending on each athlete’s arm segment lengths and flexibility. Again, the priority is the security of the bar on the shoulders. The initial force will be imparted to the bar by the legs and only after this will the responsibility for elevating the bar shift to the arms. Consequently, there is time to move the arms and hands into better pressing position during the transition of force from the legs to arms.
Once the proper rack position has been established, the lift is identical to the push press from behind the neck with the exception that the bar must be brought back into place overhead after it passes the lifter’s face. The bar path will be identical to that of the press with which the lifter is now familiar.
Cue the lifter to take in a proper breath and take a moment to settle and stabilize before initiating the dip. Watch the dip for the qualities established earlier—a gradual enough acceleration downward to prevent separation from the bar but enough speed to encourage a stretch reflex; proper depth; a quick transition from dip to drive with no horizontal shifting of the body or bar; a vicious and vertical drive of the bar; proper timing of the transition between leg and arm drive; vertical bar path until it passes the head and is brought back slightly; bar finishing in the proper overhead position; overhead position active and stable.
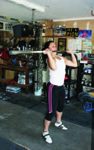
As a strength movement, the push press is excellent both for pressing strength and for developing improved dip depth and transition speed and timing. Athletes will be able to handle heavy loads, and once familiar with the lifts, should do so regularly in strength cycles. Heavy push presses will very quickly reveal weaknesses or technique flaws that can then be corrected.
As a stage in the jerk learning progression, once the athlete can demonstrate consistently correct movement, we can proceed to the push jerk.
Push Press
The Push Jerk
Whereas the snatch and clean involve first an upward pull of the bar followed by a downward pull of the body, the jerk begins with an upward push of the bar followed by a downward push of the body; the fundamental principle is the same—elevating and accelerating the bar as much as possible before rapidly shifting the body into a lower position in which to receive the load—only the specific actions have changed.
The push jerk—also known as the power jerk—is used by some weightlifters in competition, although its use is far less common than the split jerk because of it’s relative fore and aft instability and the limitations on depth. In order to be a successful power jerker, a lifter must be able to produce a very consistently precise bar path and be able to elevate the load relatively high. Typically the power jerk is limited to lifters with extraordinary leg and pressing strength.
Outside of a competitive jerking style, the push jerk is and excellent stage in the jerk learning progression. The press has introduced the athlete with the movement pattern of the arms and the overhead position, and the push press has taught the athlete to generate the initial acceleration of the bar with the legs and the transition between leg and arm drive. The push jerk introduces the idea of moving the body under the bar without the distraction of the dramatic foot placement transition of the split jerk.
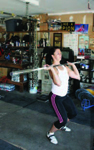
Again, we’ll start with the bar behind the neck to allow a straight vertical bar path while focusing on the new elements. To further isolate the new segment of the lift, the athlete will press the bar approximately halfway up and pause. The only remaining movement is now is the push of the body underneath the bar. This exercise is can be called a tall jerk behind the neck.
Once the athlete has set this position and taken in a proper breath to stabilize, he or she will aggressively drive themselves down against the bar, replacing the feet in a receiving position identical to those of the snatch and clean. Commonly lifters will unintentionally replace their feet in excessively wide stances because of the perceived stability; the sooner this is noticed and corrected, the less of chance it will develop into a habit proving extremely difficult to break in the future.
The lockout of the elbows and the return of the feet to the platform should occur at approximately the same time. Invariably athletes will move the feet more quickly than the arms because they of course have far less distance to travel; extremely quick elbow extension, however, is a critical component of a successful jerk. A sense of viciousness must be instilled in the athlete at the outset, whether working with little or no weight or maximal loads.
The overhead receiving position should of course be no different than that of the snatch—the shoulders must be actively elevated with the shoulder blades retracted to create a tight and secure base for the arms. A habit of continued elbow extension effort should be encouraged at all stages of learning and with all weights. If an athlete is lazy with keeping the elbows extended, the receipt of heavier weights will prove unsuccessful and developing the habit is always more difficult later.
The depth of the receiving position will depend directly on the height the lifter has been able to elevate the bar, and therefore indirectly on the weight being lifted. When learning and training with light weights, such as those that can be easily pressed or push pressed, a reasonable depth should be achieved despite its being physically unnecessary to bring the bar overhead. Practicing the jerk with a particularly shallow receiving depth will typically result in trouble in the future when the athlete begins attempting to jerk with heavier loads and finds him- or herself unable to achieve an adequately deep receiving position.
In actual practice, of course, the lifter must receive the bar at whatever height necessary, just as he or she must do with a snatch or clean, to prevent the weight from crashing and becoming unstable, or potentially causing injury to the elbows and shoulders. That being the case, the actual depth of the receiving position will vary with every lift, even lifts of the same weight since it’s unlikely an athlete will accelerate the bar to an identical degree with every attempt.
Tall Jerk Behind the Neck
If an athlete is having trouble with the idea of pushing under the bar, this intermediate movement can be slowed down in order to allow a more controlled motion initially. Starting in the same half-press position, but with the feet already in the receiving stance, the lifter can slowly press him- or herself down into a quarter squat while locking out the elbows. The bar should remain at approximately the same height.
Once the bar has been received and stabilized in the proper position, the lifter will recover to a standing position with the arms remaining extended—the lift does not end until the athlete is standing fully again and the bar is stabilized overhead. At this point, the bar may be lowered for a subsequent rep.
When the lifter is able to perform this movement segment successfully, he or she can be progressed to a complete push jerk behind the neck.
The push jerk will now simply be a combination of the push press and the segment drill the athlete just performed. The lifter will place the feet in the drive position, take in air and stabilize the torso, then dip and drive the bar up as in the push press. When the lifter has extended the legs and accelerate the bar with them as much as possible, he or she will rapidly change directions and push him- or herself under the bar to receive it with locked arms in approximately a quarter squat depth with the feet in the receiving position.
Push Jerk Behind the Neck

Push Jerk
The leg extension does not have to be complete—the last few degrees of leg extension will not add any considerable force to the bar, and, just as in the second pulls of the snatch and clean, remaining extended for too long will reduce the amount of time the lifter has to get under the bar. That being said, it’s important that the athlete not cut the leg extension short and fail to elevate the bar as much as possible with the legs.
Once the bar has left the lifter’s back, the responsibility for continuing its drive up shifts to the arms with the assistance of the remaining momentum. At this time—the moment the bar leaves the shoulders—the movement of the feet to the receiving position will begin. With the feet no longer driving against the platform, the attempt to press the bar up will push the lifter down. However, with light training weights, the bar’s inertia will be very small relative to the lifter’s body, so the natural reaction will be much less than that seen with a fully loaded barbell. For this reason, in the early training stages, the movement will be somewhat contrived; that is, the force applied to the bar must be reduced to prevent simply push pressing it. This reduction of force should not be confused with a reduction of speed—that should remain the same.
When the athlete has become comfortable with the basic movement of the jerk, the bar can be moved to the front rack position. We’re now combining the dip and drive element of the push press, the drive under of the tall jerk, and the arm and hand positions and perfectly upright torso of the front rack.
With the bar now racked in the front, breathing becomes even more critical. The bar’s increased distance from its primary supporting structure, the back, results in a greater moment on the thoracic spine, magnifying the tendency for the athlete’s back to round forward under the load, particularly during the transition phase of the dip when the position must support a greater force. This demands the torso be stabilized with air pressure and muscular tension as much as possible.
The dip and drive phase of the lift is no different than from behind the neck with the exception that the torso can and must be kept completely vertical. Once the proper rack position is established—hands as deep and elbows dropped as much as possible without sacrificing the bar’s security on the shoulders—the athlete will draw in his or her breath and take a moment to settle and stabilize.
When the body is set, the lifter will initiate the dip. With the bar racked in the front, even more so than in the back, a smooth acceleration downward is necessary to prevent the bar from separating from the shoulders. Separation in the front will prove much more difficult to manage than in the back both because of the bar’s position farther from the spine as well as the relative lack of muscular padding to mitigate the crashing effect on the clavicles.
At the bottom of the dip, the tendency with the bar in front will be to shift forward. The lifter must fight this and may even feel like he or she is leaning backward when vertical. Often the athlete will unintentionally drop the elbows, which will encourage the bar to roll down the chest; the arms must remain in the same position throughout the dip and drive to ensure the bar’s placement on the shoulders.
It’s important that the lifter attempt to keep his or her weight focused toward the back of the feet throughout the movement. The athlete’s center of gravity will unavoidably shift forward slightly as he or she dips—if the weight is forward at the beginning of the movement, this shift will encourage the drive to tilt forward, pushing the bar away from the lifter.
After a quick and smooth transition, the lifter will need to drive the bar vertically with as much force and speed as possible. When in the learning stages and using light weights, the force will need to be reduced somewhat to allow a jerk—if the force is too great, the light weight will be overhead before the athlete even has a chance to drive under the bar. Even with a reduction of force, the speed should be maintained.
As the bar leaves the shoulders, the lifter will need to quickly pull his or her head back out of the way to allow an uninterrupted vertical line of travel past the head, after which the bar will be brought back slightly into its final position. At the same time, the feet will be off the platform and must be replaced in the receiving position as quickly and powerfully as possible. An audible clap with the shoes’ contact with the platform is desirable if the result of speed and aggressiveness, not excessive elevation. In the brief moment the feet are not driving against the platform, the athlete’s effort to drive the bar up will drive him or her down, allowing the arms to be locked out when the body settles in the receiving position under the bar.
Once the bar and lifter are stable in the receiving position, the athlete can return to standing with the bar overhead. Only once the feet are brought back in line with each other and the body is fully erect is the lift over.
The Split Jerk
The final step in the jerk progression is to switch to the split receiving position the lifter was acquainted with previously. This will typically allow the athlete to jerk the most weight because of the position’s wide base and stability in all directions and its ability to allow the athlete to assume a relatively low hip position with more than enough strength to arrest the downward force and to recover again to standing.
There are only two differences between the push or power jerk and the split jerk—the receiving position of the feet, of course, and the path of the bar.
With the split jerk, the lifter is able to manage loads well beyond his or her bodyweight. With two objects disconnected to the floor, such as a weightlifter and the barbell during the foot replacement phase of the jerk, force applied by one object to the other will move both objects; this is Newton’s Third Law: for every action, there is an equal and opposite reaction, the very principle that allows weightlifting to occur at all.
When a lifter jerks a barbell heavier than his or her own weight, the attempt to pull the barbell backward into its final overhead position will actually pull the lifter forward as well. The greater the weight of the barbell relative to the lifter, the farther the lifter will travel relative to the barbell. That is, a very heavy bar will travel nearly vertically while the lifter drives forward into place underneath it.
This being the case, we want to practice this movement irrespective of the barbell’s weight on a given rep. If we fail to do so, we add an unfamiliar element to an already difficult lift once we reach heavier loads—we want to train precisely as we intend to lift when it matters most. Possibly the most common reason for missed jerks is the lifter’s failure to commit to getting far under the bar and therefore being unable to support it even if perfect lockout of the arms is achieved.
The best cue for visualizing this forward movement I’ve heard is that used by Coach Mike Burgener, who describes to the lifter a plate of glass running vertically in front of the lifter directly through the bar when in its racked position. As the bar passes the lifter’s head—traveling directly up the plane described by the glass—he or she must drive the body through the glass to get under the bar.
Another way that has been effective for eliciting better movement is simply the idea of driving the body through the arms, much as the lifter does during a press or push press. However, in the case of the split jerk, this drive through is both slight forward leaning of the torso and actual forward movement of the support base.
At this point, the athlete is already familiar with the split receiving position and is reasonably capable of hitting it quickly and consistently from the drive position without a bar. The goal now is to introduce this forward movement of the body and coordinate it with the rest of the jerk mechanics.
A wise position for the coach will be directly to the lifter’s side. This will allow the best perspective from which to judge the bar path and torso position. A vertical line of reference behind the lifter can be helpful, or one can be created between the coach and lifter with a length of PVC or bar held in place vertically.
Again, the mechanics of the dip and drive have not changed and all of the elements we looked for in the push jerk should be in place here as well. Once the bar passes the lifter’s head, we’ll look for a quick and aggressive push of the body forward through the arms and under the bar.
It’s common for athletes, even with the appropriate forward movement of the body as a whole, to fail to place the lead foot far enough forward. This is known as short-stepping and will result in more difficultly stabilizing the weight as it’s received, greater stress on the lead knee, and a weaker position from which to recover. If this is consistently a problem for a given lifter, dedicated footwork drills and a large volume of quality repetition should be employed before it becomes too much of a habit. Drawing a chalk line on the platform at the lifter’s toes in his or her starting position and then a line at the toe of the lead leg when at the proper depth can help by providing a visual cue until the movement becomes better ingrained.
The replacement of the feet on the platform in the split position will be slightly staggered—the back foot should hit an instant before the front. In this brief moment during which the athlete is again connected to the platform before the front foot hits will allow him or her to push off the back foot to finalize the forward drive of the body under the bar.
The feet hitting at exactly the same time is not necessarily problematic; if all other elements are in place, it’s not worth investing a great deal of time and effort to correct. The lead foot hitting first suggests that the lifter has not driven far enough through the arms, the bar has been pushed forward instead of vertically or even slightly backward, the lead foot is not far enough forward, or a combination of these faults. In other words, the lead foot hitting first is not a problem in and of itself, but indicative of other technique problems in need of correction.
Finally, the jerk demands a certain aggressiveness and confidence. It will be the most weight the lifter ever places overhead—with the exception perhaps of exercises such as jerk supports in which a bar is lifted from a rack a short distance—and consequently it has the tendency to instill potentially debilitating fear in the lifter as the attempts near maximal. Often an increase between attempts of a mere 2-3 kg will result in a dramatic change in technique due to the athlete’s lack of confidence and unwillingness to commit to the attempt. Practicing missing with lighter weights, performing heavy jerk supports, and jerking from behind the neck with greater loads than from the front are all excellent ways to build the lifter’s confidence and ensure more consistent technique with limit weights.
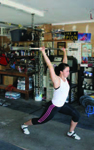
Split Jerk with proper recovery: lead foot back halfway first followed by the back foot forward the remaining distance
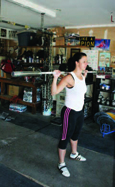
The push press is an intermediate movement combining elements of the press and the jerk. As a lift itself, it’s an excellent strength builder, allowing the athlete to press greater loads overhead with the assistance of more of the body than the arms and shoulders. As a progression toward the jerk, it introduces the lifter to the idea of initiating an upward drive of the bar with a dip and subsequent drive of the legs and hips, as well as the timing of transitioning between driving with the legs to pressing with the arms.
As we did with the press, we’ll first perform the push press from behind the neck. Again, this allows a vertical bar path to the overhead position, giving the athlete an opportunity to focus first on the dip and drive of the lift without being concurrently concerned with the bar path from the front.
With the bar racked securing on the back of the shoulders, the hands placed just outside shoulder width, and the feet in the drive position, the athlete needs to prepare for the dip and drive by taking in air and stabilizing the torso in the manner described earlier. This pressurization of the stomach is critical for success—an unstable torso will succumb to the tendency to collapse forward, shifting the athlete’s weight to the toes and redirecting the path of the bar forward, resulting in anything from a difficult to a failed lift.
The athlete will not be able to maintain a perfectly vertical torso with the bar behind the neck; this placement will necessitate a slight forward lean. However, this angle must be maintained throughout the dip and drive, which will keep the path of the bar vertical.
After filling the torso with air and tightening down the surrounding musculature, the athlete should pause a second or two to ensure stabilization has been achieved. Often a rush to commence the lift immediately after the breath or even as the breath is being finished will greatly reduce stability.
Once the lifter is stable, he or she will dip into the power position by bending at the knees only. As was discussed previously in regards to the power position, the actual depth will vary among athletes. There will be a point at which the athlete feels a fairly abrupt loss of strength—the ideal depth of the dip is just above this point. Because the transition from the eccentric dip to the concentric drive must be as rapid as possible, entering into a mechanically weak position is for obvious reasons ill advised.
The speed of the dip must balance the need to generate a stretch-shortening response to increase the subsequent concentric movement and the need to prevent separation of the bar from the lifter. If the dip is too quick, the lifter will drop out from underneath the bar. If the created space is significant enough, the bar will actually still be traveling down as the athlete is driving back up. Since it’s clearly more difficult to accelerate a downward traveling bar upward, the dip must be controlled to prevent this.
The transition must be powerful and the lifter must fight to prevent the torso from dropping forward. Once the direction has been reversed, the athlete will drive straight up with the legs and hips, attempting to achieve maximal acceleration of the bar. As the legs and hips near full extension, the arms must be brought in to continue the bar’s path upward. Timing this transition is key—pressing too early with the arms will prevent the full transfer of leg and hip power to the bar and leave more work to the weaker arms and shoulders, while waiting too long before initiating the press will mean needing to accelerate the bar after it has started slowing down following the powerful leg drive.
Athletes may rise onto their toes at the end of the leg extension. As was discussed earlier in regards to ankle extension in the pulls of the snatch and clean, this extension is neither necessary nor significantly helpful and potentially troublesome in terms of balance. It should be avoided as much as is possible without the avoidance limiting surrounding performance. If a lifter habitually extends the ankles in the push press in the absence of any other technique faults, it can be considered benign and should be left alone.
Overhead, the lifter must continue to attempt to drive the bar up even after the arms have reached full extension.
Push press behind the neck
Once the athlete can demonstrate competence with the push press behind the neck—meaning correct breathing, a solid dip, quick transition, and vertical bar path—we can move the bar to the front rack position.
The first order of business is establishing a new rack position that will be used for the push press and the jerk. At this point we have two—that of the clean and that of the press. For the clean, our priority is securing the bar on the shoulders and connecting it to the torso as closely as possible in order to support the load during recovery. For the press, our priority is placing the arms into the strongest position to drive the bar overhead. Because the push press and the jerk require both a secure connection to the torso and the ability to press the bar, we need to find a balance between the two rack positions.
We start with the clean rack because positioning the bar on the shoulders must take precedence over an advantageous pressing position of the arms. If the bar is not connected tightly to the torso, the transfer of power from the legs to the bar will be limited by the inability of the arms to withstand the forces and maintain the bar’s exact position relative to the torso—in other words, when the athlete transitions from the dip to drive of the legs, a bar held primarily in the arms will continue descending after the legs have begun extending again. This robs a great deal of the power generated by the legs from the bar and typically results in a shift of balance that does not bode well for a successful lift even if adequate force is transferred to the bar.
From the clean rack position, the athlete should essentially push the hands in as deeply under the bar and drop the elbows as near to vertical as possible without compromising the security of the bar’s position on the shoulders. For most athletes, the resulting position will have the elbows and hands near midpoint between their position in the clean and press racks—the actual positions will vary depending on each athlete’s arm segment lengths and flexibility. Again, the priority is the security of the bar on the shoulders. The initial force will be imparted to the bar by the legs and only after this will the responsibility for elevating the bar shift to the arms. Consequently, there is time to move the arms and hands into better pressing position during the transition of force from the legs to arms.
Once the proper rack position has been established, the lift is identical to the push press from behind the neck with the exception that the bar must be brought back into place overhead after it passes the lifter’s face. The bar path will be identical to that of the press with which the lifter is now familiar.
Cue the lifter to take in a proper breath and take a moment to settle and stabilize before initiating the dip. Watch the dip for the qualities established earlier—a gradual enough acceleration downward to prevent separation from the bar but enough speed to encourage a stretch reflex; proper depth; a quick transition from dip to drive with no horizontal shifting of the body or bar; a vicious and vertical drive of the bar; proper timing of the transition between leg and arm drive; vertical bar path until it passes the head and is brought back slightly; bar finishing in the proper overhead position; overhead position active and stable.
As a strength movement, the push press is excellent both for pressing strength and for developing improved dip depth and transition speed and timing. Athletes will be able to handle heavy loads, and once familiar with the lifts, should do so regularly in strength cycles. Heavy push presses will very quickly reveal weaknesses or technique flaws that can then be corrected.
As a stage in the jerk learning progression, once the athlete can demonstrate consistently correct movement, we can proceed to the push jerk.
Push Press
The Push Jerk
Whereas the snatch and clean involve first an upward pull of the bar followed by a downward pull of the body, the jerk begins with an upward push of the bar followed by a downward push of the body; the fundamental principle is the same—elevating and accelerating the bar as much as possible before rapidly shifting the body into a lower position in which to receive the load—only the specific actions have changed.
The push jerk—also known as the power jerk—is used by some weightlifters in competition, although its use is far less common than the split jerk because of it’s relative fore and aft instability and the limitations on depth. In order to be a successful power jerker, a lifter must be able to produce a very consistently precise bar path and be able to elevate the load relatively high. Typically the power jerk is limited to lifters with extraordinary leg and pressing strength.
Outside of a competitive jerking style, the push jerk is and excellent stage in the jerk learning progression. The press has introduced the athlete with the movement pattern of the arms and the overhead position, and the push press has taught the athlete to generate the initial acceleration of the bar with the legs and the transition between leg and arm drive. The push jerk introduces the idea of moving the body under the bar without the distraction of the dramatic foot placement transition of the split jerk.
Again, we’ll start with the bar behind the neck to allow a straight vertical bar path while focusing on the new elements. To further isolate the new segment of the lift, the athlete will press the bar approximately halfway up and pause. The only remaining movement is now is the push of the body underneath the bar. This exercise is can be called a tall jerk behind the neck.
Once the athlete has set this position and taken in a proper breath to stabilize, he or she will aggressively drive themselves down against the bar, replacing the feet in a receiving position identical to those of the snatch and clean. Commonly lifters will unintentionally replace their feet in excessively wide stances because of the perceived stability; the sooner this is noticed and corrected, the less of chance it will develop into a habit proving extremely difficult to break in the future.
The lockout of the elbows and the return of the feet to the platform should occur at approximately the same time. Invariably athletes will move the feet more quickly than the arms because they of course have far less distance to travel; extremely quick elbow extension, however, is a critical component of a successful jerk. A sense of viciousness must be instilled in the athlete at the outset, whether working with little or no weight or maximal loads.
The overhead receiving position should of course be no different than that of the snatch—the shoulders must be actively elevated with the shoulder blades retracted to create a tight and secure base for the arms. A habit of continued elbow extension effort should be encouraged at all stages of learning and with all weights. If an athlete is lazy with keeping the elbows extended, the receipt of heavier weights will prove unsuccessful and developing the habit is always more difficult later.
The depth of the receiving position will depend directly on the height the lifter has been able to elevate the bar, and therefore indirectly on the weight being lifted. When learning and training with light weights, such as those that can be easily pressed or push pressed, a reasonable depth should be achieved despite its being physically unnecessary to bring the bar overhead. Practicing the jerk with a particularly shallow receiving depth will typically result in trouble in the future when the athlete begins attempting to jerk with heavier loads and finds him- or herself unable to achieve an adequately deep receiving position.
In actual practice, of course, the lifter must receive the bar at whatever height necessary, just as he or she must do with a snatch or clean, to prevent the weight from crashing and becoming unstable, or potentially causing injury to the elbows and shoulders. That being the case, the actual depth of the receiving position will vary with every lift, even lifts of the same weight since it’s unlikely an athlete will accelerate the bar to an identical degree with every attempt.
Tall Jerk Behind the Neck
If an athlete is having trouble with the idea of pushing under the bar, this intermediate movement can be slowed down in order to allow a more controlled motion initially. Starting in the same half-press position, but with the feet already in the receiving stance, the lifter can slowly press him- or herself down into a quarter squat while locking out the elbows. The bar should remain at approximately the same height.
Once the bar has been received and stabilized in the proper position, the lifter will recover to a standing position with the arms remaining extended—the lift does not end until the athlete is standing fully again and the bar is stabilized overhead. At this point, the bar may be lowered for a subsequent rep.
When the lifter is able to perform this movement segment successfully, he or she can be progressed to a complete push jerk behind the neck.
The push jerk will now simply be a combination of the push press and the segment drill the athlete just performed. The lifter will place the feet in the drive position, take in air and stabilize the torso, then dip and drive the bar up as in the push press. When the lifter has extended the legs and accelerate the bar with them as much as possible, he or she will rapidly change directions and push him- or herself under the bar to receive it with locked arms in approximately a quarter squat depth with the feet in the receiving position.
Push Jerk Behind the Neck
Push Jerk
The leg extension does not have to be complete—the last few degrees of leg extension will not add any considerable force to the bar, and, just as in the second pulls of the snatch and clean, remaining extended for too long will reduce the amount of time the lifter has to get under the bar. That being said, it’s important that the athlete not cut the leg extension short and fail to elevate the bar as much as possible with the legs.
Once the bar has left the lifter’s back, the responsibility for continuing its drive up shifts to the arms with the assistance of the remaining momentum. At this time—the moment the bar leaves the shoulders—the movement of the feet to the receiving position will begin. With the feet no longer driving against the platform, the attempt to press the bar up will push the lifter down. However, with light training weights, the bar’s inertia will be very small relative to the lifter’s body, so the natural reaction will be much less than that seen with a fully loaded barbell. For this reason, in the early training stages, the movement will be somewhat contrived; that is, the force applied to the bar must be reduced to prevent simply push pressing it. This reduction of force should not be confused with a reduction of speed—that should remain the same.
When the athlete has become comfortable with the basic movement of the jerk, the bar can be moved to the front rack position. We’re now combining the dip and drive element of the push press, the drive under of the tall jerk, and the arm and hand positions and perfectly upright torso of the front rack.
With the bar now racked in the front, breathing becomes even more critical. The bar’s increased distance from its primary supporting structure, the back, results in a greater moment on the thoracic spine, magnifying the tendency for the athlete’s back to round forward under the load, particularly during the transition phase of the dip when the position must support a greater force. This demands the torso be stabilized with air pressure and muscular tension as much as possible.
The dip and drive phase of the lift is no different than from behind the neck with the exception that the torso can and must be kept completely vertical. Once the proper rack position is established—hands as deep and elbows dropped as much as possible without sacrificing the bar’s security on the shoulders—the athlete will draw in his or her breath and take a moment to settle and stabilize.
When the body is set, the lifter will initiate the dip. With the bar racked in the front, even more so than in the back, a smooth acceleration downward is necessary to prevent the bar from separating from the shoulders. Separation in the front will prove much more difficult to manage than in the back both because of the bar’s position farther from the spine as well as the relative lack of muscular padding to mitigate the crashing effect on the clavicles.
At the bottom of the dip, the tendency with the bar in front will be to shift forward. The lifter must fight this and may even feel like he or she is leaning backward when vertical. Often the athlete will unintentionally drop the elbows, which will encourage the bar to roll down the chest; the arms must remain in the same position throughout the dip and drive to ensure the bar’s placement on the shoulders.
It’s important that the lifter attempt to keep his or her weight focused toward the back of the feet throughout the movement. The athlete’s center of gravity will unavoidably shift forward slightly as he or she dips—if the weight is forward at the beginning of the movement, this shift will encourage the drive to tilt forward, pushing the bar away from the lifter.
After a quick and smooth transition, the lifter will need to drive the bar vertically with as much force and speed as possible. When in the learning stages and using light weights, the force will need to be reduced somewhat to allow a jerk—if the force is too great, the light weight will be overhead before the athlete even has a chance to drive under the bar. Even with a reduction of force, the speed should be maintained.
As the bar leaves the shoulders, the lifter will need to quickly pull his or her head back out of the way to allow an uninterrupted vertical line of travel past the head, after which the bar will be brought back slightly into its final position. At the same time, the feet will be off the platform and must be replaced in the receiving position as quickly and powerfully as possible. An audible clap with the shoes’ contact with the platform is desirable if the result of speed and aggressiveness, not excessive elevation. In the brief moment the feet are not driving against the platform, the athlete’s effort to drive the bar up will drive him or her down, allowing the arms to be locked out when the body settles in the receiving position under the bar.
Once the bar and lifter are stable in the receiving position, the athlete can return to standing with the bar overhead. Only once the feet are brought back in line with each other and the body is fully erect is the lift over.
The Split Jerk
The final step in the jerk progression is to switch to the split receiving position the lifter was acquainted with previously. This will typically allow the athlete to jerk the most weight because of the position’s wide base and stability in all directions and its ability to allow the athlete to assume a relatively low hip position with more than enough strength to arrest the downward force and to recover again to standing.
There are only two differences between the push or power jerk and the split jerk—the receiving position of the feet, of course, and the path of the bar.
With the split jerk, the lifter is able to manage loads well beyond his or her bodyweight. With two objects disconnected to the floor, such as a weightlifter and the barbell during the foot replacement phase of the jerk, force applied by one object to the other will move both objects; this is Newton’s Third Law: for every action, there is an equal and opposite reaction, the very principle that allows weightlifting to occur at all.
When a lifter jerks a barbell heavier than his or her own weight, the attempt to pull the barbell backward into its final overhead position will actually pull the lifter forward as well. The greater the weight of the barbell relative to the lifter, the farther the lifter will travel relative to the barbell. That is, a very heavy bar will travel nearly vertically while the lifter drives forward into place underneath it.
This being the case, we want to practice this movement irrespective of the barbell’s weight on a given rep. If we fail to do so, we add an unfamiliar element to an already difficult lift once we reach heavier loads—we want to train precisely as we intend to lift when it matters most. Possibly the most common reason for missed jerks is the lifter’s failure to commit to getting far under the bar and therefore being unable to support it even if perfect lockout of the arms is achieved.
The best cue for visualizing this forward movement I’ve heard is that used by Coach Mike Burgener, who describes to the lifter a plate of glass running vertically in front of the lifter directly through the bar when in its racked position. As the bar passes the lifter’s head—traveling directly up the plane described by the glass—he or she must drive the body through the glass to get under the bar.
Another way that has been effective for eliciting better movement is simply the idea of driving the body through the arms, much as the lifter does during a press or push press. However, in the case of the split jerk, this drive through is both slight forward leaning of the torso and actual forward movement of the support base.
At this point, the athlete is already familiar with the split receiving position and is reasonably capable of hitting it quickly and consistently from the drive position without a bar. The goal now is to introduce this forward movement of the body and coordinate it with the rest of the jerk mechanics.
A wise position for the coach will be directly to the lifter’s side. This will allow the best perspective from which to judge the bar path and torso position. A vertical line of reference behind the lifter can be helpful, or one can be created between the coach and lifter with a length of PVC or bar held in place vertically.
Again, the mechanics of the dip and drive have not changed and all of the elements we looked for in the push jerk should be in place here as well. Once the bar passes the lifter’s head, we’ll look for a quick and aggressive push of the body forward through the arms and under the bar.
It’s common for athletes, even with the appropriate forward movement of the body as a whole, to fail to place the lead foot far enough forward. This is known as short-stepping and will result in more difficultly stabilizing the weight as it’s received, greater stress on the lead knee, and a weaker position from which to recover. If this is consistently a problem for a given lifter, dedicated footwork drills and a large volume of quality repetition should be employed before it becomes too much of a habit. Drawing a chalk line on the platform at the lifter’s toes in his or her starting position and then a line at the toe of the lead leg when at the proper depth can help by providing a visual cue until the movement becomes better ingrained.
The replacement of the feet on the platform in the split position will be slightly staggered—the back foot should hit an instant before the front. In this brief moment during which the athlete is again connected to the platform before the front foot hits will allow him or her to push off the back foot to finalize the forward drive of the body under the bar.
The feet hitting at exactly the same time is not necessarily problematic; if all other elements are in place, it’s not worth investing a great deal of time and effort to correct. The lead foot hitting first suggests that the lifter has not driven far enough through the arms, the bar has been pushed forward instead of vertically or even slightly backward, the lead foot is not far enough forward, or a combination of these faults. In other words, the lead foot hitting first is not a problem in and of itself, but indicative of other technique problems in need of correction.
Finally, the jerk demands a certain aggressiveness and confidence. It will be the most weight the lifter ever places overhead—with the exception perhaps of exercises such as jerk supports in which a bar is lifted from a rack a short distance—and consequently it has the tendency to instill potentially debilitating fear in the lifter as the attempts near maximal. Often an increase between attempts of a mere 2-3 kg will result in a dramatic change in technique due to the athlete’s lack of confidence and unwillingness to commit to the attempt. Practicing missing with lighter weights, performing heavy jerk supports, and jerking from behind the neck with greater loads than from the front are all excellent ways to build the lifter’s confidence and ensure more consistent technique with limit weights.
Split Jerk with proper recovery: lead foot back halfway first followed by the back foot forward the remaining distance
| Greg Everett is the owner of Catalyst Athletics, publisher of The Performance Menu Journal and author of Olympic Weightlifting: A Complete Guide for Athletes & Coaches, Olympic Weightlifting for Sports, and The Portable Greg Everett, and is the writer, director, producer, editor, etc of the independent documentary American Weightlifting. Follow him on Facebook here. |
Search Articles
Article Categories
Sort by Author
Sort by Issue & Date
Article Categories
Sort by Author
Sort by Issue & Date