

The Clean: Part 2

Because of the difficulty of racking an essentially weightless implement such as a length of PVC, the lifter is probably already using a bar of some type. We may at this point transition to a regulation bar or simply continue using the present bar and venture into greater ranges of motion. This decision should be based on how easily the lifter is able to manage the weight of the bar being used. Ideally we want enough weight to give the lifter some feedback and allow more natural movements, but not enough weight to prevent the lifter from demonstrating proper technique—the athlete must earn weight increases.
Bailing Out
As with the snatch, there will be plenty of times when a clean is not completed successfully for any number of reasons and the athlete must safely discard the barbell. Unlike in the snatch, however, there is really only one option for bailing out of a clean—dumping the bar forward.
Before any weight is added to the bar, the lifter should practice and become familiar with this procedure. Have the athlete rack the bar on the shoulders and assume the bottom position of a front squat. Instruct him or her to then simultaneously push the bar forward from the shoulders and jump backward—the idea is to put distance between him- or herself and the bar to prevent it from crashing onto the thighs. This can and should be practiced from a variety of squat depths and from standing.
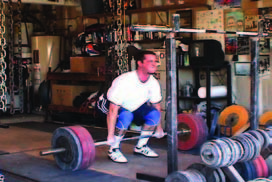
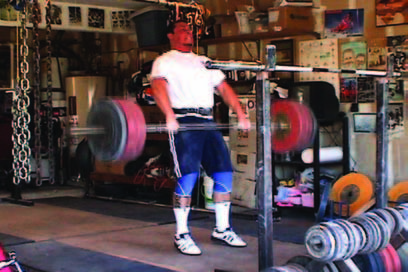
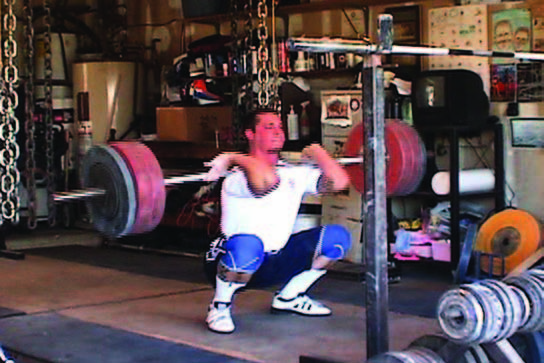
The Starting Position
The starting position for the clean is in its essence identical to that of the snatch—both adhere to the same basic principles. The only difference is the width of the grip and the consequent minor change in hip and shoulder height.
Start position of the Clean
Start position of the Snatch
The feet are of course in the pulling position—under the hips and toed out slightly. Until the bar leaves the platform, the lifter’s weight may be toward the balls of the feet, but as the plates leave the floor, the weight must quickly shift back toward the heels and remain there as long as possible. Imagining driving the heels through the floor can help encourage this habit.
The back is set tightly in a reverse arch to maximize its rigidity and therefore transfer as much force from the legs to the bar as well as protect the spinal joints from injury. The head is facing straight forward or even slightly downward if it doesn’t encourage the lifter to come forward onto the toes. The elbows are rotated to point outward and the arms are fully extended and being actively pulled into the body, but are not themselves tight.
Breathing should be essentially the same as any other heavy structural lifting—the abdomen and chest are filled with air and that air is held tightly during the movement to stabilize the torso as much as possible. Because in the starting position the abdomen is somewhat compressed, this is not the place to fill up with air. A common method of ensuring maximal air intake after setting the foot and hand positions is to briefly elevate the hips to open the abdomen, fill with air, and return to start the lift. This will allow more air to be taken in but will also allow the lifter to spend as much time as is necessary setting his or her starting position before the final breath.
The starting position must be tight—the transition between the starting position and the first pull does not involve transitioning from loose to tight. In other words, there should be no abrupt change in muscle tension at this point—it should be developed, maintained, and then accelerated as the lift begins. This leads to the idea of wedging: the athlete must force him- or herself into the starting position because it will not be one of comfort or relaxation. With the grip on the bar and the position of the feet set, the lifter pushes the hips into place as if her or she were driving a wedge. This will ensure the tight starting position we’re after.
There are two basic ways to achieve this wedge, expressed as either static or dynamic starts. With a static start, the lifter will place him- or herself into position and remain set for a moment before initiating the first pull. This approach has two primary advantages: first, for less experienced lifters, it of course allows the athlete to more carefully set the position and ensure its correctness; second, it allows time to develop more tension in the muscles prior to takeoff, in theory setting up for greater potential power in the pull. In a dynamic start, in contrast, the lifter sets the feet and grip, wedges, and immediately initiates the pull without hesitation in the final starting position. It’s common for dynamic starters to wedge past the final starting position, sometimes dramatically, and then return to it before pulling. This can be helpful to lifters with a tendency to begin with the hips too high.
The First Pull
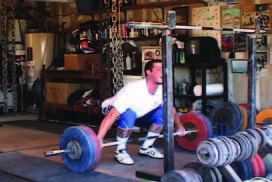
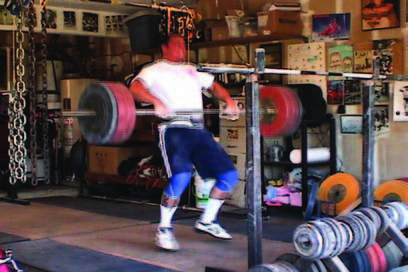
The first pull of the clean brings the barbell from its starting point at the shins to above the knee. This can be considered nothing more than a positioning movement—that is, its purpose is nothing more than to bring the barbell past the knees, the point at which the lift truly becomes explosive. Until the bar is above the knees, the movement is little more than a simple deadlift.

The back angle during the first pull should remain approximately the same as it was when the bar left the platform. Probably the most common tendency, particularly among athletes with long legs, is to elevate the hips more quickly than the shoulders. This shifts the load from the legs to the back more, putting the long-legged individual into a lifting position in which they’re more comfortable due to his or her relatively weak legs and strong back.
The problem with this habit is that this motion tends to bring the lifter’s center of mass forward. As the bar leaves the platform, the athlete may be perfectly balanced—but the rapid elevation of the hips is likely not compensated for by pushing them farther back to maintain the initial centering of the load. This brings the lifter onto the toes and the bar forward, both limiting the potential force generation of the legs and most likely resulting in a forward leaning receiving posture, making the recovery far more difficult if not impossible. Furthermore, if the lifter does manage to remain balanced properly, the upcoming scoop will be initiated from a point at which the bar is too high and will actually drop somewhat as the hips are driven forward. Not only does this eliminate any existing upward momentum of the bar and make the acceleration of the second pull much more difficult, but in competition this downward bar travel, known as hitching, is illegal.
The bar needs to be kept as close as possible to the shins as it rises. Ideally, it never actually touches the legs—any friction created by the bar sliding against the body obviously slows it down or at best requires more force to keep it moving at the same speed, so friction should be avoided if possible. However, friction from the bar sliding against the body is preferable to the bar drifting away from the body. It’s better to start with the bar touching and over time learn to keep it just off the body than to start with it too far outside and learn to bring it in.
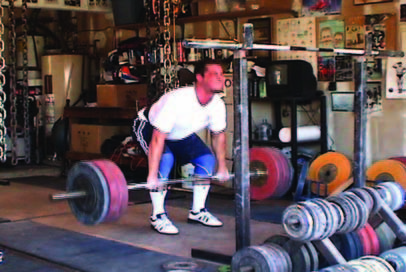
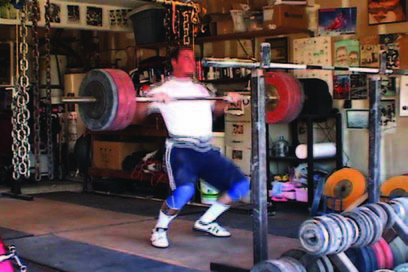
The Second Pull
The second pull begins when the bar passes the lifter's knees and the hips and knees begin to drive forward into the power position. As during the first pull, we want to keep the bar as close as possible to the thighs without it actually touching, but sliding up the thighs is preferable from the bar drifting away from the body.
As the bar reaches approximately mid-thigh, the scoop will begin, the hips driving forward, the knees re-bending slightly and the lifter entering the power position. The bar will and should contact the body as the hips move forward, but watch for excessive horizontal hip travel bumping the bar out from the body. From here, the hips and legs must be extended violently and vertically.
Even among lifters who extend their ankles during the second pull of the snatch, it’s rare to find one who does during the second pull of the clean, most likely because the bar doesn’t need to be elevated nearly as high and the weight is significantly greater. Likewise, lifters who tend to kick the feet back or elevate them excessively during the transition to the third pull are much less likely to do so during the clean.
Keeping the arms internally rotated to point the elbows outward in preparation for the third pull is just as important in the clean as in the snatch. It may be more important considering the tendency for athletes to try to lift the bar with the arms, and with the narrower hand placement of the clean, this is easier to do and consequently more common. With the elbows oriented to the sides, they must rise up and out, forcing the bar to remain close to the body.
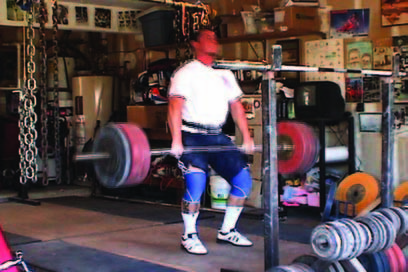
The Third Pull
The third pull brings the lifter under the bar and into the receiving position after the bar has reached its maximal acceleration. The most critical point of the clean’s third pull is the path of the elbows. The clean is not a curl in which the bar travels around the elbows—the elbows must travel around the bar. If the arms have remained internally rotated throughout the lift to this point, this will be relatively easy. If the elbows are allowed to rotate in, they will invariably be pulled to the lifter’s sides and become set pivot points for the arms, resulting in the bar swinging out from the body. If the elbows are pulled high and to the sides instead, the bar will continue traveling up close to the body. The bar will then become the pivot point and the elbows can be swung around it and into their final position pointed forward as they would be for a front squat.
This elbow movement must be extremely quick. If the elbows don’t come around quickly enough, the lifter will find him- or herself in a deep squat with a bar resting in the arms—with the exception of light weights, this will simply not work. Even if the bar is racked on the shoulders, low elbows will likely allow the upper back to round forward, at best making the recovery from the squat far more difficult than it needs to be, and at worst causing the lifter to drop the bar.
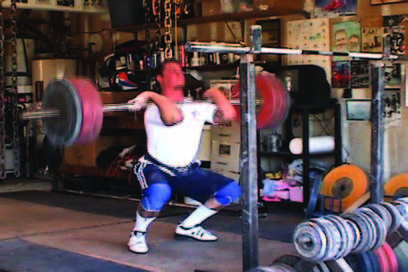
Receiving the Bar
The completion of the third pull will place the lifter in a front squat. Depending on how high the bar was pulled, the depth of the squat will vary. We want the pull to be high enough to allow at least some eccentric squatting prior to the recovery—this will allow the lifter to bounce out of the hole, accelerating through a very difficult portion of the movement. As was discussed in the previous squat section, this bounce is not the result of the athlete collapsing into the bottom of the squat—the entire body is tight and the torso pressurized with air. The bounce is the result of the stretch-shortening reflex and immediate initiation of the squat recovery.
The recovery of the clean is no different than a front squat with the exception of the usually greater bounce from the bottom. The lifter’s weight should be driving primarily through the heels and the glutes activated aggressively. The back must be arched tightly, keeping the chest up and the bar racked securely on the shoulders. Actively driving the elbows up can help bring the lifter up from the squat and will encourage the upright torso and tight back.
As the lifter is standing, the hips must be pushed in to keep the torso as upright as possible. Allowing the hips to rise prematurely will tilt the torso forward, reducing the security of the bar’s position on the shoulders and increasing the moment on the back, resulting in it rounding forward and potentially causing the lifter to drop the bar. As always, keep the hips and shoulders rising at the same rate.
Next Time
We’ll be back in the next issue with some clean assistance exercises to wrap up the clean series. After that, it’s on to the jerk.
Bailing Out
As with the snatch, there will be plenty of times when a clean is not completed successfully for any number of reasons and the athlete must safely discard the barbell. Unlike in the snatch, however, there is really only one option for bailing out of a clean—dumping the bar forward.
Before any weight is added to the bar, the lifter should practice and become familiar with this procedure. Have the athlete rack the bar on the shoulders and assume the bottom position of a front squat. Instruct him or her to then simultaneously push the bar forward from the shoulders and jump backward—the idea is to put distance between him- or herself and the bar to prevent it from crashing onto the thighs. This can and should be practiced from a variety of squat depths and from standing.
The Starting Position
The starting position for the clean is in its essence identical to that of the snatch—both adhere to the same basic principles. The only difference is the width of the grip and the consequent minor change in hip and shoulder height.
Start position of the Clean
Start position of the Snatch
The feet are of course in the pulling position—under the hips and toed out slightly. Until the bar leaves the platform, the lifter’s weight may be toward the balls of the feet, but as the plates leave the floor, the weight must quickly shift back toward the heels and remain there as long as possible. Imagining driving the heels through the floor can help encourage this habit.
The back is set tightly in a reverse arch to maximize its rigidity and therefore transfer as much force from the legs to the bar as well as protect the spinal joints from injury. The head is facing straight forward or even slightly downward if it doesn’t encourage the lifter to come forward onto the toes. The elbows are rotated to point outward and the arms are fully extended and being actively pulled into the body, but are not themselves tight.
Breathing should be essentially the same as any other heavy structural lifting—the abdomen and chest are filled with air and that air is held tightly during the movement to stabilize the torso as much as possible. Because in the starting position the abdomen is somewhat compressed, this is not the place to fill up with air. A common method of ensuring maximal air intake after setting the foot and hand positions is to briefly elevate the hips to open the abdomen, fill with air, and return to start the lift. This will allow more air to be taken in but will also allow the lifter to spend as much time as is necessary setting his or her starting position before the final breath.
The starting position must be tight—the transition between the starting position and the first pull does not involve transitioning from loose to tight. In other words, there should be no abrupt change in muscle tension at this point—it should be developed, maintained, and then accelerated as the lift begins. This leads to the idea of wedging: the athlete must force him- or herself into the starting position because it will not be one of comfort or relaxation. With the grip on the bar and the position of the feet set, the lifter pushes the hips into place as if her or she were driving a wedge. This will ensure the tight starting position we’re after.
There are two basic ways to achieve this wedge, expressed as either static or dynamic starts. With a static start, the lifter will place him- or herself into position and remain set for a moment before initiating the first pull. This approach has two primary advantages: first, for less experienced lifters, it of course allows the athlete to more carefully set the position and ensure its correctness; second, it allows time to develop more tension in the muscles prior to takeoff, in theory setting up for greater potential power in the pull. In a dynamic start, in contrast, the lifter sets the feet and grip, wedges, and immediately initiates the pull without hesitation in the final starting position. It’s common for dynamic starters to wedge past the final starting position, sometimes dramatically, and then return to it before pulling. This can be helpful to lifters with a tendency to begin with the hips too high.
The First Pull
The first pull of the clean brings the barbell from its starting point at the shins to above the knee. This can be considered nothing more than a positioning movement—that is, its purpose is nothing more than to bring the barbell past the knees, the point at which the lift truly becomes explosive. Until the bar is above the knees, the movement is little more than a simple deadlift.
The back angle during the first pull should remain approximately the same as it was when the bar left the platform. Probably the most common tendency, particularly among athletes with long legs, is to elevate the hips more quickly than the shoulders. This shifts the load from the legs to the back more, putting the long-legged individual into a lifting position in which they’re more comfortable due to his or her relatively weak legs and strong back.
The problem with this habit is that this motion tends to bring the lifter’s center of mass forward. As the bar leaves the platform, the athlete may be perfectly balanced—but the rapid elevation of the hips is likely not compensated for by pushing them farther back to maintain the initial centering of the load. This brings the lifter onto the toes and the bar forward, both limiting the potential force generation of the legs and most likely resulting in a forward leaning receiving posture, making the recovery far more difficult if not impossible. Furthermore, if the lifter does manage to remain balanced properly, the upcoming scoop will be initiated from a point at which the bar is too high and will actually drop somewhat as the hips are driven forward. Not only does this eliminate any existing upward momentum of the bar and make the acceleration of the second pull much more difficult, but in competition this downward bar travel, known as hitching, is illegal.
The bar needs to be kept as close as possible to the shins as it rises. Ideally, it never actually touches the legs—any friction created by the bar sliding against the body obviously slows it down or at best requires more force to keep it moving at the same speed, so friction should be avoided if possible. However, friction from the bar sliding against the body is preferable to the bar drifting away from the body. It’s better to start with the bar touching and over time learn to keep it just off the body than to start with it too far outside and learn to bring it in.
The Second Pull
The second pull begins when the bar passes the lifter's knees and the hips and knees begin to drive forward into the power position. As during the first pull, we want to keep the bar as close as possible to the thighs without it actually touching, but sliding up the thighs is preferable from the bar drifting away from the body.
As the bar reaches approximately mid-thigh, the scoop will begin, the hips driving forward, the knees re-bending slightly and the lifter entering the power position. The bar will and should contact the body as the hips move forward, but watch for excessive horizontal hip travel bumping the bar out from the body. From here, the hips and legs must be extended violently and vertically.
Even among lifters who extend their ankles during the second pull of the snatch, it’s rare to find one who does during the second pull of the clean, most likely because the bar doesn’t need to be elevated nearly as high and the weight is significantly greater. Likewise, lifters who tend to kick the feet back or elevate them excessively during the transition to the third pull are much less likely to do so during the clean.
Keeping the arms internally rotated to point the elbows outward in preparation for the third pull is just as important in the clean as in the snatch. It may be more important considering the tendency for athletes to try to lift the bar with the arms, and with the narrower hand placement of the clean, this is easier to do and consequently more common. With the elbows oriented to the sides, they must rise up and out, forcing the bar to remain close to the body.
The Third Pull
The third pull brings the lifter under the bar and into the receiving position after the bar has reached its maximal acceleration. The most critical point of the clean’s third pull is the path of the elbows. The clean is not a curl in which the bar travels around the elbows—the elbows must travel around the bar. If the arms have remained internally rotated throughout the lift to this point, this will be relatively easy. If the elbows are allowed to rotate in, they will invariably be pulled to the lifter’s sides and become set pivot points for the arms, resulting in the bar swinging out from the body. If the elbows are pulled high and to the sides instead, the bar will continue traveling up close to the body. The bar will then become the pivot point and the elbows can be swung around it and into their final position pointed forward as they would be for a front squat.
This elbow movement must be extremely quick. If the elbows don’t come around quickly enough, the lifter will find him- or herself in a deep squat with a bar resting in the arms—with the exception of light weights, this will simply not work. Even if the bar is racked on the shoulders, low elbows will likely allow the upper back to round forward, at best making the recovery from the squat far more difficult than it needs to be, and at worst causing the lifter to drop the bar.
Receiving the Bar
The completion of the third pull will place the lifter in a front squat. Depending on how high the bar was pulled, the depth of the squat will vary. We want the pull to be high enough to allow at least some eccentric squatting prior to the recovery—this will allow the lifter to bounce out of the hole, accelerating through a very difficult portion of the movement. As was discussed in the previous squat section, this bounce is not the result of the athlete collapsing into the bottom of the squat—the entire body is tight and the torso pressurized with air. The bounce is the result of the stretch-shortening reflex and immediate initiation of the squat recovery.
The recovery of the clean is no different than a front squat with the exception of the usually greater bounce from the bottom. The lifter’s weight should be driving primarily through the heels and the glutes activated aggressively. The back must be arched tightly, keeping the chest up and the bar racked securely on the shoulders. Actively driving the elbows up can help bring the lifter up from the squat and will encourage the upright torso and tight back.
As the lifter is standing, the hips must be pushed in to keep the torso as upright as possible. Allowing the hips to rise prematurely will tilt the torso forward, reducing the security of the bar’s position on the shoulders and increasing the moment on the back, resulting in it rounding forward and potentially causing the lifter to drop the bar. As always, keep the hips and shoulders rising at the same rate.
Next Time
We’ll be back in the next issue with some clean assistance exercises to wrap up the clean series. After that, it’s on to the jerk.
| Greg Everett is the owner of Catalyst Athletics, publisher of The Performance Menu Journal and author of Olympic Weightlifting: A Complete Guide for Athletes & Coaches, Olympic Weightlifting for Sports, and The Portable Greg Everett, and is the writer, director, producer, editor, etc of the independent documentary American Weightlifting. Follow him on Facebook here. |
Search Articles
Article Categories
Sort by Author
Sort by Issue & Date
Article Categories
Sort by Author
Sort by Issue & Date