

Olympic Weightlifting – The Pulling Movements
There’s no argument that Olympic Weightlifting movements are some of the most dynamic, explosive and athletically beneficial exercises for fitness or strength enthusiasts. The problem that exists is that many tend to overcomplicate the lifts when there is absolutely no need to do so. Of course, that may seem easy for the experienced Olympic Weightlifter to say. However, I still have clear memory of learning the lifts with a highly specialized coach as a child, and it was taught to me in a simple way—which is exactly how I instruct today. As a coach who conducts seminars, group training, private lessons, and daily sessions with athletes, I’ve developed a manner of teaching that people feel is dumbed down, due to my purposeful intent to communicate highly technical movements in a manner that is comprehensible to the athlete. It is a frustrating thing to watch coaches and/or the novice overthink and overcomplicate the lifts, which ultimately is counterproductive to execution of the lift at any degree of accuracy.
Of all the elements included in both the Snatch and Clean+Jerk, the most important is indisputably the pulling movement of each lift. Seemingly, this is why so much attention is paid to this segment of the lift. If you’re reading this Journal, you probably have been exposed to the literal definition of the Olympic Movements on more than one occasion, whether from your coach, other coaches, books or some other way. The information below outlines how I teach the pulling movements—without regard to the biomechanical aspects of how it is done. You already know that information. Now, let me provide some real-life perspective.
Lift Off
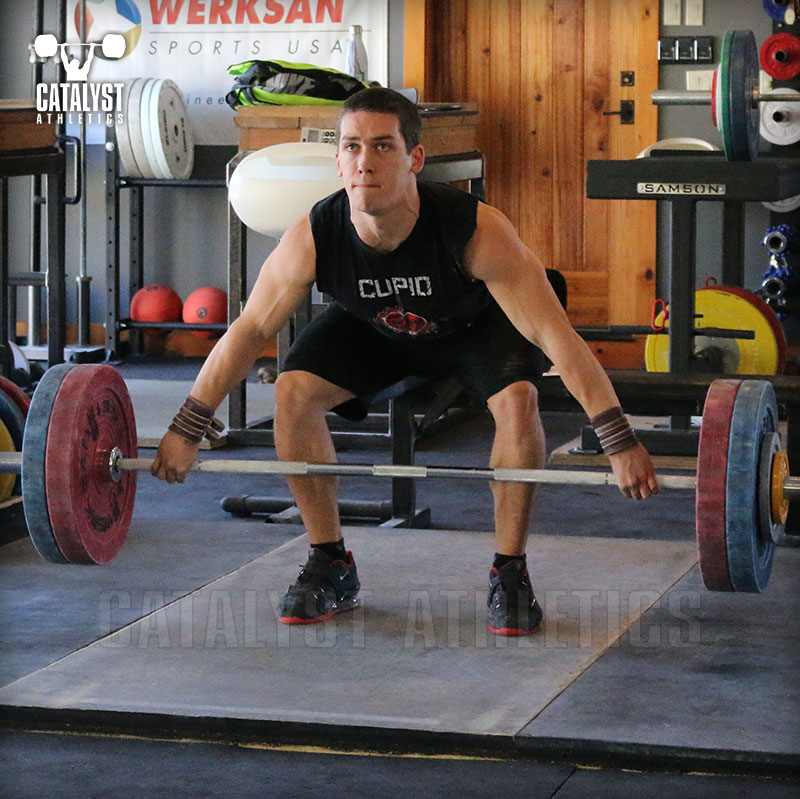
Most commonly referred to as the “First Pull,” the lift off, as I refer to it in my gym, can be an odd thing to get comfortable with as a beginner. Primarily, simply getting set at the bar can expose many areas where an athlete may need development in coordination, flexibility and/or strength. The idea of bending over to reach the barbell that sits only at the height of the mid-low shin while keeping the back straight or arched may seem challenging if not impossible for the novice. Let’s face it. It feels weird. It is an odd position that people have usually never tried until they walk into an Olympic Weightlifting session. As a coach, you have to acknowledge that to your beginner or elite athlete and work with them to gain confidence while set at the bar. If an athlete doesn’t start correctly, they certainly won’t finish correctly. Some items to focus on as your athlete is learning this position involve an explanation of what happens to the knees and arms from the set position to the lift off as well as what to think about as force is put on the bar.
First, let’s address where we want the bar to go once we have lifted it off the ground. In theory, the path of the barbell should travel straight up in an imaginary vertical line. Yes, there is some variation but, regardless, that’s the idea. It is the “path of least resistance”—a phrase with which most people are familiar. Most people, however, are not familiar with a description of center of gravity, force vectors or recalling their 11th grade physics class. Remember what we are talking about? Simplification of the explanation. Draw on your own personal experiences to explain a movement to your athlete. Trust me, they will appreciate it.
As an example, picture watching a lifter from the side as they are in the set position prior to executing a Snatch or Clean+Jerk. Now, take a stick, PVC or broom and hold it vertically next to the lifter with the bottom touching the bar. This provides a visual demonstration of the straight line. Teach the athlete to keep the bar on that line, showing them that it is they who must move around the bar. This tactile and visual method proves to be extremely effective. I teach my athletes that the goal of weightlifting is to have the barbell weigh more than them, if not two times as much as them one day. As we know, it is impossible to handle such weight on any horizontal plane or S-curve path. So teach the athlete that they only way for the bar to stay on that vertical stick you are holding is that they must manipulate themselves around the barbell they are holding while they are lifting off of the ground. Keep that in mind as we continue discussing the pulling movements.
Now that we have established the correct bar path, let’s address the knees. As the athlete begins to lift, it is imperative that the lifter makes every effort to shift the knees out of the way of the bar. Yes, it is possible to lift vertically while shifting the knees out of the bar’s path. To note, I am not referring to the infamous “Double Knee Bend”—which I intend to discuss very soon. As the lifter begins pulling, teach them early to do everything possible to clear the path of the bar. In fact, in my experience, most athletes teach themselves about this when they bang their knees with the bar. Sometimes mistakes make great teachers!
If the athlete has the opposite problem of keeping the bar too far away from them, you have a new problem to fix before you discuss the knees. Coaches could choose to delve into center of gravity issues or planes, force vectors or any of a number of scientific explanations of why this is a problem. I find most of my clients begin to look dazed if I go that route. Rather, I use the grocery bag or backpack theory. Would you carry your groceries away from your body or hold them in as close as possible? Chances are the light goes on in the athlete’s mind about keeping the bar close to them.
Onto the arms. During lift off, the arms should be tensed but straight. By now, as coaches, we are very aware of this. Any premature bending of the arms and there will be problems later down the line. As Mike Burgener would say, “When the arms bend, the power ends.” This is so true. It is my belief that every part of the Oly lift depends on the one before it. Deviate from a proper position and the next position will have some making up to do. Some coaches use cues such as “think of your arms as ropes” or “lock out your arms and keep them straight” (not the best idea since you want some tension). The truth of the matter in this one is this: there is no secret trick to teach someone to keep from bending the arms too soon. Simply tell them not to do it. If you’re teaching the proper positions before moving on and blending them together, then they should have mastered the straight arms anyway. Use video or coaching correction so the athlete eventually recognizes when the arms bend too soon. Nothing to over-think here or stress about. Practice, practice, practice until the athlete can perform the straight arm pull. There’s only one place the arms should bend and it’s at the finishing stages of the pull. The athlete will eventually recognize the difference. And recognition is the first huge step to fixing the problem.
Lastly, regarding the total movement of the body and bar combined, I teach athletes that hips-and-bar move at the same rate vertically. In other words, “butt and bar”. I then demonstrate this, and then allow the athlete to slowly practice this movement. Have the lifter get into the starting position and then lift the bar 4 inches off of the ground, and then lower it and repeat. If the athlete’s hips are moving too early, you can put your hand on their hips and push down on them when they come up to fast. Tactile coaching is often incredibly useful. Of course, please be respectful of personal differences and gender differences when actually touching an athlete. By teaching the athlete to lift their hips and bar at the same time and at the same rate, it will allow for perfect posture leading into the transition phase of the pulling movements. Lifting the hips faster than the rate of the bar will leave the bar velocity a little slow, causing it to be difficult to gain the acceleration needed for the lift. Conversely, lifting the bar faster than the rate of the hips, which I can’t say I’ve seen much of in my career, will prevent the shoulders from being in advance of the bar and cause a host of other issues with bar trajectory.
Now, if you’ve studied the lifts long enough you’ll know that this “hips and bar” statement would contradict what occurs during the Double Knee Bend. It may, but as mentioned previously, the Double Knee Bend technique will be discussed later.
A trick I tell my athletes who are going heavy is to never get discouraged by the feel of the first pull; it will feel slow and heavy. Have you ever attempted a 1RM in either Snatch or Clean+Jerk and felt the weight of it immediately on lift off? You may immediately let your mind jump to “There’s no way! It’s too heavy.” Well, if you had that thought then you were right; you have already defeated yourself. An athlete needs to remember that the first pull is not the most important of all pulling movements but rather it is the set up for the most critical movement. It serves to direct the bar into the correct location for the truly crucial step: the transition into second pull. Teach athletes to ignore the heavy feel of the first pull. That is, if it’s heavy, if it’s slow, it’s supposed to be! Remember it is a new 1RM for the athlete. If it were easy, then it wouldn’t be a max. Embrace the fact that heavy weights will feel heavy and slow on lift off, and block it out. Then the athlete can maintain proper posture and discipline and have more confidence going into the next phase when he or she explodes vertically on the jump, or second pull. It is almost certain that a slow and heavy first pull will still translate to a successful lift, so long as the transition and second pull are powerful and executed thoroughly.
Transition
This is the phase where the lifter pulls the bar into their upper thighs while shifting their hips forward toward the bar in an attempt to prepare for what’s called the “Second Pull”. The old school term for the transition was the “scoop.” I’ve also heard the term “pockets” or “banging off the thighs.” I prefer to call it either the “transition” or the “Power Position.” Speaking of “banging off the thighs,” it isn’t advisable to teach the novice how to pop the bar from the thighs in an effort to gain propulsion. In fact, the topic should be avoided. Making contact with the bar in this fashion is, like the Double Knee Bend, a high level concept that should be saved for when the athlete has more experience with the lifts. If the athlete is taught how to transition properly, or enter the Power Position correctly, then what is meant by “banging the thighs” will occur on its own with little effort by the athlete. Yes, making contact with the upper thighs, or in some anatomical frames, the lower abdomen, is hugely advantageous but I never teach to “bang” the bar against your leg. All my athletes “bang the thighs” eventually but trying to do so too soon will cause the athlete to focus on that one aspect far too much. It will ruin the overall timing of the lift and definitely cause premature bending of the arms.
As you might have been able to ascertain from this article, I believe in visual and tactile forms of coaching as much as possible. A visual cue for an athlete on whether or not they are “banging” the bar or not is to ask them to look at the marks on their upper thighs after a practice. If they are bruised at all, they are banging the bar. If they have red marks, the amount of contact is probably good most times with a few times of too much banging. This is also a good visual indicator of where the athlete is making contact which correlates to whether or not they are actually hitting the Power Position correctly. If there are red marks from your knee to your hips, the athlete is performing the transition and second pull inconsistently. If the marks are in one place on the upper thigh you know they are both consistent and in the right place.
After teaching the posture of the first pull, coaches should show athletes how to actively pull the bar in while shifting the hips forward. Notice I did not say shift the knees forward. Providing the knees had been moved away from the path of the bar, they should be brought back under the bar but by way of the hips coming forward rather than the knees. Why? Because it will allow the athlete to time the placement of the bar-to-thigh position prior to the second pull perfectly.
Now, on to the Double Knee Bend. I’ll preface this section by saying that the Double Knee Bend is not a poor tactic to incorporate into The Lifts but rather something saved for experienced lifters taught by experienced coaches. It certainly works for the Chinese and for many elite world competitors. However, teaching it to a beginner serves only to increase the chances of a coach overcomplicating the movements. The novice is already flooded with numerous technical aspects of all the positions necessary to execute the lift. Teaching them to lift the hips up high, practically straightening the knees, then re-bending the knees under the bar in order to extend for the second pull is certainly a high level concept requiring better than average motor skills, coordination and flexibility. In addition, the Double Knee Bend places the athlete at risk of (a) slowing the acceleration of the bar (which will be mentioned later), (b) confusing the concept of the imaginary line of symmetry mentioned previously, especially during the second pull, and (c) effecting the “timing” at which the athlete gets under the bar whether in the overhead squat position for the snatch or the rack position of the clean.
I do not teach the Double Knee Bend to any of my athletes. Some will automatically perform it naturally, without discussion. Those who do not are taught exactly as I have outlined above. Again, the Double Knee Bend is a very unique and efficient tactic in Olympic Weightlifting. Those coaches who swear by it and only teach in this manner most likely have a ton of experience in the sport. I know many of them personally and have had this discussion with them. I just do not believe that it should be taught to beginners and athletes who have become elite without it. Why change something if it’s not broken?
Final Pulling Movements
Once the athlete has entered the Power Position, it is time for the most powerful and explosive part of the lift – The Second Pull. You may recognize when a lifter is entering this position because you will hear most coaches screaming similar terms to their athlete. The most common coaching cue used for this is “Finish!” A very nice term that if I had just a penny for each time I’ve heard it, and certainly used it myself, I would be filthy rich. I also like the term “Extend,” which I took from my first coach and mentor, Coach Bill “Mac” McDaniel.
As mentioned previously, every position depends on the one before it. Providing the athlete has maintained discipline during the first pull (meaning they maintained proper posture, regardless of the weight on the bar, then shifted the bar into their hips while driving hips forward), then they should be in an almost perfectly erect torso, knees bent, ready to jump (or execute a triple joint extension). After their full body is extended, teach them to engage the arms by pulling the bar. I teach my athletes to aim for their chin or to look like a scarecrow. When they look at me oddly I reassure them that by the time the bar reaches their chin, they’ll be under it or have it racked on their shoulders depending on the lift. I try to eliminate their fear that I’m asking them to decapitate themselves but I can tell you, just like hitting your knees, if you make contact on your face with the bar you’ll probably only make that mistake once!
Now, here’s an example of how beginners tend to overcomplicate the second pull. I recently trained the owner of a CrossFit gym who, like many Crossfiters, wished to use the lifts more for training clients. During the explanation of the second pull, the owner says “Right, so I must ensure I execute the ankle, knee, hip extension all the way, right? In that order?” This person told me he read about it somewhere and was taught to make sure the “triple joint extension” was performed. My response was simply to say, “Just jump! As powerfully as you can.” I explained that it’s simpler to think of jumping vertically, as the extension of those joints would occur naturally anyway. It was evident that the owner was executing every lift while focusing too hard on all three joints, one at a time, to ensure they each extended in sequence. As a result, as any experienced Olympic Weightlifter would tell you, it slowed the movement down. This concept is too complicated, too segmented. When the bar gets to your thighs, jump. Your body will know what to do.
Now, every article written about the second pull must, at some point, mention the shrug. I’ve heard coaches over and over again stress the shrug. For some, it’s more of a focus than the first pull or even the transition. Shrug! Shrug! Shrug! In our gym, I don’t even mention it when teaching. Not even to my elite athletes. Shrugging occurs naturally when lifting weight overhead. Take a random person off the street and ask them to lift any reasonable object over their head, by keeping the object fairly close to the body (as opposed to the motion of a Kettlebell swing). I guarantee you they will shrug their shoulders to some extent in order to aid their arms.
That said, the shrug during the second pull, in the specific manner with which is necessary for these lifts, is a fine motor skill. Some may argue that, but we’re not asking the athlete to shrug slowly, as in a common friendly gesture saying, “I don’t know.” We’re asking the athlete to shrug shoulders as high, quick and explosively as possible. Not easy for the novice. Furthermore, I’ve witnessed too many beginners focus so much on shrugging that (a) they perform it too early during the lift, removing its benefit from the equation when it is most needed (remember each position depends on the one before it) and (b) it slows the overall speed of the lift. So don’t worry about the shrug. It’s happening anyway. Making it a large focus ruins the timing.
Conclusion
Once the above elements from the lift off, to the first pull, into the transition, then the explosive extension of the second pull are executed in sequence, the barbell should be weightless. For a fraction of a second, it will be suspended in the air, as though gravity is no longer affecting the bar. This is when the athlete positions themselves under the bar as aggressively as possible. When reading these steps, it’s important to remember that there is no slow motion in either the Snatch or Clean+Jerk.
Though important to break down the positions before attempting to blend them all together for speed and efficiency, the ultimate goal is to execute all phases of the pulling movements with constant acceleration. As speed and power in cars is measured by the results of a 0 mph - 60 mph test, so should Olympic lifting movements. If we use the 0 mph - 60 mph analogy, the bar begins at 0 mph when it is on the platform. As the lift off occurs, the barbell is constantly accelerating so that it hits 60 mph immediately following the transition into the second pull. If done correctly, it won’t matter if the top of the bar’s trajectory is as high as the athlete’s chest or the belly button, he/she will have just enough time to get underneath it in the overhead squat position or rack position before it reverses direction due to gravity.
The technical proficiency needed to execute the Snatch and Clean+Jerk correctly is what makes this an Olympic sport. Development of these movements takes time, practice and determination by both the coach and the athlete. There will be plenty of time down the line to increase specificity as the athlete is exposed to the lifts, but I highly recommend that any coach keep it as simple as possible for as long as possible.
Of all the elements included in both the Snatch and Clean+Jerk, the most important is indisputably the pulling movement of each lift. Seemingly, this is why so much attention is paid to this segment of the lift. If you’re reading this Journal, you probably have been exposed to the literal definition of the Olympic Movements on more than one occasion, whether from your coach, other coaches, books or some other way. The information below outlines how I teach the pulling movements—without regard to the biomechanical aspects of how it is done. You already know that information. Now, let me provide some real-life perspective.
Lift Off
Most commonly referred to as the “First Pull,” the lift off, as I refer to it in my gym, can be an odd thing to get comfortable with as a beginner. Primarily, simply getting set at the bar can expose many areas where an athlete may need development in coordination, flexibility and/or strength. The idea of bending over to reach the barbell that sits only at the height of the mid-low shin while keeping the back straight or arched may seem challenging if not impossible for the novice. Let’s face it. It feels weird. It is an odd position that people have usually never tried until they walk into an Olympic Weightlifting session. As a coach, you have to acknowledge that to your beginner or elite athlete and work with them to gain confidence while set at the bar. If an athlete doesn’t start correctly, they certainly won’t finish correctly. Some items to focus on as your athlete is learning this position involve an explanation of what happens to the knees and arms from the set position to the lift off as well as what to think about as force is put on the bar.
First, let’s address where we want the bar to go once we have lifted it off the ground. In theory, the path of the barbell should travel straight up in an imaginary vertical line. Yes, there is some variation but, regardless, that’s the idea. It is the “path of least resistance”—a phrase with which most people are familiar. Most people, however, are not familiar with a description of center of gravity, force vectors or recalling their 11th grade physics class. Remember what we are talking about? Simplification of the explanation. Draw on your own personal experiences to explain a movement to your athlete. Trust me, they will appreciate it.
As an example, picture watching a lifter from the side as they are in the set position prior to executing a Snatch or Clean+Jerk. Now, take a stick, PVC or broom and hold it vertically next to the lifter with the bottom touching the bar. This provides a visual demonstration of the straight line. Teach the athlete to keep the bar on that line, showing them that it is they who must move around the bar. This tactile and visual method proves to be extremely effective. I teach my athletes that the goal of weightlifting is to have the barbell weigh more than them, if not two times as much as them one day. As we know, it is impossible to handle such weight on any horizontal plane or S-curve path. So teach the athlete that they only way for the bar to stay on that vertical stick you are holding is that they must manipulate themselves around the barbell they are holding while they are lifting off of the ground. Keep that in mind as we continue discussing the pulling movements.
Now that we have established the correct bar path, let’s address the knees. As the athlete begins to lift, it is imperative that the lifter makes every effort to shift the knees out of the way of the bar. Yes, it is possible to lift vertically while shifting the knees out of the bar’s path. To note, I am not referring to the infamous “Double Knee Bend”—which I intend to discuss very soon. As the lifter begins pulling, teach them early to do everything possible to clear the path of the bar. In fact, in my experience, most athletes teach themselves about this when they bang their knees with the bar. Sometimes mistakes make great teachers!
If the athlete has the opposite problem of keeping the bar too far away from them, you have a new problem to fix before you discuss the knees. Coaches could choose to delve into center of gravity issues or planes, force vectors or any of a number of scientific explanations of why this is a problem. I find most of my clients begin to look dazed if I go that route. Rather, I use the grocery bag or backpack theory. Would you carry your groceries away from your body or hold them in as close as possible? Chances are the light goes on in the athlete’s mind about keeping the bar close to them.
Onto the arms. During lift off, the arms should be tensed but straight. By now, as coaches, we are very aware of this. Any premature bending of the arms and there will be problems later down the line. As Mike Burgener would say, “When the arms bend, the power ends.” This is so true. It is my belief that every part of the Oly lift depends on the one before it. Deviate from a proper position and the next position will have some making up to do. Some coaches use cues such as “think of your arms as ropes” or “lock out your arms and keep them straight” (not the best idea since you want some tension). The truth of the matter in this one is this: there is no secret trick to teach someone to keep from bending the arms too soon. Simply tell them not to do it. If you’re teaching the proper positions before moving on and blending them together, then they should have mastered the straight arms anyway. Use video or coaching correction so the athlete eventually recognizes when the arms bend too soon. Nothing to over-think here or stress about. Practice, practice, practice until the athlete can perform the straight arm pull. There’s only one place the arms should bend and it’s at the finishing stages of the pull. The athlete will eventually recognize the difference. And recognition is the first huge step to fixing the problem.
Lastly, regarding the total movement of the body and bar combined, I teach athletes that hips-and-bar move at the same rate vertically. In other words, “butt and bar”. I then demonstrate this, and then allow the athlete to slowly practice this movement. Have the lifter get into the starting position and then lift the bar 4 inches off of the ground, and then lower it and repeat. If the athlete’s hips are moving too early, you can put your hand on their hips and push down on them when they come up to fast. Tactile coaching is often incredibly useful. Of course, please be respectful of personal differences and gender differences when actually touching an athlete. By teaching the athlete to lift their hips and bar at the same time and at the same rate, it will allow for perfect posture leading into the transition phase of the pulling movements. Lifting the hips faster than the rate of the bar will leave the bar velocity a little slow, causing it to be difficult to gain the acceleration needed for the lift. Conversely, lifting the bar faster than the rate of the hips, which I can’t say I’ve seen much of in my career, will prevent the shoulders from being in advance of the bar and cause a host of other issues with bar trajectory.
Now, if you’ve studied the lifts long enough you’ll know that this “hips and bar” statement would contradict what occurs during the Double Knee Bend. It may, but as mentioned previously, the Double Knee Bend technique will be discussed later.
A trick I tell my athletes who are going heavy is to never get discouraged by the feel of the first pull; it will feel slow and heavy. Have you ever attempted a 1RM in either Snatch or Clean+Jerk and felt the weight of it immediately on lift off? You may immediately let your mind jump to “There’s no way! It’s too heavy.” Well, if you had that thought then you were right; you have already defeated yourself. An athlete needs to remember that the first pull is not the most important of all pulling movements but rather it is the set up for the most critical movement. It serves to direct the bar into the correct location for the truly crucial step: the transition into second pull. Teach athletes to ignore the heavy feel of the first pull. That is, if it’s heavy, if it’s slow, it’s supposed to be! Remember it is a new 1RM for the athlete. If it were easy, then it wouldn’t be a max. Embrace the fact that heavy weights will feel heavy and slow on lift off, and block it out. Then the athlete can maintain proper posture and discipline and have more confidence going into the next phase when he or she explodes vertically on the jump, or second pull. It is almost certain that a slow and heavy first pull will still translate to a successful lift, so long as the transition and second pull are powerful and executed thoroughly.
Transition
This is the phase where the lifter pulls the bar into their upper thighs while shifting their hips forward toward the bar in an attempt to prepare for what’s called the “Second Pull”. The old school term for the transition was the “scoop.” I’ve also heard the term “pockets” or “banging off the thighs.” I prefer to call it either the “transition” or the “Power Position.” Speaking of “banging off the thighs,” it isn’t advisable to teach the novice how to pop the bar from the thighs in an effort to gain propulsion. In fact, the topic should be avoided. Making contact with the bar in this fashion is, like the Double Knee Bend, a high level concept that should be saved for when the athlete has more experience with the lifts. If the athlete is taught how to transition properly, or enter the Power Position correctly, then what is meant by “banging the thighs” will occur on its own with little effort by the athlete. Yes, making contact with the upper thighs, or in some anatomical frames, the lower abdomen, is hugely advantageous but I never teach to “bang” the bar against your leg. All my athletes “bang the thighs” eventually but trying to do so too soon will cause the athlete to focus on that one aspect far too much. It will ruin the overall timing of the lift and definitely cause premature bending of the arms.
As you might have been able to ascertain from this article, I believe in visual and tactile forms of coaching as much as possible. A visual cue for an athlete on whether or not they are “banging” the bar or not is to ask them to look at the marks on their upper thighs after a practice. If they are bruised at all, they are banging the bar. If they have red marks, the amount of contact is probably good most times with a few times of too much banging. This is also a good visual indicator of where the athlete is making contact which correlates to whether or not they are actually hitting the Power Position correctly. If there are red marks from your knee to your hips, the athlete is performing the transition and second pull inconsistently. If the marks are in one place on the upper thigh you know they are both consistent and in the right place.
After teaching the posture of the first pull, coaches should show athletes how to actively pull the bar in while shifting the hips forward. Notice I did not say shift the knees forward. Providing the knees had been moved away from the path of the bar, they should be brought back under the bar but by way of the hips coming forward rather than the knees. Why? Because it will allow the athlete to time the placement of the bar-to-thigh position prior to the second pull perfectly.
Now, on to the Double Knee Bend. I’ll preface this section by saying that the Double Knee Bend is not a poor tactic to incorporate into The Lifts but rather something saved for experienced lifters taught by experienced coaches. It certainly works for the Chinese and for many elite world competitors. However, teaching it to a beginner serves only to increase the chances of a coach overcomplicating the movements. The novice is already flooded with numerous technical aspects of all the positions necessary to execute the lift. Teaching them to lift the hips up high, practically straightening the knees, then re-bending the knees under the bar in order to extend for the second pull is certainly a high level concept requiring better than average motor skills, coordination and flexibility. In addition, the Double Knee Bend places the athlete at risk of (a) slowing the acceleration of the bar (which will be mentioned later), (b) confusing the concept of the imaginary line of symmetry mentioned previously, especially during the second pull, and (c) effecting the “timing” at which the athlete gets under the bar whether in the overhead squat position for the snatch or the rack position of the clean.
I do not teach the Double Knee Bend to any of my athletes. Some will automatically perform it naturally, without discussion. Those who do not are taught exactly as I have outlined above. Again, the Double Knee Bend is a very unique and efficient tactic in Olympic Weightlifting. Those coaches who swear by it and only teach in this manner most likely have a ton of experience in the sport. I know many of them personally and have had this discussion with them. I just do not believe that it should be taught to beginners and athletes who have become elite without it. Why change something if it’s not broken?
Final Pulling Movements
Once the athlete has entered the Power Position, it is time for the most powerful and explosive part of the lift – The Second Pull. You may recognize when a lifter is entering this position because you will hear most coaches screaming similar terms to their athlete. The most common coaching cue used for this is “Finish!” A very nice term that if I had just a penny for each time I’ve heard it, and certainly used it myself, I would be filthy rich. I also like the term “Extend,” which I took from my first coach and mentor, Coach Bill “Mac” McDaniel.
As mentioned previously, every position depends on the one before it. Providing the athlete has maintained discipline during the first pull (meaning they maintained proper posture, regardless of the weight on the bar, then shifted the bar into their hips while driving hips forward), then they should be in an almost perfectly erect torso, knees bent, ready to jump (or execute a triple joint extension). After their full body is extended, teach them to engage the arms by pulling the bar. I teach my athletes to aim for their chin or to look like a scarecrow. When they look at me oddly I reassure them that by the time the bar reaches their chin, they’ll be under it or have it racked on their shoulders depending on the lift. I try to eliminate their fear that I’m asking them to decapitate themselves but I can tell you, just like hitting your knees, if you make contact on your face with the bar you’ll probably only make that mistake once!
Now, here’s an example of how beginners tend to overcomplicate the second pull. I recently trained the owner of a CrossFit gym who, like many Crossfiters, wished to use the lifts more for training clients. During the explanation of the second pull, the owner says “Right, so I must ensure I execute the ankle, knee, hip extension all the way, right? In that order?” This person told me he read about it somewhere and was taught to make sure the “triple joint extension” was performed. My response was simply to say, “Just jump! As powerfully as you can.” I explained that it’s simpler to think of jumping vertically, as the extension of those joints would occur naturally anyway. It was evident that the owner was executing every lift while focusing too hard on all three joints, one at a time, to ensure they each extended in sequence. As a result, as any experienced Olympic Weightlifter would tell you, it slowed the movement down. This concept is too complicated, too segmented. When the bar gets to your thighs, jump. Your body will know what to do.
Now, every article written about the second pull must, at some point, mention the shrug. I’ve heard coaches over and over again stress the shrug. For some, it’s more of a focus than the first pull or even the transition. Shrug! Shrug! Shrug! In our gym, I don’t even mention it when teaching. Not even to my elite athletes. Shrugging occurs naturally when lifting weight overhead. Take a random person off the street and ask them to lift any reasonable object over their head, by keeping the object fairly close to the body (as opposed to the motion of a Kettlebell swing). I guarantee you they will shrug their shoulders to some extent in order to aid their arms.
That said, the shrug during the second pull, in the specific manner with which is necessary for these lifts, is a fine motor skill. Some may argue that, but we’re not asking the athlete to shrug slowly, as in a common friendly gesture saying, “I don’t know.” We’re asking the athlete to shrug shoulders as high, quick and explosively as possible. Not easy for the novice. Furthermore, I’ve witnessed too many beginners focus so much on shrugging that (a) they perform it too early during the lift, removing its benefit from the equation when it is most needed (remember each position depends on the one before it) and (b) it slows the overall speed of the lift. So don’t worry about the shrug. It’s happening anyway. Making it a large focus ruins the timing.
Conclusion
Once the above elements from the lift off, to the first pull, into the transition, then the explosive extension of the second pull are executed in sequence, the barbell should be weightless. For a fraction of a second, it will be suspended in the air, as though gravity is no longer affecting the bar. This is when the athlete positions themselves under the bar as aggressively as possible. When reading these steps, it’s important to remember that there is no slow motion in either the Snatch or Clean+Jerk.
Though important to break down the positions before attempting to blend them all together for speed and efficiency, the ultimate goal is to execute all phases of the pulling movements with constant acceleration. As speed and power in cars is measured by the results of a 0 mph - 60 mph test, so should Olympic lifting movements. If we use the 0 mph - 60 mph analogy, the bar begins at 0 mph when it is on the platform. As the lift off occurs, the barbell is constantly accelerating so that it hits 60 mph immediately following the transition into the second pull. If done correctly, it won’t matter if the top of the bar’s trajectory is as high as the athlete’s chest or the belly button, he/she will have just enough time to get underneath it in the overhead squat position or rack position before it reverses direction due to gravity.
The technical proficiency needed to execute the Snatch and Clean+Jerk correctly is what makes this an Olympic sport. Development of these movements takes time, practice and determination by both the coach and the athlete. There will be plenty of time down the line to increase specificity as the athlete is exposed to the lifts, but I highly recommend that any coach keep it as simple as possible for as long as possible.
|
Daniel Camargo is a USAW International Coach and a 22-year veteran in the sport of Olympic Weightlifting. As an athlete Camargo was a 3-time U.S. Junior World Team Member and represented U.S.A. in 9 other international competitions. He also set three junior American Records. Now in his 14th year as a head coach, Camargo has produced several State, Collegiate and National Champions, as well as 12 athletes who themselves represented the United States in international competitions. In 2009, he was selected as Team Leader and Coach of Team USA and spent 10 days in Romania where he led the U.S. Team to the Junior World Weightlifting Championships. |
Search Articles
Article Categories
Sort by Author
Sort by Issue & Date
Article Categories
Sort by Author
Sort by Issue & Date