

Striking for CrossFit
CrossFit enjoys a reciprocating relationship with the elements with which it is formed. CrossFit is comprised in part of Olympic Lifting and Gymnastics and all parties have benefited from the interaction. For their part, Mixed Martial Arts (MMA), Thai box¬ing and grappling tend to produce remark¬ably conditioned and well-rounded athletes due to the training and demands inherent in their sports. It is no more surprising to find kickboxers who can display power and flexibility than it is to see gymnasts display strength and agility. Martial arts training, particularly grap¬pling and kickbox¬ing, produce highly desirable training adaptations.
With this in mind we would like to provide a Striking 101 course for peo¬ple who have little or no exposure to the striking arts. Our intention is not to prepare individuals for a self-defense sit¬uation, but simply to provide the basics of how to punch, kick, knee and elbow ef¬fectively. At Cross¬Fit NorCal, we have stand alone Muay Thai classes and we incorporate striking into CF style workouts. One challenge I have found in using strikes as conditioning is the ability to quantify workload and power out¬put, as this quantifiable element is a corner¬stone of the success of CF and most effective strength and conditioning programs. I’m still looking! In the meantime it is sufficient to note that if one is committing 100% effort on all strikes, a few minutes of combina¬tions will be very taxing. One can monitor how many total strikes can be achieved in a given time frame, but that is information we will consider later; for now let’s look at how to actually hit things!
Let’s first consider what we will be hitting and some protective gear to make the train¬ing safe and effective. A very good Thai bag is most desirable. The 6’ Thai bag is perfect for both low kicks and punching. It is softer than the cheap Everlast bags one can find in any sporting goods store and this makes a difference in one’s enjoyment while training. The smaller, hard heavy bags are less expen¬sive than the good quality Thai bags but the price difference is less dramatic than the performance and enjoyment you will obtain from the bet¬ter bag.
While you are plac¬ing your order for the Thai bag you should order some long (180”) wrist wraps and training gloves. One can find good quality gloves from other vendors, but these are some of the best. Look for 14-16 oz gloves with a recessed thumb and Velcro closures. This is another area where spend¬ing a bit of money up front will make the training process much more enjoyable.
Once you have your gloves and wraps you need to wrap your wrists correctly. As you will notice from the link, there are many ap¬proaches to this! Pick one of the methods that wraps between the fingers and make sure to keep the fingers spread wide to pre¬vent compression of tendons and ligaments in the hand while striking. I particularly like the fourth method listed.
So, your snazzy Thai bag is hung, your hands are wrapped and sheathed in the best gloves available. What next? A thorough warmup of dynamic range of motion stretches, jum¬prope, and the BURGENER WARMUP make sense. Now we are ready to go.
Stance
You cannot shoot a cannon from a canoe, so you need to have an effective athletic stance from which to launch your heavy artillery. If you are right handed, stand with feet slightly wider than the hips, take a small step forward with the left foot, rotate the feet SLIGHTLY to the right with your weight on the balls of your feet. If you are balanced and feel athletic and able to move in any di¬rection, this is a good stance to start with. The right hand is held with the knuckles at about your temple level with the elbow dropping straight down. I call this posi¬tion “On the Phone.” The left hand can be held on the left temple or can float 6-8” in front of the face at about temple height. The shoulders are rounded forward and the chin is recessed towards the chest. Even though we are not training to be fighters there is no reason to use shoddy form and look like spankers!
Jab
The first strike we will work with is the Jab, which is performed with the lead hand. Side note: We will be performing all strikes in a way that is most conducive to generat¬ing power. There are many ways to throw these strikes, but we will be focusing on a basic technique with, again, an emphasis on power. The jab is initiated by an inward rotation of the hip, followed by a forward launching of the shoulder with the hand shooting out and making the strike with the first two knuckles of the hand. Depending upon your distance from the bag, you may make a small step forward with the left foot as well. Your intention is not to strike the surface of the bag, but to strike through the bag and return the hand to the original posi¬tion near your face as quickly as possible. Perform all movements slowly in the begin¬ning, adding power as you gain confidence in the movement.
Rear Hand Cross
The second strike is the rear hand cross. This is a knockout strike and can be incred¬ibly powerful when properly developed. Again, the strike is initiated with a rotation of the hips, but this time it is the right hip rotating forward, with a simultaneous driv¬ing forward of the right foot while driving the right shoulder forward, corkscrewing the hand with the palm facing down and again striking with the first two knuckles. This whole process of driving forward is akin to throwing a shot-put: leg drive, hip rotation, shoulder rotation/drive… all im¬parting massive power to the hand. The strike is completed as quickly as possible by returning the right hand to the “On the Phone” position.
Hook
Hooks are thrown from a preloaded position with extra weight on one of the legs. Hooks can be initiated on their own, but typically follow a cross or another hook. Practicing the hook in isolation is good at first and can be done by shifting the weight forward to the left foot. One then rapidly shifts weight to the right foot while launching the left hand to the bag while keeping the arm at a 90 degree angle. The strike has a circular characteristic, bringing it back to the face as quickly as possible. From this position, a right hook can be thrown by repeating the above steps for the right side. If the foot¬work feels awkward, one may benefit from practicing the weight shift/rotation aspects of the movement with the lower body iso¬lated.
Elbow Strike
Elbow strikes are performed with essentially the same biomechanics as either the cross or hooks. It is important to note, however, that elbow strikes should not drag through the bag, but should make a point of impact, with the limb then returning to the cover posi¬tion. Dragging the elbows or knees along the bag will make for some impressive burns in only a few hits.
Foot Jab
Our first kick will be the foot jab, also called a front kick. With the lead leg, the knee is driven upward and then the leg is driven out towards the bag, making contact with the ball of the foot. The toes of the striking foot should be curled back out of the way, the heel of the supporting leg rotates to¬wards the kick slightly, and the torso can¬tilevers back to assist the kick. This is not a Karate-five-Oh board breaker, but rather a penetrating push kick that will drive either the bag or your opponent backward. These same biomechanics can be used to execute the rear leg push kick.
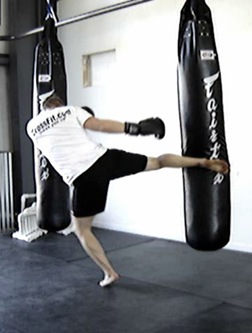
Round Kick
The Thai round kick has been incorporat¬ed into virtually every martial art of merit due to its amazing power production. Many styles claim to have the goods with regards to power production and lethality, but the Thai round kick has thousands of docu¬mented ring knockouts and instances of the kick breaking the femur of the opponent. That is a HARD kick!
Rear Leg Round Kick
We will start with the rear leg round kick, which is actually initiated with a small step forward and towards 10:00 with the left leg. The left foot plants on the ball of the foot with the left knee pointing forward and the left heel pointing backwards. One then shifts weight forward onto the left foot while vio¬lently rotating the lower body, propelling the straight right leg into the bag with the lead¬ing edge of the shin, not the foot! While this is occurring, the upper body rotates counter to the kick with the right hand swinging to¬ward the bag, the left hand covers the face, and the heel of the left foot should be point¬ing toward the bag. If the position is correct, the shoulders should be pointing toward the left wall, essentially at a 90 degree angle to 12:00 where the bag is located. One should now recover back to the same stance seen immediately prior to the kick, using the leg to push off the bag and using the hip to re¬trieve the leg.
NOTE OF CAUTION! This is a very power¬ful kick, and if your placement on the bag is wrong--for example, striking with the foot instead of the shin--the results can be quite undesirable. This is especially true if one has opted for one of the cheap, hard, heavy bags available at sporting goods stores. Ramp up the power on this strike slowly and with caution. Never attempt this kick cold!
Lead Leg Round Kick
One can train the lead leg round kick by simply switching the right leg to the front and working the same technique with the left leg, but this is not how the cool kids do it and we do not want anyone to make fun of your form, so spend some time working the switch kick. When you think switch kick, think “Dosey-do.” Really. Once you have thought Dosey-do, it’s time to do it. Stand in your normal stance with the left foot in front of a line and your right foot behind the line. The line can be the edge of a horse stall mat, a piece of tape or the Mason-Dixon line… anything works so long as it divides your body into anterior/posterior pieces. Now, with the left foot, lightly bounce back and forth over the line, keeping contact through the ball of the foot. Make the movement light and springy. After you have done this 10-20 times, put the left foot in its normal posi¬tion and do the same thing with the right foot. While you are doing this, have your hands in the on-guard position and do not alter your shoulder orientation in the least. Once you have Dosey-Do’ed both the front foot and rear foot independently do them simultaneously, finishing the movement by rapidly stepping forward with the left foot. This should be a very ballistic movement in which the left foot is violently bounced off the floor to spring load the movement. En¬deavor to move both feet at the same time but the reality is that you will need to move the left foot slightly before the right. You should practice this movement across the floor, making advances of 2-3 feet each time you perform the movement.
Now that you have the rudiments of the Dosey-Do you can throw a lead leg switch kick. This kick can become almost as pow¬erful as your rear leg kick and is an impres¬sive athletic fete to master. To throw the kick Dosey-Do as described above, but in¬stead of stepping forward with the left foot at the end of the movement, rotate on the right foot and launch the left kick. All the mechanics described above for the rear leg round kick apply here. Return the left leg to the forward position while retreating from the bag.
Knee
Knees are thrown from very close range, are devastating strikes, and can be far more challenging to throw properly than one might think. The movement is not simply lifting the knee towards the sky but rather a driving forward of the knee with a rotation of the support foot, back lean similar to that in the push kick, and a serious opening of the hips. To throw the rear knee, grasp the bag with both hands at about head/shoul¬der height and drive the right knee forward through the bag, while rotating the left heel towards the bag. Remember, this is not a glancing or sliding strike, but should drive straight in and straight out. The lead knee can be thrown in the same way as the right but is typically preceded by the Dosey-Do to spring-load the strike. You can also practice the knee across the floor working on control and balance.
Putting it All to Work
When first learning these movements, it is helpful to work each one in isolation, em¬phasizing form. Patience in this stage will result in technique that is safe, powerful and flowing. One way to approach this is to work many cycles of 10-20 reps of each movement. For example, you could per¬form:
. 20 Jab (J)
. 20 Cross (C)
. 20 Left Hook (LH)
. 20 Right Hook (RH)
. 20 Push Kicks (PK) both legs
. 20 Left Round Kick (LRK)
. 20 Right Round Kick (RRK)
2-3 times, 3-5 days per week in the begin¬ning to build technique and allow your body to adapt to the new stimulus. You will prog¬ress quickly and there is more fun ahead!
I left out the knees and elbows for simplic¬ity, but I think you get the idea. Once you have a foundation in the movements in iso¬lation, it is time to reap the full benefit of this training and work these movements in combination. Here are some simple, pro¬gressive combinations:
. Jab (J)
. Jab, Cross (C)
. J, C, Hook (H) (Left or Right)
. J, Right Round Kick (RRK)
. J, Left Round Kick (LRK)
. J,C,RRK
. J,C,RRK, Left Knee (LK)
. C, Left Elbow (LE), Right Elbow (RE), LRK
Let’s work a few of these combination as rounds. In the beginning, make the rounds 1min in duration with a 30 sec rest. You can emulate regular fight training and work up to 3 min rounds with 1 min rest, or you can use Tabata intervals for a more intense, an¬aerobic emphasis. Mix it up!
Round(s)
. 1 (J,C)
. 2 (J, RRK)
. 3 (J,C,LK, RRK)
. 4 (C, LH, RK x2, RH)
I think you get the idea. Almost any combi¬nation will “work” but there are some pro¬gressions that lend themselves to better flow and biomechanics. Let us know what you think of these.
Remember to start slowly and make tech¬nique more important than power. Take ad¬vantage of the Digital Coaching section of the message board to post video of your ef¬forts. There are many people on the message board who can offer helpful pointers. In a few months we will look at how to integrate some striking and functional movements for another twist on CrossFit programming.
With this in mind we would like to provide a Striking 101 course for peo¬ple who have little or no exposure to the striking arts. Our intention is not to prepare individuals for a self-defense sit¬uation, but simply to provide the basics of how to punch, kick, knee and elbow ef¬fectively. At Cross¬Fit NorCal, we have stand alone Muay Thai classes and we incorporate striking into CF style workouts. One challenge I have found in using strikes as conditioning is the ability to quantify workload and power out¬put, as this quantifiable element is a corner¬stone of the success of CF and most effective strength and conditioning programs. I’m still looking! In the meantime it is sufficient to note that if one is committing 100% effort on all strikes, a few minutes of combina¬tions will be very taxing. One can monitor how many total strikes can be achieved in a given time frame, but that is information we will consider later; for now let’s look at how to actually hit things!
Let’s first consider what we will be hitting and some protective gear to make the train¬ing safe and effective. A very good Thai bag is most desirable. The 6’ Thai bag is perfect for both low kicks and punching. It is softer than the cheap Everlast bags one can find in any sporting goods store and this makes a difference in one’s enjoyment while training. The smaller, hard heavy bags are less expen¬sive than the good quality Thai bags but the price difference is less dramatic than the performance and enjoyment you will obtain from the bet¬ter bag.
While you are plac¬ing your order for the Thai bag you should order some long (180”) wrist wraps and training gloves. One can find good quality gloves from other vendors, but these are some of the best. Look for 14-16 oz gloves with a recessed thumb and Velcro closures. This is another area where spend¬ing a bit of money up front will make the training process much more enjoyable.
Once you have your gloves and wraps you need to wrap your wrists correctly. As you will notice from the link, there are many ap¬proaches to this! Pick one of the methods that wraps between the fingers and make sure to keep the fingers spread wide to pre¬vent compression of tendons and ligaments in the hand while striking. I particularly like the fourth method listed.
So, your snazzy Thai bag is hung, your hands are wrapped and sheathed in the best gloves available. What next? A thorough warmup of dynamic range of motion stretches, jum¬prope, and the BURGENER WARMUP make sense. Now we are ready to go.
Stance
You cannot shoot a cannon from a canoe, so you need to have an effective athletic stance from which to launch your heavy artillery. If you are right handed, stand with feet slightly wider than the hips, take a small step forward with the left foot, rotate the feet SLIGHTLY to the right with your weight on the balls of your feet. If you are balanced and feel athletic and able to move in any di¬rection, this is a good stance to start with. The right hand is held with the knuckles at about your temple level with the elbow dropping straight down. I call this posi¬tion “On the Phone.” The left hand can be held on the left temple or can float 6-8” in front of the face at about temple height. The shoulders are rounded forward and the chin is recessed towards the chest. Even though we are not training to be fighters there is no reason to use shoddy form and look like spankers!
Jab
The first strike we will work with is the Jab, which is performed with the lead hand. Side note: We will be performing all strikes in a way that is most conducive to generat¬ing power. There are many ways to throw these strikes, but we will be focusing on a basic technique with, again, an emphasis on power. The jab is initiated by an inward rotation of the hip, followed by a forward launching of the shoulder with the hand shooting out and making the strike with the first two knuckles of the hand. Depending upon your distance from the bag, you may make a small step forward with the left foot as well. Your intention is not to strike the surface of the bag, but to strike through the bag and return the hand to the original posi¬tion near your face as quickly as possible. Perform all movements slowly in the begin¬ning, adding power as you gain confidence in the movement.
Rear Hand Cross
The second strike is the rear hand cross. This is a knockout strike and can be incred¬ibly powerful when properly developed. Again, the strike is initiated with a rotation of the hips, but this time it is the right hip rotating forward, with a simultaneous driv¬ing forward of the right foot while driving the right shoulder forward, corkscrewing the hand with the palm facing down and again striking with the first two knuckles. This whole process of driving forward is akin to throwing a shot-put: leg drive, hip rotation, shoulder rotation/drive… all im¬parting massive power to the hand. The strike is completed as quickly as possible by returning the right hand to the “On the Phone” position.
Hook
Hooks are thrown from a preloaded position with extra weight on one of the legs. Hooks can be initiated on their own, but typically follow a cross or another hook. Practicing the hook in isolation is good at first and can be done by shifting the weight forward to the left foot. One then rapidly shifts weight to the right foot while launching the left hand to the bag while keeping the arm at a 90 degree angle. The strike has a circular characteristic, bringing it back to the face as quickly as possible. From this position, a right hook can be thrown by repeating the above steps for the right side. If the foot¬work feels awkward, one may benefit from practicing the weight shift/rotation aspects of the movement with the lower body iso¬lated.
Elbow Strike
Elbow strikes are performed with essentially the same biomechanics as either the cross or hooks. It is important to note, however, that elbow strikes should not drag through the bag, but should make a point of impact, with the limb then returning to the cover posi¬tion. Dragging the elbows or knees along the bag will make for some impressive burns in only a few hits.
Foot Jab
Our first kick will be the foot jab, also called a front kick. With the lead leg, the knee is driven upward and then the leg is driven out towards the bag, making contact with the ball of the foot. The toes of the striking foot should be curled back out of the way, the heel of the supporting leg rotates to¬wards the kick slightly, and the torso can¬tilevers back to assist the kick. This is not a Karate-five-Oh board breaker, but rather a penetrating push kick that will drive either the bag or your opponent backward. These same biomechanics can be used to execute the rear leg push kick.
Round Kick
The Thai round kick has been incorporat¬ed into virtually every martial art of merit due to its amazing power production. Many styles claim to have the goods with regards to power production and lethality, but the Thai round kick has thousands of docu¬mented ring knockouts and instances of the kick breaking the femur of the opponent. That is a HARD kick!
Rear Leg Round Kick
We will start with the rear leg round kick, which is actually initiated with a small step forward and towards 10:00 with the left leg. The left foot plants on the ball of the foot with the left knee pointing forward and the left heel pointing backwards. One then shifts weight forward onto the left foot while vio¬lently rotating the lower body, propelling the straight right leg into the bag with the lead¬ing edge of the shin, not the foot! While this is occurring, the upper body rotates counter to the kick with the right hand swinging to¬ward the bag, the left hand covers the face, and the heel of the left foot should be point¬ing toward the bag. If the position is correct, the shoulders should be pointing toward the left wall, essentially at a 90 degree angle to 12:00 where the bag is located. One should now recover back to the same stance seen immediately prior to the kick, using the leg to push off the bag and using the hip to re¬trieve the leg.
NOTE OF CAUTION! This is a very power¬ful kick, and if your placement on the bag is wrong--for example, striking with the foot instead of the shin--the results can be quite undesirable. This is especially true if one has opted for one of the cheap, hard, heavy bags available at sporting goods stores. Ramp up the power on this strike slowly and with caution. Never attempt this kick cold!
Lead Leg Round Kick
One can train the lead leg round kick by simply switching the right leg to the front and working the same technique with the left leg, but this is not how the cool kids do it and we do not want anyone to make fun of your form, so spend some time working the switch kick. When you think switch kick, think “Dosey-do.” Really. Once you have thought Dosey-do, it’s time to do it. Stand in your normal stance with the left foot in front of a line and your right foot behind the line. The line can be the edge of a horse stall mat, a piece of tape or the Mason-Dixon line… anything works so long as it divides your body into anterior/posterior pieces. Now, with the left foot, lightly bounce back and forth over the line, keeping contact through the ball of the foot. Make the movement light and springy. After you have done this 10-20 times, put the left foot in its normal posi¬tion and do the same thing with the right foot. While you are doing this, have your hands in the on-guard position and do not alter your shoulder orientation in the least. Once you have Dosey-Do’ed both the front foot and rear foot independently do them simultaneously, finishing the movement by rapidly stepping forward with the left foot. This should be a very ballistic movement in which the left foot is violently bounced off the floor to spring load the movement. En¬deavor to move both feet at the same time but the reality is that you will need to move the left foot slightly before the right. You should practice this movement across the floor, making advances of 2-3 feet each time you perform the movement.
Now that you have the rudiments of the Dosey-Do you can throw a lead leg switch kick. This kick can become almost as pow¬erful as your rear leg kick and is an impres¬sive athletic fete to master. To throw the kick Dosey-Do as described above, but in¬stead of stepping forward with the left foot at the end of the movement, rotate on the right foot and launch the left kick. All the mechanics described above for the rear leg round kick apply here. Return the left leg to the forward position while retreating from the bag.
Knee
Knees are thrown from very close range, are devastating strikes, and can be far more challenging to throw properly than one might think. The movement is not simply lifting the knee towards the sky but rather a driving forward of the knee with a rotation of the support foot, back lean similar to that in the push kick, and a serious opening of the hips. To throw the rear knee, grasp the bag with both hands at about head/shoul¬der height and drive the right knee forward through the bag, while rotating the left heel towards the bag. Remember, this is not a glancing or sliding strike, but should drive straight in and straight out. The lead knee can be thrown in the same way as the right but is typically preceded by the Dosey-Do to spring-load the strike. You can also practice the knee across the floor working on control and balance.
Putting it All to Work
When first learning these movements, it is helpful to work each one in isolation, em¬phasizing form. Patience in this stage will result in technique that is safe, powerful and flowing. One way to approach this is to work many cycles of 10-20 reps of each movement. For example, you could per¬form:
. 20 Jab (J)
. 20 Cross (C)
. 20 Left Hook (LH)
. 20 Right Hook (RH)
. 20 Push Kicks (PK) both legs
. 20 Left Round Kick (LRK)
. 20 Right Round Kick (RRK)
2-3 times, 3-5 days per week in the begin¬ning to build technique and allow your body to adapt to the new stimulus. You will prog¬ress quickly and there is more fun ahead!
I left out the knees and elbows for simplic¬ity, but I think you get the idea. Once you have a foundation in the movements in iso¬lation, it is time to reap the full benefit of this training and work these movements in combination. Here are some simple, pro¬gressive combinations:
. Jab (J)
. Jab, Cross (C)
. J, C, Hook (H) (Left or Right)
. J, Right Round Kick (RRK)
. J, Left Round Kick (LRK)
. J,C,RRK
. J,C,RRK, Left Knee (LK)
. C, Left Elbow (LE), Right Elbow (RE), LRK
Let’s work a few of these combination as rounds. In the beginning, make the rounds 1min in duration with a 30 sec rest. You can emulate regular fight training and work up to 3 min rounds with 1 min rest, or you can use Tabata intervals for a more intense, an¬aerobic emphasis. Mix it up!
Round(s)
. 1 (J,C)
. 2 (J, RRK)
. 3 (J,C,LK, RRK)
. 4 (C, LH, RK x2, RH)
I think you get the idea. Almost any combi¬nation will “work” but there are some pro¬gressions that lend themselves to better flow and biomechanics. Let us know what you think of these.
Remember to start slowly and make tech¬nique more important than power. Take ad¬vantage of the Digital Coaching section of the message board to post video of your ef¬forts. There are many people on the message board who can offer helpful pointers. In a few months we will look at how to integrate some striking and functional movements for another twist on CrossFit programming.
| Robb Wolf is the author of the best-selling book The Paleo Solution, co-founder of the Performance Menu, and co-owner of NorCal Strength & Conditioning. |
Search Articles
Article Categories
Sort by Author
Sort by Issue & Date
Article Categories
Sort by Author
Sort by Issue & Date