

The Snatch: Part 2
When we left off several years ago, we had made our way through coaching a new lifter in the very basics of the snatch with a length of PVC. Said lifter is now demonstrating expertise with the PVC and is growing bored and feeling the need to add some wheels to impress the ladies.
With nothing but personal experience and reasoning to substantiate, I'll claim there isn't a single male athlete in the universe who won't want to immediately slip 80kg onto the bar and try to launch it. Occasionally, those of the stupid strong variety will be successful, at least in terms of getting the bar overhead, but it will likely look like Andy Dick having a grand mal seizure. As a coach, it's your responsibility to progress the lifter as appropriate, even if it means some lifters use nothing but an empty bar for what may seem to them like an absurdly extended period of time—or return to the PVC again.
If you missed the last installment, go back and read it. "Dave, maybe in the future children will learn to drive rocket cars before they walk, but for now, let's stick to the fundamentals!"
Facility and Equipment
Something we haven't covered yet is where these snatches are taking place and with what. Granted, it strikes me as obvious, but I've been surprised before. We'll be thorough and not leave anyone behind.
Bars
Spending more money on a bar will prevent a lot of frustration and likely save you money in the long run. Chapman, Werksan, and Pendlay all make quality bars for decent prices. I recommend selling any extra children you may have lying around for some spending money—a nice bar will give you much greater returns with much less maintenance.
Bumpers & Change
There is a wide range of quality in the realm of bumper plates, but outside of competition and elite lifting, weight is weight. I would recommend using kilogram bumpers and change for the sake of preparing for possible competition and ease of communication within the weightlifting community, but if you already own pound bumpers and plates, just lift them and use a calculator if someone asks.
Nicer bumpers and even change will be color-coded. Red is 25kg (55lb), blue is 20kg (44lb), yellow is 15 kg (33lb), and green is 10 kg (22lb). If your bumpers are black, you can purchase colored tape to wrap them in if you want to learn to associate the colors with their weights easily.
Flooring
A weightlifting platform is the ideal lifting surface, surprisingly enough. Quality platforms can be built easily and inexpensively. A wooden lifting surface can also be placed within rubber flooring for a simple and unobtrusive platform (fat guy on top sold separately).
However they're arranged, a wooden lifting surface will provide a stable, smooth and solid lifting platform, and rubberized landing pads will reduce the beating your bar and bumpers take and extend their useful lives.
To the Bar!
Whether a lifter transitions directly to a regulation bar (20kg for the dudes, 15kg for the chicks) or to some kind of intermediate bar (e.g. 5-10kg training bar) is entirely within your discretion as a coach. Consider the athlete's strength and consistency with the movements in question. When in doubt, err on the light side. Don't be afraid to move a lifter back down to a lighter bar if the foray to the big kid's bar appears to be premature—we all make mistakes. If your lifter questions you on this, respond with an excessive prescription of burpees accompanied by mean-spirited ridicule regarding the lifter's inability to progress fast enough.
The Grip
Step one with the new bar is finding the lifter's snatch grip. At this point, both you and the lifter should be able to find and recognize the proper grip width fairly quickly and easily. There will still be some minor adjustment from time to time as you and the lifter decide is necessary, but for now, stick with the grip prescription described in the last installment of this series. Ensure that both you and the lifter make mental notes of the grip position relative to landmarks on the bar to make life in the near future a little easier.
Having a lifter change grip widths frequently will make your job of recognizing and correctly problems far more difficult than necessary—consistency in grip width will allow you to focus on the movement. That said, however, always keep in mind how grip width can affect the movement. For example, if the bar is consistently hitting low on the thighs during the second pull, it may be a case of an excessively narrow grip placing the bar low relative to the hips. But be sure that the problem doesn’t have another source before resorting to grip adjustment.
Bailing Out
Now that we're working with something with enough mass to cause bodily harm, it's important early on to familiarize the athlete with strategies for escaping immanent doom—don't wait until the lifter's left arm is collapsing under 90kg overhead.
It might be wise to first instruct the bail-out with PVC—loud crashing noises tend to freak people out and make them reluctant to drop the bar as we need them to. Also, if they don't listen to you, less damage will be incurred if the lifter drops a length of PVC instead of a bar on his or her back.
Bailing out of a failed snatch isn't rocket science—but it does require commitment and a strategy that has become second nature long before its employment is needed—under a heavy bar that's threatening to split you in half is neither a good time nor place to make plans.
There are really only two directions to dump a bar: forward or backward. Even if a lifter somehow manages to be losing control of a bar to the side, dumping it either forward or backward is necessary—an Olympic bar is seven feet long, which is a pretty great distance to launch a loaded bar, particularly when it's already out of control.
Keep in mind, the location and present direction of travel of the bar determines the dumping location, not the lifter. I've heard recommendations to always dump a bar in either the front or the back. If you have trouble understanding why this is not just difficult, but remarkably stupid, try dumping a bar that's falling in front of you behind yourself and see what happens. I won't come visit you in the hospital.
It's also important to maintain clear lifting areas. Bumpers, change, other bars, architecture and small pets can all be objects onto which a bar may fall and off of which it may subsequently bounce unexpectedly, setting up some potentially ugly collisions. 100kg bouncing onto the backs of a lifter's legs is not an event you want to sanction.
Forward
Dumping a bar out front is the easiest direction because it will require the least movement of the lifter and the bar will be in the lifter's field of vision. Typically this happens involuntarily when a lifter leaves the bar out front during the pull or fails to turn it over aggressively enough—it will simply come to rest overhead in front of the lifter's base and promptly bounce right back to the floor.
More of a concern are the instances when the bar lands correctly in the slot directly overhead, but for one reason or another, one or both of the lifter's arms fail to lock and the bar begins heading right down on top of his or her head. In this instance, the lifter must actively push the bar forward, keeping the arms as long as possible, and jumping backward (Note: this is assuming the bar is literally directly overhead. If when the elbow or elbows break the bar begins to favor the back, that's the direction in which it must be dumped.). As long as the arms are extended fully, keeping the grip on the bar will ensure it lands well in front of any of the lifter's body parts. In some case, literally throwing the bar may be necessary. Be sure to let your athletes know this is all right—don't let them fail to bail out completely for fear of making noise, looking stupid or somehow offending you.
Video: Missing in Front
Backward
Three things are critical when dumping a bar behind: extending the arms as fully as possible, loosening the grip on the bar, and jumping forward. Extending the arms or keeping them extended will of course maximize the radius of the falling bar's arc, consequently creating more safe space for the lifter. However, few athletes will have the shoulder flexibility to maintain their grip on the bar throughout said arc—it's therefore important that they release their grip on the bar as it travels down, ideally letting it go at the point farthest behind them. At the same time, the lifter must jump forward as far as possible to prevent the bar from dropping onto his or her lower back.
Video: Missing Behind
From the Top Down
The next step once the lifter has grabbed a real bar is to verify he or she is able to perform all he or she did with the PVC and with equal skill and consistency. We didn't spend all that time with the PVC for fun—if those movement patterns fall apart with a bar, there's no sense in moving on any further.
The Overhead Squat
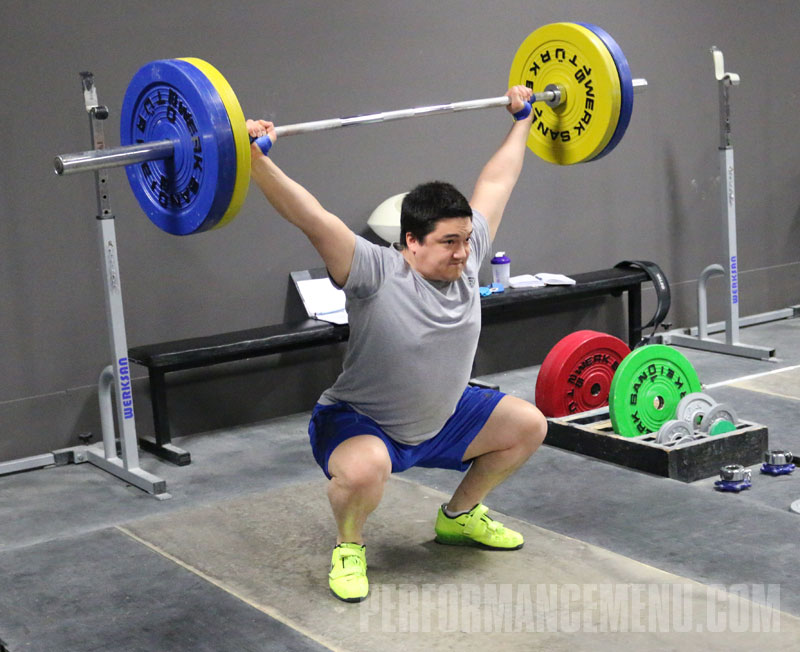
Let's make something abundantly clear before we go any further: If an athlete can't perform a legitimate, stable overhead squat, that athlete CANNOT SNATCH. This is not a brain teaser—the receiving position for the snatch is the bottom of an overhead squat. Let's let the foundation dry before we start hanging the curtains.
Just as you did with the PVC, instruct the lifter to bring the bar overhead with a snatch grip and squat. Not squat a little—squat. That means as low as the body will allow the hips to travel. It's extremely common for athletes to install depth governors on their squats and arrest the descent sometimes long before actually reaching bottom. This may fly while doing excessive numbers of air squats for uninspired trainers, but it will crash and burn on a snatch attempt with any kind of real loading. The additional weight is going to bring the athletes' hips down whether they want it to or not, so those athletes better be prepared physically to not only achieve ass-to-ankles overhead squats but to recover from them as well.
Monitor the lifter on the way down closely—the movement should be smooth and controlled. If he or she is fighting the bar throughout the journey, it suggests one or more problems: overhead instability arising from weak shoulders, back and/or arms or inadequate flexibility, inadequate hip and/or leg flexibility preventing the hips from remaining nearly over the heels throughout the movement, or poor balance in general. All of these things must be addressed and corrected as soon as possible.
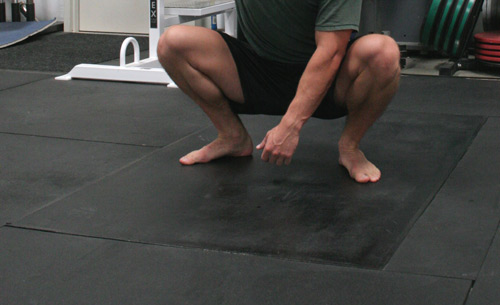
Invite the lifter to stay in the bottom of the squat—let them feel the position, force them to maintain their posture and balance, and continue watching for problems. In this position, it's common for weight to be predominantly on the toes or for the outer edges of the feet to elevate. In both instances, stand adjustment or flexibility work is needed. While continuing to attempt to achieve and maintain the overhead squat will help improve flexibility, it alone is rarely sufficient or expedient.
Again, monitor the lifter's movement when you allow them to return to standing. Do not allow him or her to initiate the squat with hip elevation. Premature hip elevation means forward tilting of the torso—don't make the movement harder than it needs to be. The torso should remain upright and at the same angle until the legs are extended. That means the hips must remain nearly within the same plane the whole way up. Driving them back and up in an arc will require that the torso and bar travel forward to keep the center of mass over the lifter's base. The more the center off gravity shifts horizontally, the more difficult controlling it will be. Again, the idea is to make the movement easier, not to add challenges.
At this point, decisions must be made in regard to the coaching strategy. A lifter may demonstrate excellent pulling technique but overhead squat like a spaz. It will be difficult to make the case for holding off on everything until he or she achieves a perfect overhead squat. In this case, you may make the decision to coach the lifter through power snatching while working aggressively to correct any overhead squatting deficiencies with practice, smart stretching, and assistance movements, and later progress him or her to full snatches when able. In the opposite case—that is, an excellent overhead squat and lame pulling technique—the course of action is obvious.
Overhead Squat Video - Notice the upright orientation of the torso, the minimal horizontal movement of the hips, and the knees necessarily pushed forward over the toes.
The Burgener Warmup
Once the overhead squat has been determined to be satisfactory, or you've decided to continue working on it and move on to the power snatch, it's time to return to the Burgener Warmup.
For most athletes, the movements of the Burgener Warmup will prove easier with a bar than with a length of PVC simply because having some resistance to work against allows them to feel more natural and the weight provides greater feedback regarding the bar's position relative to the body. Again, if the athlete is struggling with the weight, drop him or her to a lighter bar or even back to the PVC.
Run through the Warmup as many times as necessary for you to evaluate the lifter's technique and decide whether or not it's prudent to move on. If not, continue coaching only this limited section of the snatch until you feel comfortable progressing the lifter. Otherwise, read on.
The Starting Position
The sharper readers in the crowd already know that the snatch starts from the floor. As I've repeated an obnoxious number of times, start conservatively. Use training bumpers to place the bar at the correct height instead of jumping right to 10kg or 25lb bumpers if more appropriate for the lifter in question.
The starting position for the snatch is critical for a successful lift. Some athletes choose to employ dynamic starts in which the hips move into position and the lift is begun immediately, whereas other athletes choose a static start in which they set the starting position for a moment before beginning the lift. For new lifters, a static start is wise until consistency can be ensured, at which point dynamic starts can be experimented with. In addition, for the coach, fault correction becomes more difficult due to the inability to clearly see the lifter's starting position.
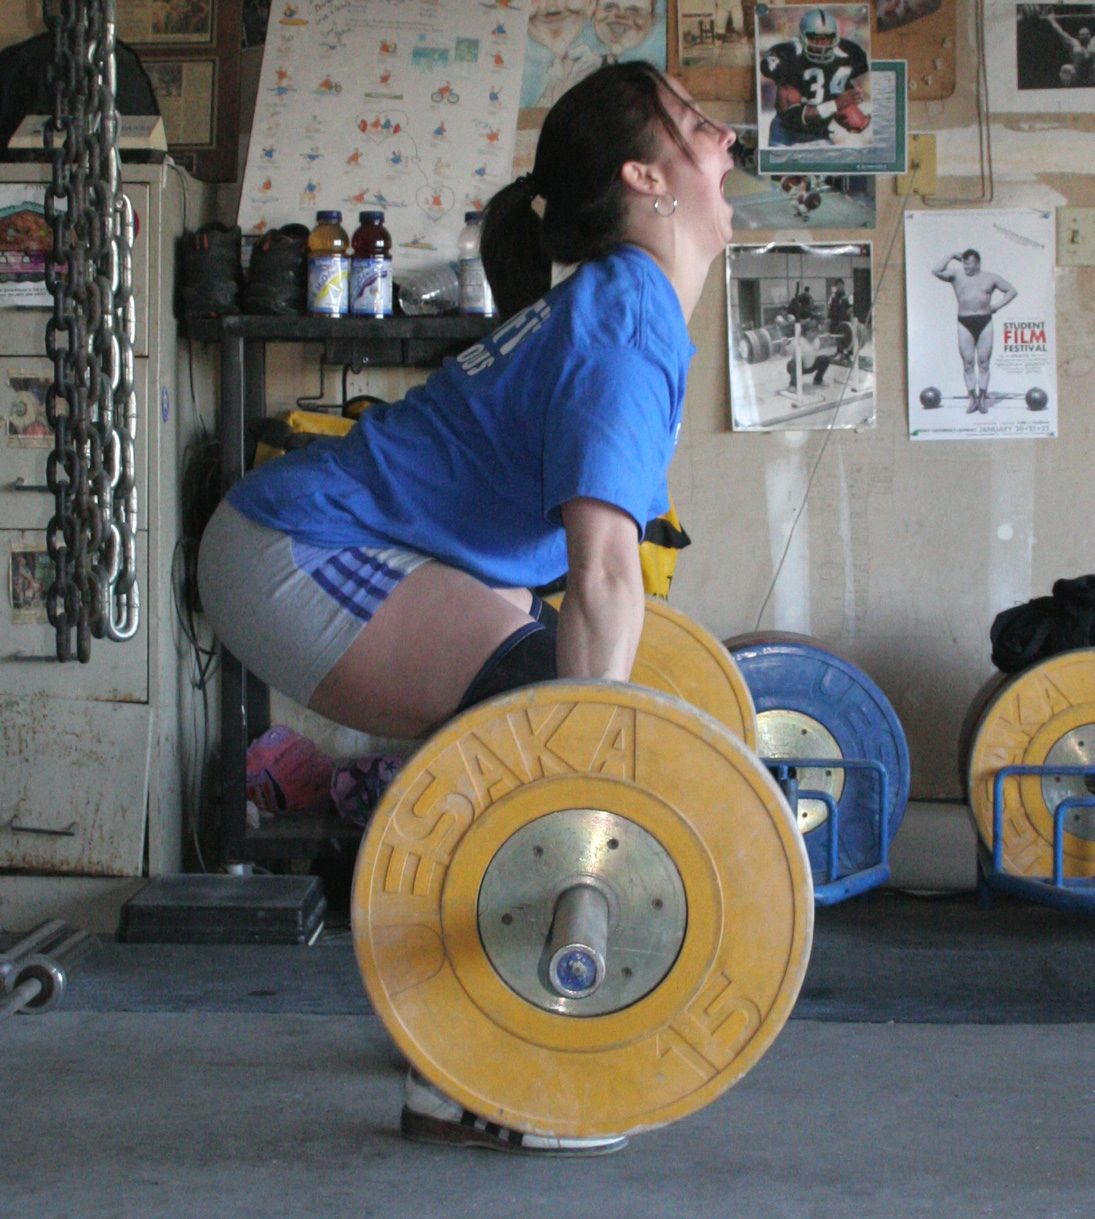
Immediately after takeoff. Weight is on the heels, hips are slightly higher
than the knees, shoulders are in front of the bar, back is curved and tight.
Based on anthropometrics, starting positions among lifters will vary somewhat. Just like the squat, however, there are certain points that will be universal.
The feet will be in the pulling position: the heels under the hips and the toes rotated outward slightly. Some lifters are successful with wider or narrower stances, but again, develop from a standard starting point before experimenting with too many details. The stance should never be so wide that the legs interfere with the arms during the pull. Some lifters also find success with dramatic external rotation of the legs in order to prevent the knees from moving as far forward and create an easier path for the bar to travel from the floor to above the knees. As with stance width, lifters should begin with the basics before moving on to more complicated details. The weight may be slightly forward on the feet—it will be shifted very soon after takeoff—but should certainly not be on the toes entirely.
The hips in the starting position will be slightly above the knees. The shorter the lifter's legs are, the lower the hips will likely be in his or her comfortable starting position. The hips should not, however, start below the knees for a lifter of any height. As mentioned previously, some lifters choose a dynamic start, often dropping the hips far below the knees at some point. Irrespective of their lowest point in motion, the hips invariably return to a point above the hips before the barbell is lifted from the floor.
As with all pulling movements, long-legged lifters will tend to elevate the hips far above the knees either at the start or before lifting the bar. This will typically result in the bar swinging away from the body and pulling the lifter forward. Consider this if a lifter is continually jumping, recovering, or dropping the bar forward.
The back must be set tightly in the starting position before the movement begins. A soft back will absorb a significant amount of the force generated by the legs and hips instead of allowing that force to be transferred to the bar. In addition, it of course limits the stability and therefore the safety of the spine. The spinal erectors should be tight from the neck to the sacrum, pulling the back into a slight reverse curve.
The shoulders should be in advance of the bar somewhat and the arms as relaxed as possible. Throughout the pull of the snatch, the arms should be internally rotated—elbows pointing away from the body—to prevent encourage the bar to remain close to the body on its way up.
In the starting position, the bar should be against the shins of the lifter. Some lifters will walk their shins to the bar before gripping it, while others prefer to first grip the bar and pull it into their shins while assuming the starting position. Either is perfectly fine as long as the bar ends up against the shins. Keeping the bar close will create better leverage and encourage it to remain close throughout the lift.
Finally, breath control is important. Just as with any heavy lift, air should be drawn in and held for the duration of the movement. It will be easier to fill the abdomen and chest with air before entering the starting position. Some lifters will grunt or otherwise expel a small burst of air during the second pull. This is acceptable, but it should be involuntary and the product of an extremely aggressive pull. A loss of too much air must be avoided or the receiving position will be destabilized.
The First Pull
The first pull of the snatch and clean brings the barbell from the floor to above the knees. This movement serves to initiate the barbell's movement and bring it into place for the second pull, which is the segment of the lift during which maximal power is applied. While relatively simple, the first pull commonly presents many problems for even experienced lifters because of interaction of the knees with the bar.
This initial phase of the lift resembles the same portion of a typical deadlift. As the bar rises, the knees must be pushed back to allow the bar to travel up uninterrupted. This must be done without elevating the hips relative to the shoulders—the angle of the back should remain the same until the bar is above the knees.
The bar should be squeezed from the floor, not jerked—that is it should be accelerated fairly slowly initially. Jerking the bar off the floor is not only counterproductive, but also potentially injurious. The lifter's body should be tight before the bar moves at all, with the exception of the arms, which should remain as loose as possible.
As described above, in the starting position, the weight may be slightly forward on the feet. When the bar is lifter from the floor, the weight should shift back to the heels; if it remains on the toes, the bar will pull the lifter forward for the remainder of the lift. Don't be afraid to focus exclusively on a lifter's feet during a lift—much can be revealed right from the initiation of the movement.
Some lifters are able to keep the bar in contact with their shins without causing any damage, while others find their shins hemorrhaging after each pull. The latter may want to invest in very tall socks. Keep in mind, however, that in competition, the socks may not touch knee sleeves if worn.
The Second Pull
The second pull begins when the bar passes the lifter's knees and the hips and knees begin to drive forward into the power position. At this point, the lifter should be well acquainted with the movement because of all of his or her practice with the hang power snatch as performed in the Burgener Warmup and elsewhere. Because the movement of the second pull was discussed pretty thoroughly in the last installment, its discussion here will be limited.
As the bar passes the knees, it will probably not be in contact with the lifter's body for a brief moment, only because tight bars peeling off kneecaps is generally not an experience a lifter is seeking. However, this is not an excuse to allow the bar to swing out. The shoulders will still at this point be in advance of the bar—if the lifter relaxes, the bar will hang directly below the arms' attachments, consequently allowing the bar to pull away from the body. The bar must then be actively pulled into the body again and kept there until the completion of the second pull when the body will begin descending. If you have trouble seeing whether or not the bar is remaining in contact with the lifter's body, cover the center of the bar with chalk and see if it transfers to the lifter's clothing in the appropriate locations. If video is available, if the location of the bar is not clear, check for shorts and shirts being pulled up the body by the bar.
As the bar reaches approximately mid-thigh, the scoop will begin, the hips driving forward, the knees re-bending slightly and the lifter entering the power position. From here, the hips and legs must be extended violently and vertically. Watch for excessive horizontal hip travel bumping the bar out from the body. The horizontal hip movement serves only to relocate the hips under the shoulders in order to allow vertical extension of the body.
Arguments about ankle extension exist. The classic notion of triple extension refers to the hip, leg and ankle, demonstrated by most lifters. However, some lifters at the highest levels of the sport display very little if any ankle extension. This has been used to argue that ankle extension is undesirable, but that argument seems to ignore the success of those who do use ankle extension.
The calves are extremely strong, but probably don't contribute a great deal to the power of the second pull. That being the case, a lack of ankle extension in the presence of excellent leg and hip extension is likely not a problem, but not necessarily beneficial.
The more important point on which to focus is where the lifter's weight is on the feet prior to their coming off the floor—the weight should be driven through the heels for as long as possible. If the ankles are extended after the completion of leg and hip extension, there are no inherent problems. Potential problems do exist, however. A lifter may spend too much time extending the ankles, delaying the third pull long enough to miss the lift; he or she may shift his or her weight forward during ankle extension, consequently shifting the body and barbell forward and again missing the lift; finally, the lifter may get too much separation from the floor and become unstable upon planting the feet again. If none of these things is occurring along with ankle extension, it should not be a concern.
The idea of the second pull is to lift the bar as high as possible and accelerate it as much as possible. This is very different from elevating the body as much as possible—the body should not travel any higher than it needs to because ultimately it must be pulled underneath the bar. This is where the jumping analogy can be problematic.
The feet should be pulled off of the floor only high enough to rapidly replace them in the lifter's squat stance—their elevation is only to allow an extremely quick position change. Some lifters will unintentionally kick their feet up and back at the end of the second pull—some can get away with it at high levels of performance, but when coaching new lifters, it should be corrected immediately and not allowed to become habit. As mentioned above, an extended separation from the floor creates potential instability upon landing because controlling the position of the body becomes more difficult.
The Third Pull
Many athletes and even coaches gravely misunderstand the final part of the snatch or clean—the third pull—as 'dropping' under the bar. The third pull is just as active and aggressive as the second, and relaxation or passivity will nearly guarantee a missed lift.
Because the bar begins in front of the legs and finishes approximately over the heels, it's clear its path cannot be perfectly linear. That being the case, the bar requires some guidance to its final position. This guidance is the result of aggressive external rotation of the arms pulling the bar back into the slot.
In addition to directing the bar back into the position in which it's received, this turnover of the arms actively pulls the lifter underneath the bar. This is a critical point—the lifter does not accelerate the bar upwards as much as possible and simply wait to fall underneath it. Basic physics tells us that objects fall at the same speed regardless of mass. Since neither a barbell nor a human body in these circumstances experiences considerable air friction, the two objects will descend at the same rate. That being the case, the lifter must accelerate his- or herself to beat the barbell down. The only option for achieving this goal is for the lifter to take advantage of the barbell's inertia and use it as an anchor on which to pull.
This active third pull will also help prevent the barbell from crashing on the lifter because it will keep the lifter more tightly attached to it and more likely to receive it at the appropriate height. Along these lines, it's important to remember that the bar must be met where it is—that is, if the bar is pulled high enough for a power snatch, the lifter should not be dropping into a full squat. It's obvious that if the lifter tries to catch a bar higher than it's been pulled, the attempt will fail, but less obvious that the height of the bar and lifter must align in the opposite case to prevent the bar from crashing onto the lifter.
Receiving the Bar
At the completion of the third pull, the barbell will be directly over the lifter and the lifter in some degree of an overhead squat, depending on the height achieved during the second pull. Just as the third pull must be aggressive, the successful receipt of the bar overhead demands actively pushing it up.
This active pushing involves two basic points—powerful elbow extension and active shoulders. Failure to drive up on the bar when receiving will result in the shoulders and elbows collapsing under the weight. Aside from potentially dropping a loaded barbell on your head and winding up in a motorized wheelchair, any break from complete elbow extension at any time is a no-lift in competition.
The bar should be stabilized before the lifter attempts to stand—rushing to stand with an unstable bar is a good way to drop it. On the other hand, the lifter may choose to stand at least partially in order to chase a bar he or she is losing out front. Within reason, this is an acceptable practice (particularly in competition), but never allow your lifters to risk injury chasing a lift. Instead, improve their technique so they don't have to.
When standing again with the bar overhead, the lifter must keep the torso upright and the arms driving the bar up. If the lifter elevates the hips sooner than the shoulders, he or she will likely lose the bar out front. The hips must be pushed in under the shoulders as soon as possible when standing.
Once the lifter has stood again, encourage him or her to keep the bar overhead until it's absolutely clear it's stable before dropping it. Dropping the bar immediately upon standing can mask a forward-falling bar and develop bad habits. If the lifter intends to compete in the future, he or she must become accustomed to holding the bar until the center judge gives the down signal.
Go Forth and Coach
You should now be equipped with all the information necessary to teach the basics of the snatch to a new lifter. The snatch series will be finalized with discussion of skill transfer and assistance exercises as well as common faults and corrections.
With nothing but personal experience and reasoning to substantiate, I'll claim there isn't a single male athlete in the universe who won't want to immediately slip 80kg onto the bar and try to launch it. Occasionally, those of the stupid strong variety will be successful, at least in terms of getting the bar overhead, but it will likely look like Andy Dick having a grand mal seizure. As a coach, it's your responsibility to progress the lifter as appropriate, even if it means some lifters use nothing but an empty bar for what may seem to them like an absurdly extended period of time—or return to the PVC again.
If you missed the last installment, go back and read it. "Dave, maybe in the future children will learn to drive rocket cars before they walk, but for now, let's stick to the fundamentals!"
Facility and Equipment
Something we haven't covered yet is where these snatches are taking place and with what. Granted, it strikes me as obvious, but I've been surprised before. We'll be thorough and not leave anyone behind.
Bars
Spending more money on a bar will prevent a lot of frustration and likely save you money in the long run. Chapman, Werksan, and Pendlay all make quality bars for decent prices. I recommend selling any extra children you may have lying around for some spending money—a nice bar will give you much greater returns with much less maintenance.
Bumpers & Change
There is a wide range of quality in the realm of bumper plates, but outside of competition and elite lifting, weight is weight. I would recommend using kilogram bumpers and change for the sake of preparing for possible competition and ease of communication within the weightlifting community, but if you already own pound bumpers and plates, just lift them and use a calculator if someone asks.
Nicer bumpers and even change will be color-coded. Red is 25kg (55lb), blue is 20kg (44lb), yellow is 15 kg (33lb), and green is 10 kg (22lb). If your bumpers are black, you can purchase colored tape to wrap them in if you want to learn to associate the colors with their weights easily.
Flooring
A weightlifting platform is the ideal lifting surface, surprisingly enough. Quality platforms can be built easily and inexpensively. A wooden lifting surface can also be placed within rubber flooring for a simple and unobtrusive platform (fat guy on top sold separately).
However they're arranged, a wooden lifting surface will provide a stable, smooth and solid lifting platform, and rubberized landing pads will reduce the beating your bar and bumpers take and extend their useful lives.
To the Bar!
Whether a lifter transitions directly to a regulation bar (20kg for the dudes, 15kg for the chicks) or to some kind of intermediate bar (e.g. 5-10kg training bar) is entirely within your discretion as a coach. Consider the athlete's strength and consistency with the movements in question. When in doubt, err on the light side. Don't be afraid to move a lifter back down to a lighter bar if the foray to the big kid's bar appears to be premature—we all make mistakes. If your lifter questions you on this, respond with an excessive prescription of burpees accompanied by mean-spirited ridicule regarding the lifter's inability to progress fast enough.
The Grip
Step one with the new bar is finding the lifter's snatch grip. At this point, both you and the lifter should be able to find and recognize the proper grip width fairly quickly and easily. There will still be some minor adjustment from time to time as you and the lifter decide is necessary, but for now, stick with the grip prescription described in the last installment of this series. Ensure that both you and the lifter make mental notes of the grip position relative to landmarks on the bar to make life in the near future a little easier.
Having a lifter change grip widths frequently will make your job of recognizing and correctly problems far more difficult than necessary—consistency in grip width will allow you to focus on the movement. That said, however, always keep in mind how grip width can affect the movement. For example, if the bar is consistently hitting low on the thighs during the second pull, it may be a case of an excessively narrow grip placing the bar low relative to the hips. But be sure that the problem doesn’t have another source before resorting to grip adjustment.
Bailing Out
Now that we're working with something with enough mass to cause bodily harm, it's important early on to familiarize the athlete with strategies for escaping immanent doom—don't wait until the lifter's left arm is collapsing under 90kg overhead.
It might be wise to first instruct the bail-out with PVC—loud crashing noises tend to freak people out and make them reluctant to drop the bar as we need them to. Also, if they don't listen to you, less damage will be incurred if the lifter drops a length of PVC instead of a bar on his or her back.
Bailing out of a failed snatch isn't rocket science—but it does require commitment and a strategy that has become second nature long before its employment is needed—under a heavy bar that's threatening to split you in half is neither a good time nor place to make plans.
There are really only two directions to dump a bar: forward or backward. Even if a lifter somehow manages to be losing control of a bar to the side, dumping it either forward or backward is necessary—an Olympic bar is seven feet long, which is a pretty great distance to launch a loaded bar, particularly when it's already out of control.
Keep in mind, the location and present direction of travel of the bar determines the dumping location, not the lifter. I've heard recommendations to always dump a bar in either the front or the back. If you have trouble understanding why this is not just difficult, but remarkably stupid, try dumping a bar that's falling in front of you behind yourself and see what happens. I won't come visit you in the hospital.
It's also important to maintain clear lifting areas. Bumpers, change, other bars, architecture and small pets can all be objects onto which a bar may fall and off of which it may subsequently bounce unexpectedly, setting up some potentially ugly collisions. 100kg bouncing onto the backs of a lifter's legs is not an event you want to sanction.
Forward
Dumping a bar out front is the easiest direction because it will require the least movement of the lifter and the bar will be in the lifter's field of vision. Typically this happens involuntarily when a lifter leaves the bar out front during the pull or fails to turn it over aggressively enough—it will simply come to rest overhead in front of the lifter's base and promptly bounce right back to the floor.
More of a concern are the instances when the bar lands correctly in the slot directly overhead, but for one reason or another, one or both of the lifter's arms fail to lock and the bar begins heading right down on top of his or her head. In this instance, the lifter must actively push the bar forward, keeping the arms as long as possible, and jumping backward (Note: this is assuming the bar is literally directly overhead. If when the elbow or elbows break the bar begins to favor the back, that's the direction in which it must be dumped.). As long as the arms are extended fully, keeping the grip on the bar will ensure it lands well in front of any of the lifter's body parts. In some case, literally throwing the bar may be necessary. Be sure to let your athletes know this is all right—don't let them fail to bail out completely for fear of making noise, looking stupid or somehow offending you.
Video: Missing in Front
Backward
Three things are critical when dumping a bar behind: extending the arms as fully as possible, loosening the grip on the bar, and jumping forward. Extending the arms or keeping them extended will of course maximize the radius of the falling bar's arc, consequently creating more safe space for the lifter. However, few athletes will have the shoulder flexibility to maintain their grip on the bar throughout said arc—it's therefore important that they release their grip on the bar as it travels down, ideally letting it go at the point farthest behind them. At the same time, the lifter must jump forward as far as possible to prevent the bar from dropping onto his or her lower back.
Video: Missing Behind
From the Top Down
The next step once the lifter has grabbed a real bar is to verify he or she is able to perform all he or she did with the PVC and with equal skill and consistency. We didn't spend all that time with the PVC for fun—if those movement patterns fall apart with a bar, there's no sense in moving on any further.
The Overhead Squat
Let's make something abundantly clear before we go any further: If an athlete can't perform a legitimate, stable overhead squat, that athlete CANNOT SNATCH. This is not a brain teaser—the receiving position for the snatch is the bottom of an overhead squat. Let's let the foundation dry before we start hanging the curtains.
Just as you did with the PVC, instruct the lifter to bring the bar overhead with a snatch grip and squat. Not squat a little—squat. That means as low as the body will allow the hips to travel. It's extremely common for athletes to install depth governors on their squats and arrest the descent sometimes long before actually reaching bottom. This may fly while doing excessive numbers of air squats for uninspired trainers, but it will crash and burn on a snatch attempt with any kind of real loading. The additional weight is going to bring the athletes' hips down whether they want it to or not, so those athletes better be prepared physically to not only achieve ass-to-ankles overhead squats but to recover from them as well.
Monitor the lifter on the way down closely—the movement should be smooth and controlled. If he or she is fighting the bar throughout the journey, it suggests one or more problems: overhead instability arising from weak shoulders, back and/or arms or inadequate flexibility, inadequate hip and/or leg flexibility preventing the hips from remaining nearly over the heels throughout the movement, or poor balance in general. All of these things must be addressed and corrected as soon as possible.
Invite the lifter to stay in the bottom of the squat—let them feel the position, force them to maintain their posture and balance, and continue watching for problems. In this position, it's common for weight to be predominantly on the toes or for the outer edges of the feet to elevate. In both instances, stand adjustment or flexibility work is needed. While continuing to attempt to achieve and maintain the overhead squat will help improve flexibility, it alone is rarely sufficient or expedient.
Again, monitor the lifter's movement when you allow them to return to standing. Do not allow him or her to initiate the squat with hip elevation. Premature hip elevation means forward tilting of the torso—don't make the movement harder than it needs to be. The torso should remain upright and at the same angle until the legs are extended. That means the hips must remain nearly within the same plane the whole way up. Driving them back and up in an arc will require that the torso and bar travel forward to keep the center of mass over the lifter's base. The more the center off gravity shifts horizontally, the more difficult controlling it will be. Again, the idea is to make the movement easier, not to add challenges.
At this point, decisions must be made in regard to the coaching strategy. A lifter may demonstrate excellent pulling technique but overhead squat like a spaz. It will be difficult to make the case for holding off on everything until he or she achieves a perfect overhead squat. In this case, you may make the decision to coach the lifter through power snatching while working aggressively to correct any overhead squatting deficiencies with practice, smart stretching, and assistance movements, and later progress him or her to full snatches when able. In the opposite case—that is, an excellent overhead squat and lame pulling technique—the course of action is obvious.
Overhead Squat Video - Notice the upright orientation of the torso, the minimal horizontal movement of the hips, and the knees necessarily pushed forward over the toes.
The Burgener Warmup
Once the overhead squat has been determined to be satisfactory, or you've decided to continue working on it and move on to the power snatch, it's time to return to the Burgener Warmup.
For most athletes, the movements of the Burgener Warmup will prove easier with a bar than with a length of PVC simply because having some resistance to work against allows them to feel more natural and the weight provides greater feedback regarding the bar's position relative to the body. Again, if the athlete is struggling with the weight, drop him or her to a lighter bar or even back to the PVC.
Run through the Warmup as many times as necessary for you to evaluate the lifter's technique and decide whether or not it's prudent to move on. If not, continue coaching only this limited section of the snatch until you feel comfortable progressing the lifter. Otherwise, read on.
The Starting Position
The sharper readers in the crowd already know that the snatch starts from the floor. As I've repeated an obnoxious number of times, start conservatively. Use training bumpers to place the bar at the correct height instead of jumping right to 10kg or 25lb bumpers if more appropriate for the lifter in question.
The starting position for the snatch is critical for a successful lift. Some athletes choose to employ dynamic starts in which the hips move into position and the lift is begun immediately, whereas other athletes choose a static start in which they set the starting position for a moment before beginning the lift. For new lifters, a static start is wise until consistency can be ensured, at which point dynamic starts can be experimented with. In addition, for the coach, fault correction becomes more difficult due to the inability to clearly see the lifter's starting position.
Immediately after takeoff. Weight is on the heels, hips are slightly higher
than the knees, shoulders are in front of the bar, back is curved and tight.
Based on anthropometrics, starting positions among lifters will vary somewhat. Just like the squat, however, there are certain points that will be universal.
The feet will be in the pulling position: the heels under the hips and the toes rotated outward slightly. Some lifters are successful with wider or narrower stances, but again, develop from a standard starting point before experimenting with too many details. The stance should never be so wide that the legs interfere with the arms during the pull. Some lifters also find success with dramatic external rotation of the legs in order to prevent the knees from moving as far forward and create an easier path for the bar to travel from the floor to above the knees. As with stance width, lifters should begin with the basics before moving on to more complicated details. The weight may be slightly forward on the feet—it will be shifted very soon after takeoff—but should certainly not be on the toes entirely.
The hips in the starting position will be slightly above the knees. The shorter the lifter's legs are, the lower the hips will likely be in his or her comfortable starting position. The hips should not, however, start below the knees for a lifter of any height. As mentioned previously, some lifters choose a dynamic start, often dropping the hips far below the knees at some point. Irrespective of their lowest point in motion, the hips invariably return to a point above the hips before the barbell is lifted from the floor.
As with all pulling movements, long-legged lifters will tend to elevate the hips far above the knees either at the start or before lifting the bar. This will typically result in the bar swinging away from the body and pulling the lifter forward. Consider this if a lifter is continually jumping, recovering, or dropping the bar forward.
The back must be set tightly in the starting position before the movement begins. A soft back will absorb a significant amount of the force generated by the legs and hips instead of allowing that force to be transferred to the bar. In addition, it of course limits the stability and therefore the safety of the spine. The spinal erectors should be tight from the neck to the sacrum, pulling the back into a slight reverse curve.
The shoulders should be in advance of the bar somewhat and the arms as relaxed as possible. Throughout the pull of the snatch, the arms should be internally rotated—elbows pointing away from the body—to prevent encourage the bar to remain close to the body on its way up.
In the starting position, the bar should be against the shins of the lifter. Some lifters will walk their shins to the bar before gripping it, while others prefer to first grip the bar and pull it into their shins while assuming the starting position. Either is perfectly fine as long as the bar ends up against the shins. Keeping the bar close will create better leverage and encourage it to remain close throughout the lift.
Finally, breath control is important. Just as with any heavy lift, air should be drawn in and held for the duration of the movement. It will be easier to fill the abdomen and chest with air before entering the starting position. Some lifters will grunt or otherwise expel a small burst of air during the second pull. This is acceptable, but it should be involuntary and the product of an extremely aggressive pull. A loss of too much air must be avoided or the receiving position will be destabilized.
The First Pull
The first pull of the snatch and clean brings the barbell from the floor to above the knees. This movement serves to initiate the barbell's movement and bring it into place for the second pull, which is the segment of the lift during which maximal power is applied. While relatively simple, the first pull commonly presents many problems for even experienced lifters because of interaction of the knees with the bar.
This initial phase of the lift resembles the same portion of a typical deadlift. As the bar rises, the knees must be pushed back to allow the bar to travel up uninterrupted. This must be done without elevating the hips relative to the shoulders—the angle of the back should remain the same until the bar is above the knees.
The bar should be squeezed from the floor, not jerked—that is it should be accelerated fairly slowly initially. Jerking the bar off the floor is not only counterproductive, but also potentially injurious. The lifter's body should be tight before the bar moves at all, with the exception of the arms, which should remain as loose as possible.
As described above, in the starting position, the weight may be slightly forward on the feet. When the bar is lifter from the floor, the weight should shift back to the heels; if it remains on the toes, the bar will pull the lifter forward for the remainder of the lift. Don't be afraid to focus exclusively on a lifter's feet during a lift—much can be revealed right from the initiation of the movement.
Some lifters are able to keep the bar in contact with their shins without causing any damage, while others find their shins hemorrhaging after each pull. The latter may want to invest in very tall socks. Keep in mind, however, that in competition, the socks may not touch knee sleeves if worn.
The Second Pull
The second pull begins when the bar passes the lifter's knees and the hips and knees begin to drive forward into the power position. At this point, the lifter should be well acquainted with the movement because of all of his or her practice with the hang power snatch as performed in the Burgener Warmup and elsewhere. Because the movement of the second pull was discussed pretty thoroughly in the last installment, its discussion here will be limited.
As the bar passes the knees, it will probably not be in contact with the lifter's body for a brief moment, only because tight bars peeling off kneecaps is generally not an experience a lifter is seeking. However, this is not an excuse to allow the bar to swing out. The shoulders will still at this point be in advance of the bar—if the lifter relaxes, the bar will hang directly below the arms' attachments, consequently allowing the bar to pull away from the body. The bar must then be actively pulled into the body again and kept there until the completion of the second pull when the body will begin descending. If you have trouble seeing whether or not the bar is remaining in contact with the lifter's body, cover the center of the bar with chalk and see if it transfers to the lifter's clothing in the appropriate locations. If video is available, if the location of the bar is not clear, check for shorts and shirts being pulled up the body by the bar.
As the bar reaches approximately mid-thigh, the scoop will begin, the hips driving forward, the knees re-bending slightly and the lifter entering the power position. From here, the hips and legs must be extended violently and vertically. Watch for excessive horizontal hip travel bumping the bar out from the body. The horizontal hip movement serves only to relocate the hips under the shoulders in order to allow vertical extension of the body.
Arguments about ankle extension exist. The classic notion of triple extension refers to the hip, leg and ankle, demonstrated by most lifters. However, some lifters at the highest levels of the sport display very little if any ankle extension. This has been used to argue that ankle extension is undesirable, but that argument seems to ignore the success of those who do use ankle extension.
The calves are extremely strong, but probably don't contribute a great deal to the power of the second pull. That being the case, a lack of ankle extension in the presence of excellent leg and hip extension is likely not a problem, but not necessarily beneficial.
The more important point on which to focus is where the lifter's weight is on the feet prior to their coming off the floor—the weight should be driven through the heels for as long as possible. If the ankles are extended after the completion of leg and hip extension, there are no inherent problems. Potential problems do exist, however. A lifter may spend too much time extending the ankles, delaying the third pull long enough to miss the lift; he or she may shift his or her weight forward during ankle extension, consequently shifting the body and barbell forward and again missing the lift; finally, the lifter may get too much separation from the floor and become unstable upon planting the feet again. If none of these things is occurring along with ankle extension, it should not be a concern.
The idea of the second pull is to lift the bar as high as possible and accelerate it as much as possible. This is very different from elevating the body as much as possible—the body should not travel any higher than it needs to because ultimately it must be pulled underneath the bar. This is where the jumping analogy can be problematic.
The feet should be pulled off of the floor only high enough to rapidly replace them in the lifter's squat stance—their elevation is only to allow an extremely quick position change. Some lifters will unintentionally kick their feet up and back at the end of the second pull—some can get away with it at high levels of performance, but when coaching new lifters, it should be corrected immediately and not allowed to become habit. As mentioned above, an extended separation from the floor creates potential instability upon landing because controlling the position of the body becomes more difficult.
The Third Pull
Many athletes and even coaches gravely misunderstand the final part of the snatch or clean—the third pull—as 'dropping' under the bar. The third pull is just as active and aggressive as the second, and relaxation or passivity will nearly guarantee a missed lift.
Because the bar begins in front of the legs and finishes approximately over the heels, it's clear its path cannot be perfectly linear. That being the case, the bar requires some guidance to its final position. This guidance is the result of aggressive external rotation of the arms pulling the bar back into the slot.
In addition to directing the bar back into the position in which it's received, this turnover of the arms actively pulls the lifter underneath the bar. This is a critical point—the lifter does not accelerate the bar upwards as much as possible and simply wait to fall underneath it. Basic physics tells us that objects fall at the same speed regardless of mass. Since neither a barbell nor a human body in these circumstances experiences considerable air friction, the two objects will descend at the same rate. That being the case, the lifter must accelerate his- or herself to beat the barbell down. The only option for achieving this goal is for the lifter to take advantage of the barbell's inertia and use it as an anchor on which to pull.
This active third pull will also help prevent the barbell from crashing on the lifter because it will keep the lifter more tightly attached to it and more likely to receive it at the appropriate height. Along these lines, it's important to remember that the bar must be met where it is—that is, if the bar is pulled high enough for a power snatch, the lifter should not be dropping into a full squat. It's obvious that if the lifter tries to catch a bar higher than it's been pulled, the attempt will fail, but less obvious that the height of the bar and lifter must align in the opposite case to prevent the bar from crashing onto the lifter.
Receiving the Bar
At the completion of the third pull, the barbell will be directly over the lifter and the lifter in some degree of an overhead squat, depending on the height achieved during the second pull. Just as the third pull must be aggressive, the successful receipt of the bar overhead demands actively pushing it up.
This active pushing involves two basic points—powerful elbow extension and active shoulders. Failure to drive up on the bar when receiving will result in the shoulders and elbows collapsing under the weight. Aside from potentially dropping a loaded barbell on your head and winding up in a motorized wheelchair, any break from complete elbow extension at any time is a no-lift in competition.
The bar should be stabilized before the lifter attempts to stand—rushing to stand with an unstable bar is a good way to drop it. On the other hand, the lifter may choose to stand at least partially in order to chase a bar he or she is losing out front. Within reason, this is an acceptable practice (particularly in competition), but never allow your lifters to risk injury chasing a lift. Instead, improve their technique so they don't have to.
When standing again with the bar overhead, the lifter must keep the torso upright and the arms driving the bar up. If the lifter elevates the hips sooner than the shoulders, he or she will likely lose the bar out front. The hips must be pushed in under the shoulders as soon as possible when standing.
Once the lifter has stood again, encourage him or her to keep the bar overhead until it's absolutely clear it's stable before dropping it. Dropping the bar immediately upon standing can mask a forward-falling bar and develop bad habits. If the lifter intends to compete in the future, he or she must become accustomed to holding the bar until the center judge gives the down signal.
Go Forth and Coach
You should now be equipped with all the information necessary to teach the basics of the snatch to a new lifter. The snatch series will be finalized with discussion of skill transfer and assistance exercises as well as common faults and corrections.
| Greg Everett is the owner of Catalyst Athletics, publisher of The Performance Menu Journal and author of Olympic Weightlifting: A Complete Guide for Athletes & Coaches, Olympic Weightlifting for Sports, and The Portable Greg Everett, and is the writer, director, producer, editor, etc of the independent documentary American Weightlifting. Follow him on Facebook here. |
Search Articles
Article Categories
Sort by Author
Sort by Issue & Date
Article Categories
Sort by Author
Sort by Issue & Date