

The Snatch pt 1
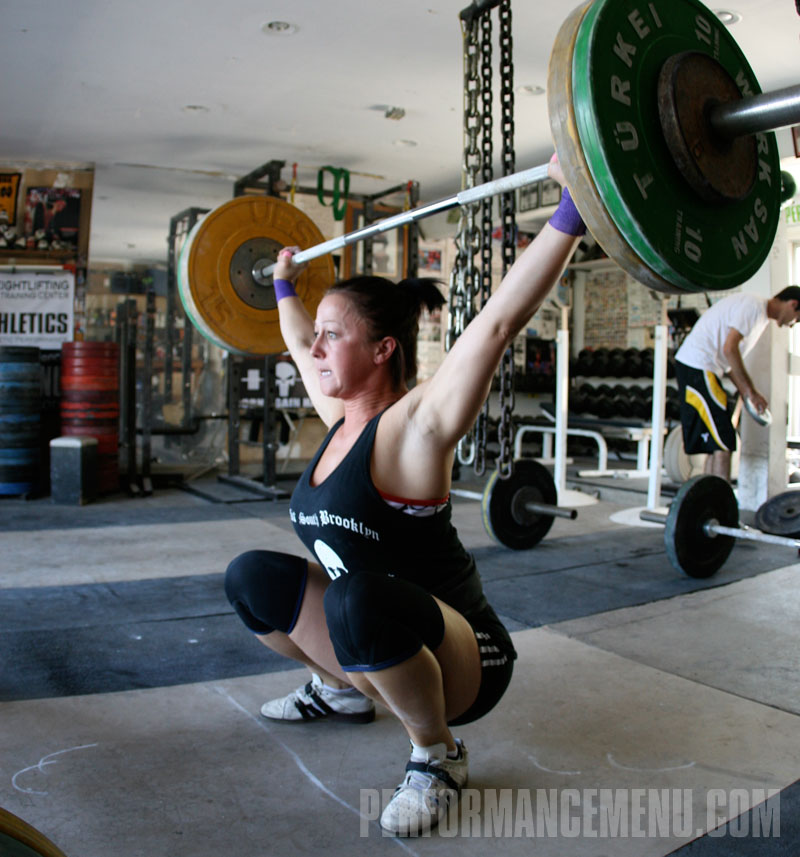
The snatch is the first of the two lifts contested in Olympic weightlifting in which the barbell is lifted from the floor to overhead in a single movement. With its unparalleled speed and extensive range of motion, it epitomizes mechanical power—the performance of maximal work in minimal time—as well as technical precision.
The fundamental pulling mechanics of the snatch apply to the clean and to a lesser degree the dip and drive of the jerk. Learning the snatch is typically more difficult than learning the clean and jerk for new lifters. For these reasons, teaching the snatch first is recommended—once a new lifter is reasonably comfortable with the snatch, the learning curve for the clean and jerk will be greatly reduced.
The Grip
The wide hand placement for the snatch serves to reduce the range of motion in order to move larger loads. It should be noted, however, that the wider grip places greater strain on the wrists because of the awkward angle in which they're placed under the bar. For this reason, new lifters should begin with relatively narrow snatch grips and incrementally widen them over time in order to allow the joint structures to adapt adequately to the stress. Eventually, each lifter will find his or her ideal width. A narrower grip will typically make the pull from the floor easier both in terms of grip strength and starting hip and back positioning, while a wider grip can improve the speed of the turnover by reducing the distance the bar must travel—lifters should experiment with varying widths to compensate for individual strengths and weaknesses, but always keep in mind the limitations and drawbacks of either extreme.
Once a lifter has determined his or her ideal grip, it's important he or she note the hand placement relative to landmarks on the bar. Typically lifters will rely on the outermost breaks in a bar's knurling for landmarks. This approach will be successful when lifting on bars of the same make. However, occasionally lifters may encounter unfamiliar bars with markings that don't align with the bars to which they're accustomed. If unnoticed, particularly in competition, this can be problematic if not disastrous. The solution is to ensure the lifter can define his or her hand position relative to the insides of the bar's sleeves, the distance between which will always be the same on Olympic bars.
There are numerous ways to determine starting grip width for the snatch. All will produce very similar results, so the chosen method is more a product of circumstances and personal preference than accuracy. More importantly, there is no formula for determining perfect grip placement for lifters and spending great amounts of time with complicated measurements simply to locate a preliminary grip width is an ineffective use of training time at best.
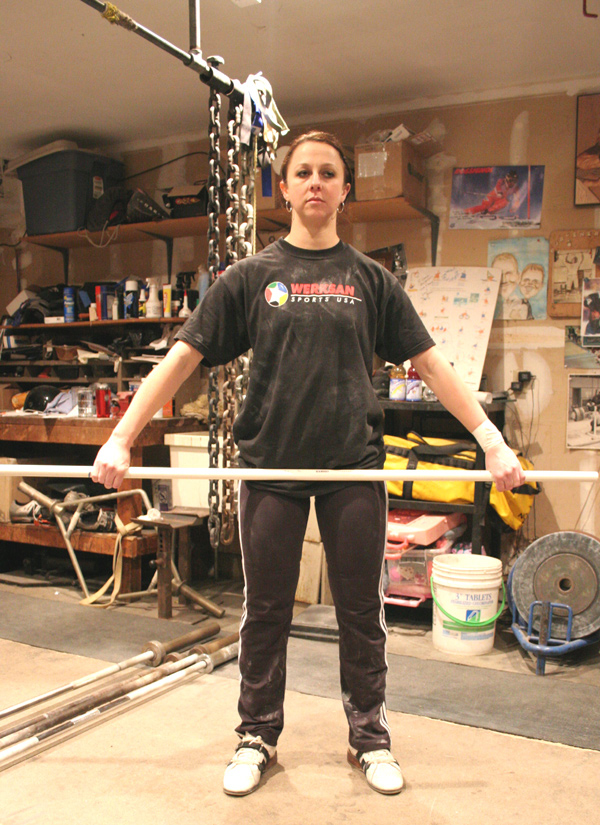
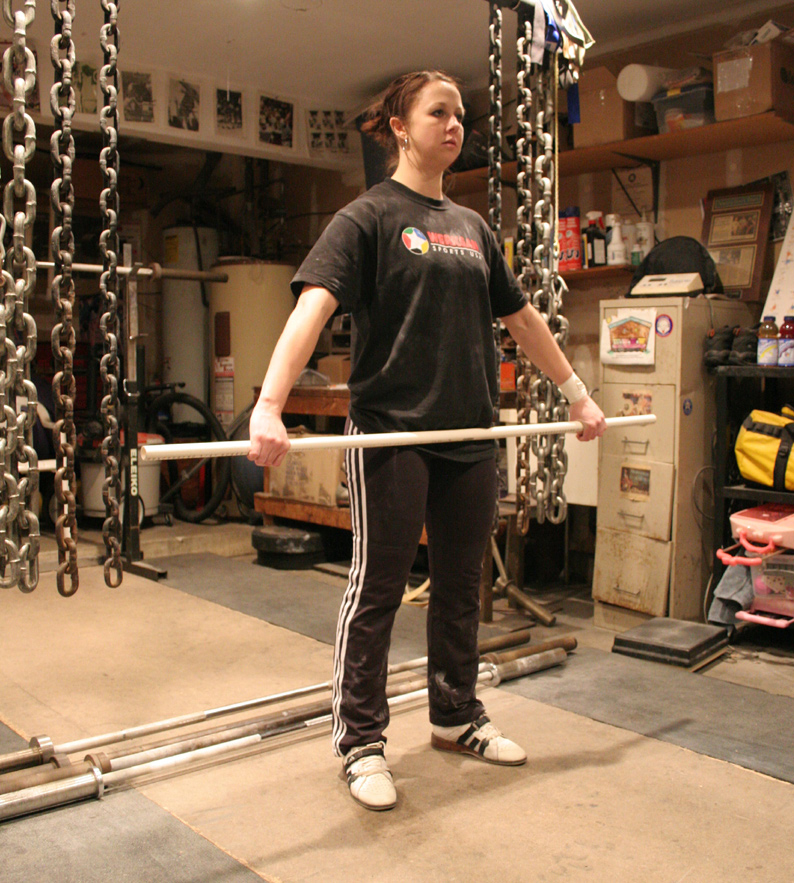
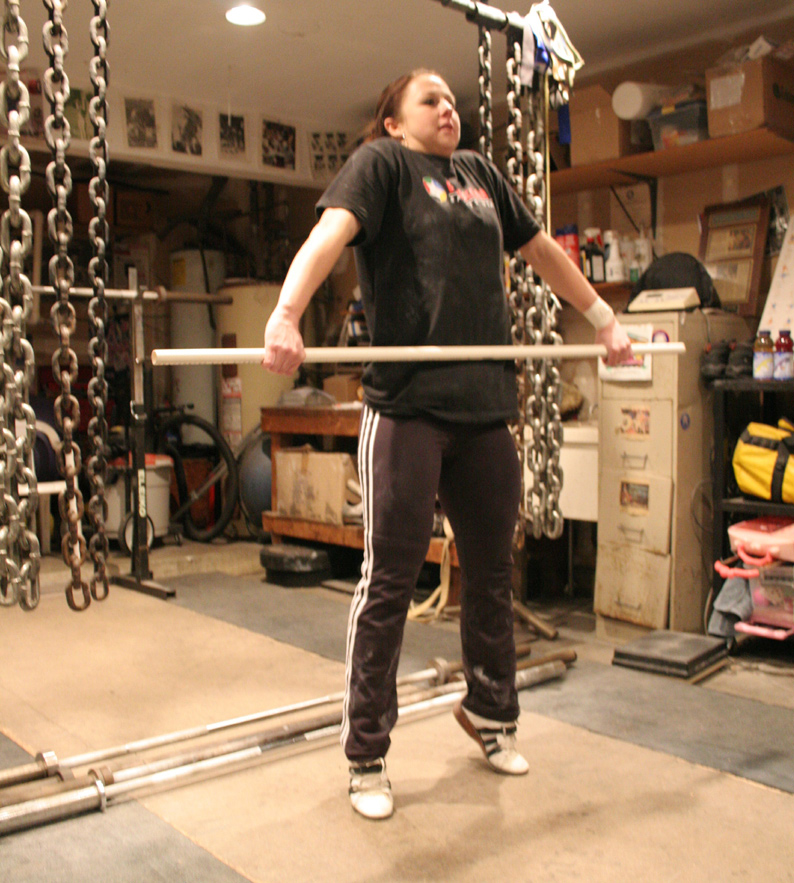
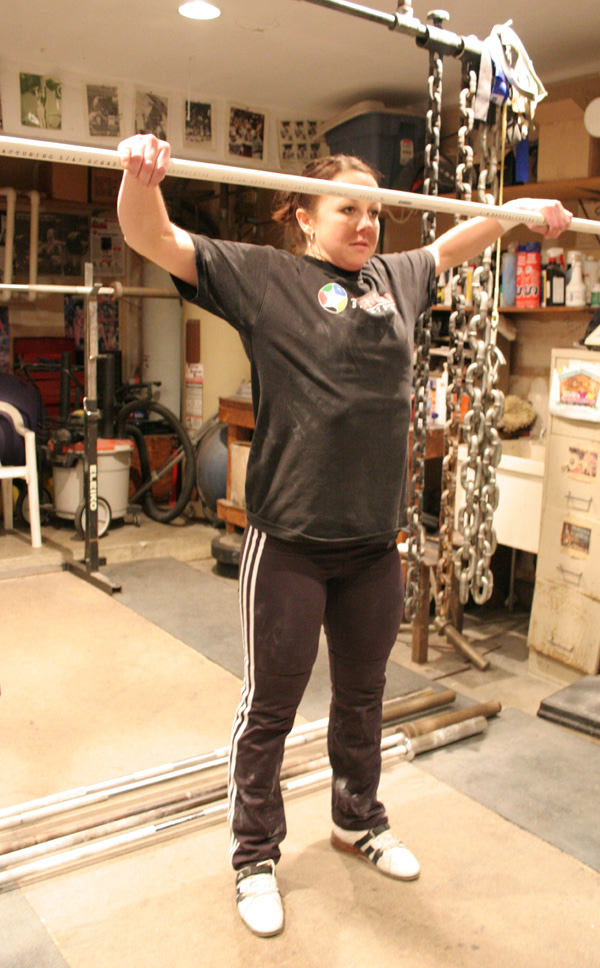
A quick and simple way to find a starting grip position is to simply instruct the lifter to hold the bar overhead and continue cuing adjustments until it is 6-10 inches above the head. Then instruct the lifter to let the bar hang at arm’s length and ensure it rests approximately in the crease of the hips. Place priority on the bar's location at the hips—if the bar is too low, it will likely be driven out away from the body by the thighs during the scoop.
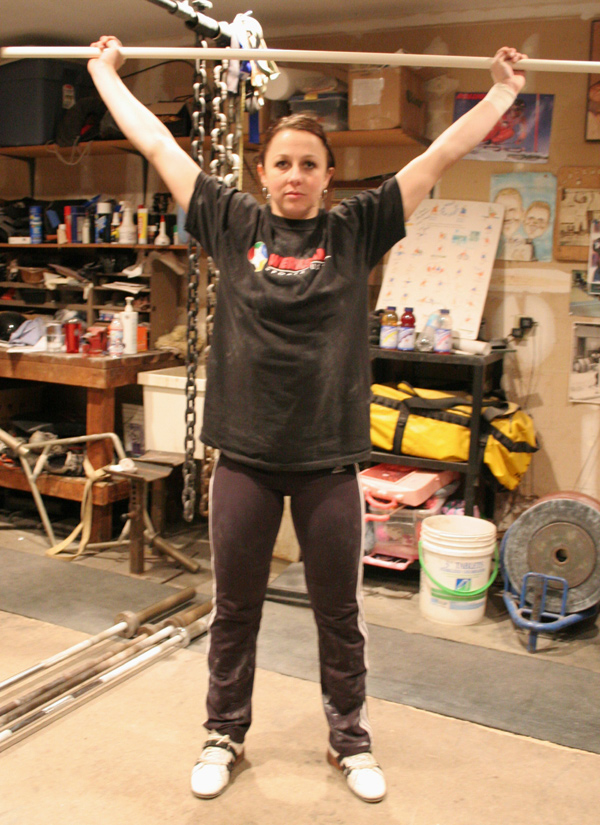
visual method – Instruct the lifter to hold the bar 6-10 inches overhead and ensure it rests approximately in the crease of the hips.
The Hook Grip
For the pull of both the snatch and the clean, the hook grip is a necessity to maintain control of the barbell during the violent pull. Some claim the hook grip is not actually the strongest grip possible in terms of pressure placed on the bar, but will prevent unwanted rotation of the bar during its turnover. My personal experience contradicts this. Either way, however, the hook grip must be used.
The hook grip is a pronated (palms facing the lifter) grip in which the thumb is pinched between the bar and usually the first and second fingers, depending on hand size. For most lifters, this will be uncomfortable if not painful initially. Consistent use will stretch the offending structures appropriately over time and the grip will ultimately offer no trouble. Lifters may find that icing the hands after training will help reduce any pain and speed the adaptation.
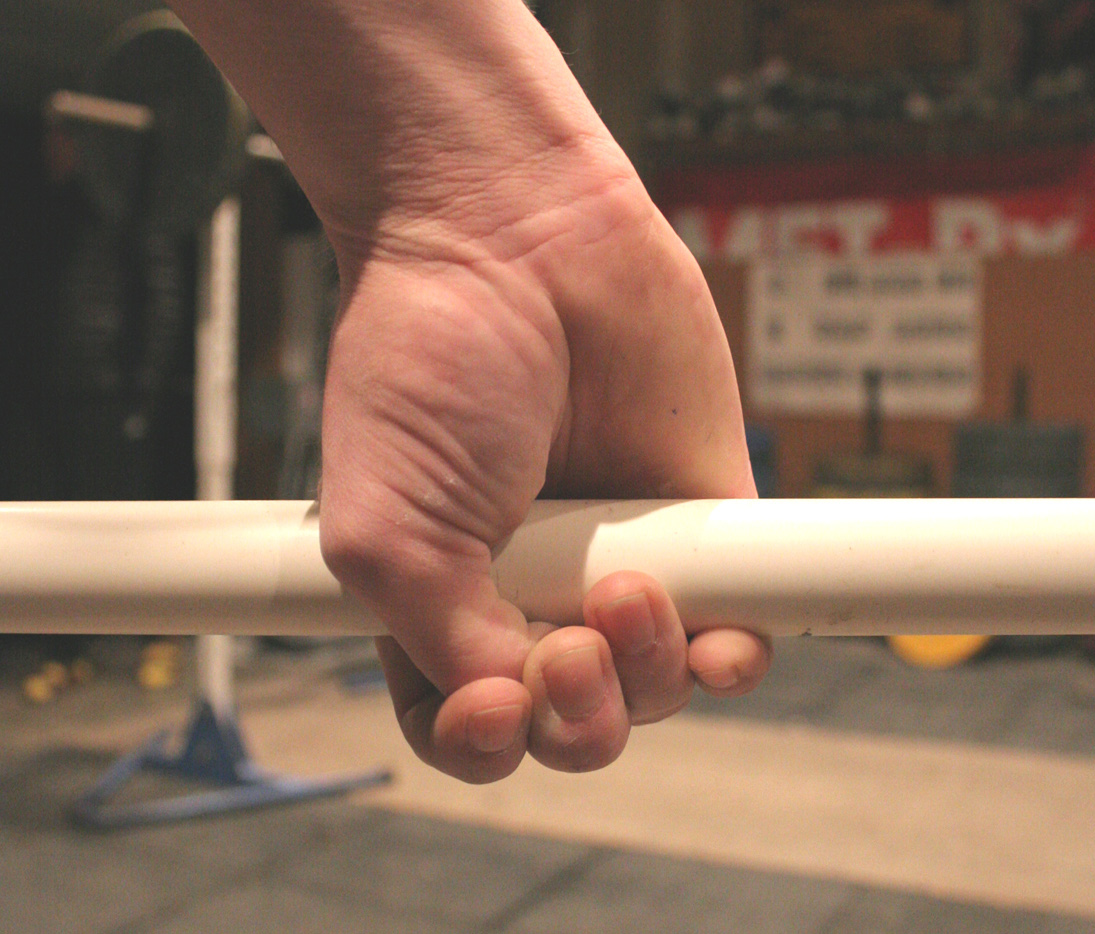
Hook Grip – The hook grip is a pronated grip in which the thumb is pinched
between the bar and fingers.
In the snatch, the hook grip may be released at the end of the third pull to return to a normal grip when the bar is received overhead. This will typically ease the stress on the hands and wrists in the overhead position. However, some lifters find that releasing the hook grip during the turnover prevents them from maintaining a tight enough connection to the bar, resulting in a weak or slow turnover. These lifters choose to maintain the hook grip throughout the lift.
It's wise when learning to practice releasing the hook grip. As the lifter progresses, he or she can decide to maintain the hook grip should that prove beneficial. If a new lifter starts by never releasing the hook grip, he or she will find it much more difficult to learn to release it later.
From the Top Down
Having been influenced greatly in my coaching by Mike Burgener, I’ve found teaching the lifts from the top down to be the most effective approach and continue to adhere to his segmentation of the pull into smaller movement drills that he has assembled and dubbed the Burgener Warmup. If you’ve followed this series of articles, you’re already familiar with the basic Olympic squat as well as the power position and transition phase of the snatch and clean. It’s now time to bring them together and apply them to the first classic lift.
The Overhead Squat
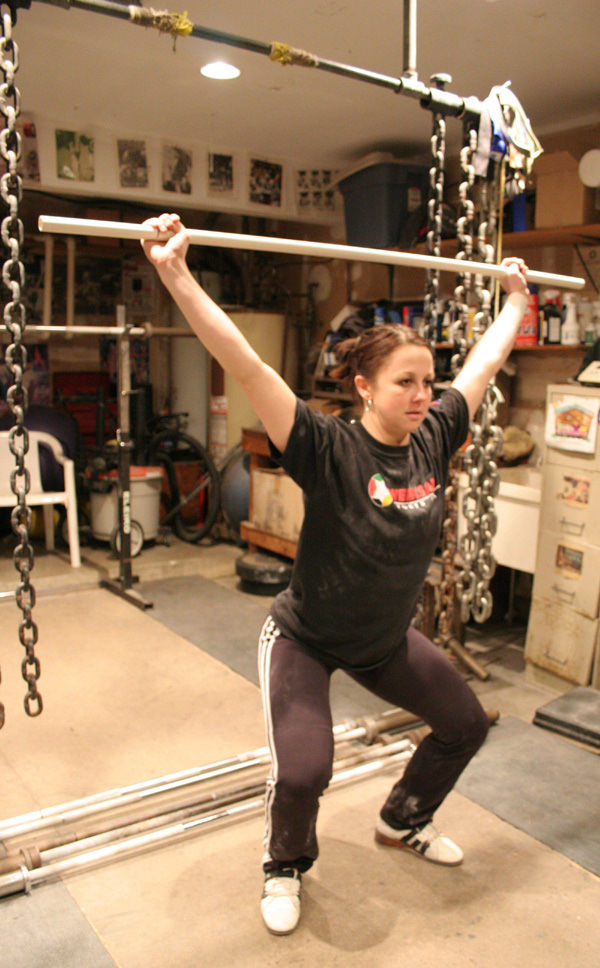
The overhead squat will be the position in which the lifter ultimately receives the bar in a snatch. Until this position is both solid and consistent, the lifter will not be able to progress substantially.
Instruct the lifters to hold a length of PVC overhead with his or her snatch grip, placing their feet in his or her ideal squat positioning. Bring the lifter into the bottom of an overhead squat and have them pause to allow you to make any comments or adjustments. At this poing you’ll be able to determine whether not this particular lifter will be capable of performing the full lift or only the power variation thereof.
Recall all of the position requirements of the Olympic squat—these must all be met in the overhead squat. Begin your appraisal of the position from the bottom. Check the foot positioning, ensuring the feet are flat and carrying the lifter’s weight evenly, and that they’re aligned with the lifter’s thighs. Next verify that the lifter’s knees are located over the feet when viewed from the front of the toes, neither diving inward nor flaring outward. The hips should be settled in over the heels instead of pushed back behind the lifter’s base. Check now for proper spinal alignment—the lifter should be maintaining a normal lordotic arch in the lumbar spine and slight kyphosis in the thoracic spine, with the torso nearly erect.
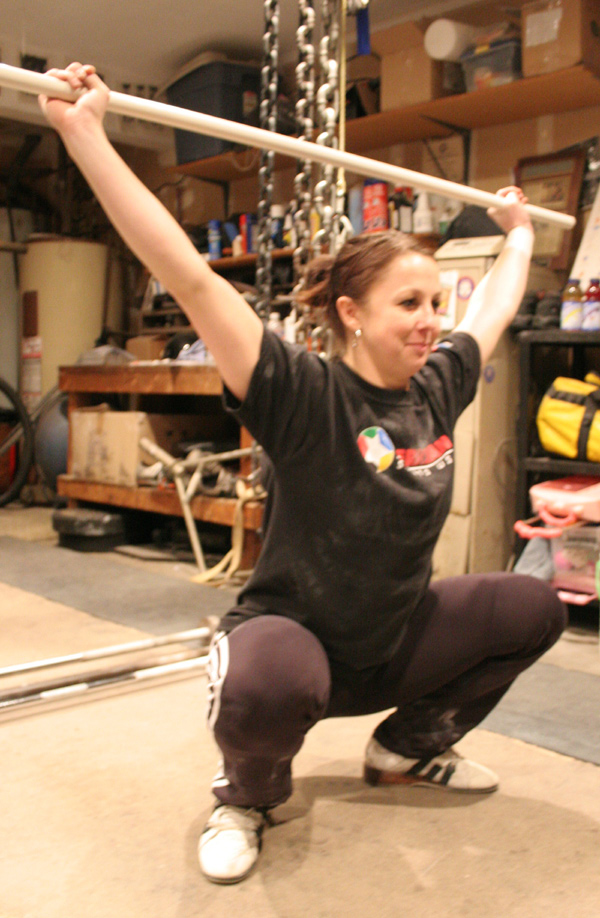
proper overhead squat position
Now with the overhead squat, we have the additional demands of proper shoulder and arm positioning to consider. First ensure the lifter is maintaining active shoulders—that is, shrugging the shoulders high and not allowing them to collapse. This detail will be critical when receiving heavy loads overhead for both stability and injury prevention. The elbows must be fully locked and the arm musculature tight. The bar must be located directly over the lifter’s base—that is, a vertical line drawn to the floor from the center of the bar’s diameter would split the lifter’s feet in half. Finally, the lifter should be driving his or her head forward through the shoulders to place the head in front of the bar.
It’s rare for a new lifter to be capable immediately of a perfect overhead squat, although more common among female athletes due to their typically greater flexibility. As was discussed in the Olympic squat article, limitations due to inflexibility must be actively corrected in order for the lifter to progress. Specific weightlifting flexibility training will be discussed in detail in a later article, but for now, a few stretches will get you started in loosening up a lifter’s tight shoulders.
Dynamic range of motion (DROM) exercises should be included in the lifter’s warmup, including unilateral and bilateral arm circles both forward and backward. Ensure the lifter shrugs the shoulders each time the arms pass over the top just as they would when holding a bar overhead. After this, the lifter can grab a length of PVC with a generously wide grip, and perform shoulder dislocates, passing the PVC overhead from front to back repeatedly, slowing and even pausing for a few seconds at the tightest point in the range of motion. Most people have a tendency to grip too narrowly and force this motion—require the lifter to start much wider than they think they need to, at a width that allows the movement to be performed with absolutely no strain. Have him or her gradually decrease the grip width until the final passes are challenging, but still do not cause any pain. Shoulder dislocates can also be performed while the lifter is positioning at the bottom of a squat to increase the stretch. Again, do not allow the lifter to force the movement.
The athlete’s present flexibility will determine the details of his or her lifting progression. As a coach, you must adjust your instruction accordingly.
The Feet – Pulling & Receiving
The next step toward the snatch is training the foot positioning for the pulling and receiving portions of the lift. You and your lifter at this point should already be familiar with both—the pulling position is that of the power position, and the receiving position is that of their squat. Now the lifter must simply develop the ability to consistently and rapidly transition the feet from the pulling to receiving position.
As a coach, you may prefer to teach this as part of your power position instruction prior to moving on to the specifics of the snatch. Either way, you’ll only need to teach it once, as the movement will be the same for the clean.
Instruct the lifter to bring his or her length of PVC into the proper overhead position and assume the pulling position with the feet. Have them then simply walk the feet to the receiving position. This may be repeated a number of times before proceeding to help the lifter become comfortable with each position.
Next, instruct the lifter to jump the feet from the pulling to the receiving position as quickly as possible with as little vertical elevation as possible. In other words, this is not a vertical jump—the feet are lifter from the floor only to re-position them more quickly. The speed and force of the feet’s movement should be great enough to produce an audible stomp on the platform. Demanding this noise is a simple way to encourage greater speed.
As a way to check the lifter’s receiving foot position, you may choose to have him or her continue into an overhead squat after each or every few landings. If the lifter finds it necessary to adjust the feet for the squat, have him or her take careful note of the ultimate position and force them to hit it on each landing. If this is proving extraordinarily difficult, chalk or tape the platform to indicate where the feet must go to give the athlete a target. Once consistently able to hit the markings, remove them and continue.
The Burgener Warm-up
The Burgener Warm-up is an effective numbered drill created by Mike Burgener to both teach and reinforce the mechanics and positions of the pull. It's primarily used to teach the snatch, although it can be adapted to teach the clean. But as mentioned previously, once an athlete is familiar with the mechanics of the snatch, the clean invariably comes with little if any additional instruction.
Each section of the warm-up contains three repetitions of the movement. Each subsequent section adds a new segment of the pull to the previous until the athlete is completing the entire movement. The warm-up is best used with a length of PVC, although a bar can be used once the athlete has developed the technique adequately.
http://www.mikesgym.org/gallery/video/burgWarmup.swf
Section 1
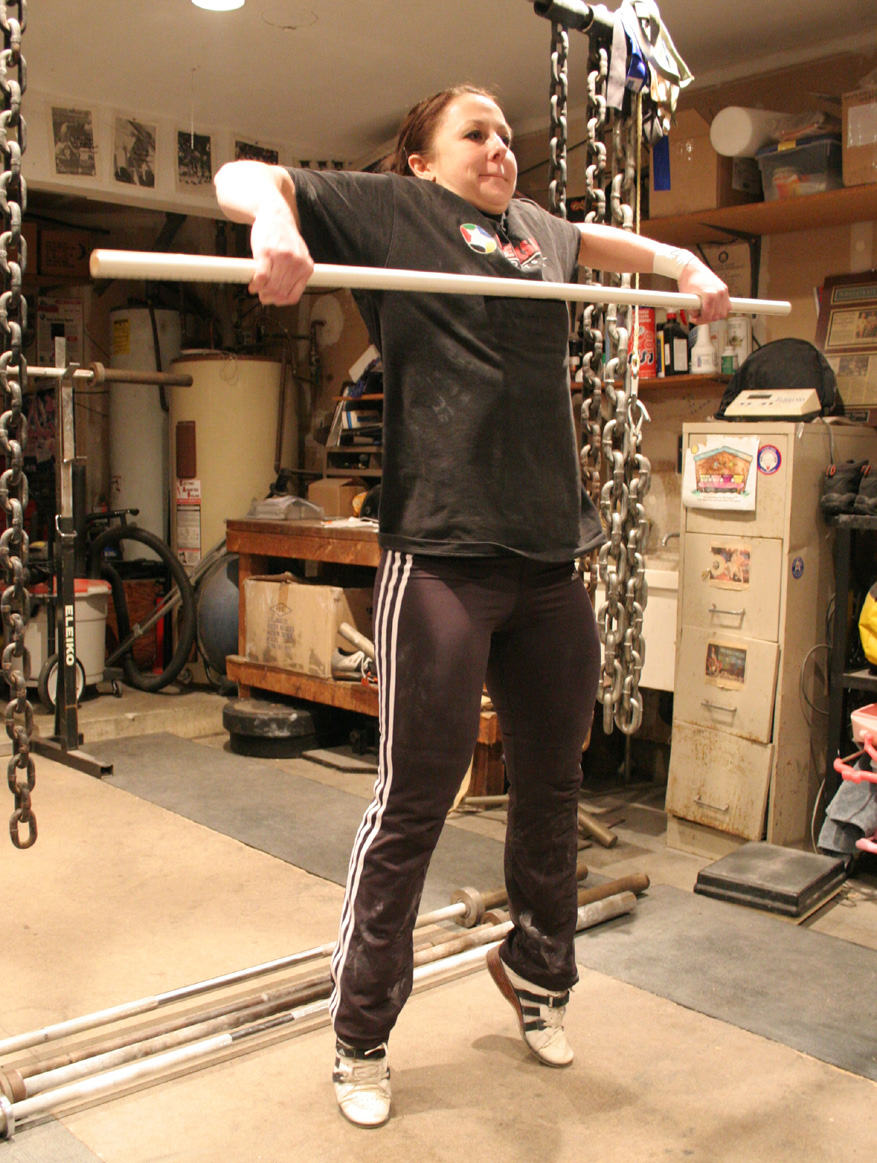
The first section of the Burgener Warm-up is the simplest but likely the most critical as the second pull. Instruct the athlete to stand with the feet in the pulling position with his or her PVC held with a snatch grip hanging at arm's length. As he or she did during the power position drills, the athlete will simply dip by bending only the knees and drive up again, following with a shrug of the shoulders. At this stage, the arms remain straight, but do not allow the athlete to lock them forcefully—they should simply be hanging. The elbows should be rotated outward so they face to each side—this will ensure that the bar remains close to the body during the third pull. You can also allow the athlete to drop the bar to around mid-thigh in order to include the scoop in the drill.
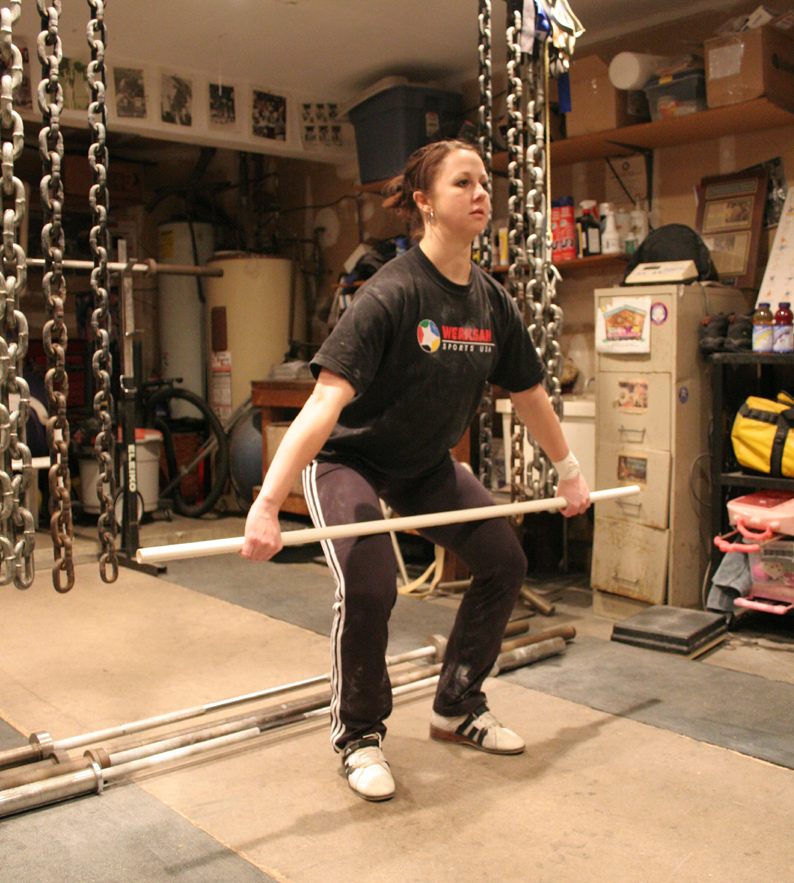
Section 1- Dip and Shrug
Section 2
The next section will begin with the first section and continue to a scarecrow position. After completing the dip and shrug of section 1, instruct the athlete to elevate the elbows, keeping the bar against the body. Ensure that the arms do not bend until the hip and knee extension and shrug have occurred. Do not allow the lifter to raise the hands higher than the elbows.
section 2: Scarecrow
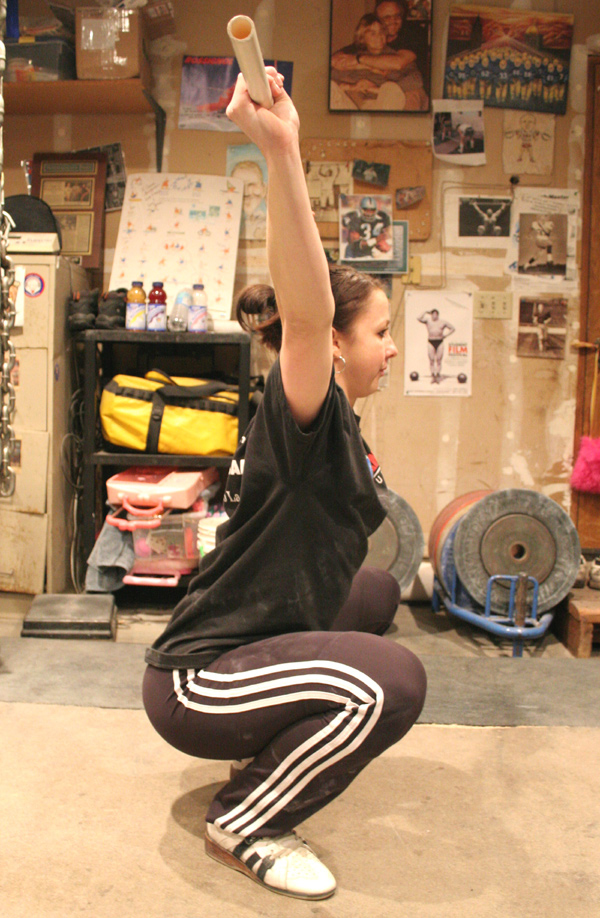
Section 3
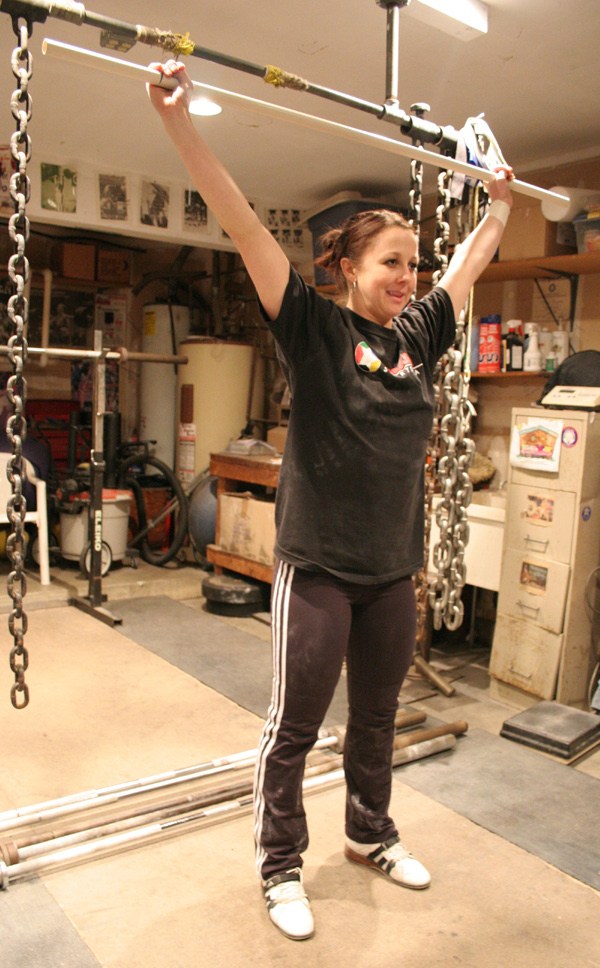
The third section is the muscle snatch exercise, essentially a snatch without the athlete pulling him- or herself under the bar—there is no re-bending of the knees as the bar arrives overhead. After successively performing the movements of sections 1 and 2, the athlete will finish the movement by bringing the PVC overhead. Again, the bar must remain close—keeping the elbows rotated outward will ensure this occurs.

Section 3: The muscle snatch
Section 4
After performing section 3, the athlete will keep the PVC overhead. Check for proper positioning. As the athlete did during the pulling and receiving drill, he or she will jump the feet from the pulling to the receiving position as quickly as possible, dropping into a deep of an overhead squat as he or she is capable of.
Section 5
The final section brings together all of the previous. Starting with the feet in the pulling position, the athlete will dip at the knees, extend the knees and hips, shrug, lift the elbows high and outside, and turn the PVC overhead as he or she pulls him or herself underneath it to catch in a full squat or one of limited depth if that is the current capacity of the athlete. As always, ensure the bar remains close to the lifter's body and he or she fully extends the knees and hips.
That's it for Now
The previous should provide a solid beginning progression for teaching the snatch to new lifters. Clearly the snatch is a remarkably technical lift and this is not a complete discussion of the movement and all of its finer details. Until the athlete has developed the fundamentals well, becoming concerned with said details will not be productive.
The fundamental pulling mechanics of the snatch apply to the clean and to a lesser degree the dip and drive of the jerk. Learning the snatch is typically more difficult than learning the clean and jerk for new lifters. For these reasons, teaching the snatch first is recommended—once a new lifter is reasonably comfortable with the snatch, the learning curve for the clean and jerk will be greatly reduced.
The Grip
The wide hand placement for the snatch serves to reduce the range of motion in order to move larger loads. It should be noted, however, that the wider grip places greater strain on the wrists because of the awkward angle in which they're placed under the bar. For this reason, new lifters should begin with relatively narrow snatch grips and incrementally widen them over time in order to allow the joint structures to adapt adequately to the stress. Eventually, each lifter will find his or her ideal width. A narrower grip will typically make the pull from the floor easier both in terms of grip strength and starting hip and back positioning, while a wider grip can improve the speed of the turnover by reducing the distance the bar must travel—lifters should experiment with varying widths to compensate for individual strengths and weaknesses, but always keep in mind the limitations and drawbacks of either extreme.
Once a lifter has determined his or her ideal grip, it's important he or she note the hand placement relative to landmarks on the bar. Typically lifters will rely on the outermost breaks in a bar's knurling for landmarks. This approach will be successful when lifting on bars of the same make. However, occasionally lifters may encounter unfamiliar bars with markings that don't align with the bars to which they're accustomed. If unnoticed, particularly in competition, this can be problematic if not disastrous. The solution is to ensure the lifter can define his or her hand position relative to the insides of the bar's sleeves, the distance between which will always be the same on Olympic bars.
There are numerous ways to determine starting grip width for the snatch. All will produce very similar results, so the chosen method is more a product of circumstances and personal preference than accuracy. More importantly, there is no formula for determining perfect grip placement for lifters and spending great amounts of time with complicated measurements simply to locate a preliminary grip width is an ineffective use of training time at best.
A quick and simple way to find a starting grip position is to simply instruct the lifter to hold the bar overhead and continue cuing adjustments until it is 6-10 inches above the head. Then instruct the lifter to let the bar hang at arm’s length and ensure it rests approximately in the crease of the hips. Place priority on the bar's location at the hips—if the bar is too low, it will likely be driven out away from the body by the thighs during the scoop.
visual method – Instruct the lifter to hold the bar 6-10 inches overhead and ensure it rests approximately in the crease of the hips.
The Hook Grip
For the pull of both the snatch and the clean, the hook grip is a necessity to maintain control of the barbell during the violent pull. Some claim the hook grip is not actually the strongest grip possible in terms of pressure placed on the bar, but will prevent unwanted rotation of the bar during its turnover. My personal experience contradicts this. Either way, however, the hook grip must be used.
The hook grip is a pronated (palms facing the lifter) grip in which the thumb is pinched between the bar and usually the first and second fingers, depending on hand size. For most lifters, this will be uncomfortable if not painful initially. Consistent use will stretch the offending structures appropriately over time and the grip will ultimately offer no trouble. Lifters may find that icing the hands after training will help reduce any pain and speed the adaptation.
Hook Grip – The hook grip is a pronated grip in which the thumb is pinched
between the bar and fingers.
In the snatch, the hook grip may be released at the end of the third pull to return to a normal grip when the bar is received overhead. This will typically ease the stress on the hands and wrists in the overhead position. However, some lifters find that releasing the hook grip during the turnover prevents them from maintaining a tight enough connection to the bar, resulting in a weak or slow turnover. These lifters choose to maintain the hook grip throughout the lift.
It's wise when learning to practice releasing the hook grip. As the lifter progresses, he or she can decide to maintain the hook grip should that prove beneficial. If a new lifter starts by never releasing the hook grip, he or she will find it much more difficult to learn to release it later.
From the Top Down
Having been influenced greatly in my coaching by Mike Burgener, I’ve found teaching the lifts from the top down to be the most effective approach and continue to adhere to his segmentation of the pull into smaller movement drills that he has assembled and dubbed the Burgener Warmup. If you’ve followed this series of articles, you’re already familiar with the basic Olympic squat as well as the power position and transition phase of the snatch and clean. It’s now time to bring them together and apply them to the first classic lift.
The Overhead Squat
The overhead squat will be the position in which the lifter ultimately receives the bar in a snatch. Until this position is both solid and consistent, the lifter will not be able to progress substantially.
Instruct the lifters to hold a length of PVC overhead with his or her snatch grip, placing their feet in his or her ideal squat positioning. Bring the lifter into the bottom of an overhead squat and have them pause to allow you to make any comments or adjustments. At this poing you’ll be able to determine whether not this particular lifter will be capable of performing the full lift or only the power variation thereof.
Recall all of the position requirements of the Olympic squat—these must all be met in the overhead squat. Begin your appraisal of the position from the bottom. Check the foot positioning, ensuring the feet are flat and carrying the lifter’s weight evenly, and that they’re aligned with the lifter’s thighs. Next verify that the lifter’s knees are located over the feet when viewed from the front of the toes, neither diving inward nor flaring outward. The hips should be settled in over the heels instead of pushed back behind the lifter’s base. Check now for proper spinal alignment—the lifter should be maintaining a normal lordotic arch in the lumbar spine and slight kyphosis in the thoracic spine, with the torso nearly erect.
proper overhead squat position
Now with the overhead squat, we have the additional demands of proper shoulder and arm positioning to consider. First ensure the lifter is maintaining active shoulders—that is, shrugging the shoulders high and not allowing them to collapse. This detail will be critical when receiving heavy loads overhead for both stability and injury prevention. The elbows must be fully locked and the arm musculature tight. The bar must be located directly over the lifter’s base—that is, a vertical line drawn to the floor from the center of the bar’s diameter would split the lifter’s feet in half. Finally, the lifter should be driving his or her head forward through the shoulders to place the head in front of the bar.
It’s rare for a new lifter to be capable immediately of a perfect overhead squat, although more common among female athletes due to their typically greater flexibility. As was discussed in the Olympic squat article, limitations due to inflexibility must be actively corrected in order for the lifter to progress. Specific weightlifting flexibility training will be discussed in detail in a later article, but for now, a few stretches will get you started in loosening up a lifter’s tight shoulders.
Dynamic range of motion (DROM) exercises should be included in the lifter’s warmup, including unilateral and bilateral arm circles both forward and backward. Ensure the lifter shrugs the shoulders each time the arms pass over the top just as they would when holding a bar overhead. After this, the lifter can grab a length of PVC with a generously wide grip, and perform shoulder dislocates, passing the PVC overhead from front to back repeatedly, slowing and even pausing for a few seconds at the tightest point in the range of motion. Most people have a tendency to grip too narrowly and force this motion—require the lifter to start much wider than they think they need to, at a width that allows the movement to be performed with absolutely no strain. Have him or her gradually decrease the grip width until the final passes are challenging, but still do not cause any pain. Shoulder dislocates can also be performed while the lifter is positioning at the bottom of a squat to increase the stretch. Again, do not allow the lifter to force the movement.
The athlete’s present flexibility will determine the details of his or her lifting progression. As a coach, you must adjust your instruction accordingly.
The Feet – Pulling & Receiving
The next step toward the snatch is training the foot positioning for the pulling and receiving portions of the lift. You and your lifter at this point should already be familiar with both—the pulling position is that of the power position, and the receiving position is that of their squat. Now the lifter must simply develop the ability to consistently and rapidly transition the feet from the pulling to receiving position.
As a coach, you may prefer to teach this as part of your power position instruction prior to moving on to the specifics of the snatch. Either way, you’ll only need to teach it once, as the movement will be the same for the clean.
Instruct the lifter to bring his or her length of PVC into the proper overhead position and assume the pulling position with the feet. Have them then simply walk the feet to the receiving position. This may be repeated a number of times before proceeding to help the lifter become comfortable with each position.
Next, instruct the lifter to jump the feet from the pulling to the receiving position as quickly as possible with as little vertical elevation as possible. In other words, this is not a vertical jump—the feet are lifter from the floor only to re-position them more quickly. The speed and force of the feet’s movement should be great enough to produce an audible stomp on the platform. Demanding this noise is a simple way to encourage greater speed.
As a way to check the lifter’s receiving foot position, you may choose to have him or her continue into an overhead squat after each or every few landings. If the lifter finds it necessary to adjust the feet for the squat, have him or her take careful note of the ultimate position and force them to hit it on each landing. If this is proving extraordinarily difficult, chalk or tape the platform to indicate where the feet must go to give the athlete a target. Once consistently able to hit the markings, remove them and continue.
The Burgener Warm-up
The Burgener Warm-up is an effective numbered drill created by Mike Burgener to both teach and reinforce the mechanics and positions of the pull. It's primarily used to teach the snatch, although it can be adapted to teach the clean. But as mentioned previously, once an athlete is familiar with the mechanics of the snatch, the clean invariably comes with little if any additional instruction.
Each section of the warm-up contains three repetitions of the movement. Each subsequent section adds a new segment of the pull to the previous until the athlete is completing the entire movement. The warm-up is best used with a length of PVC, although a bar can be used once the athlete has developed the technique adequately.
http://www.mikesgym.org/gallery/video/burgWarmup.swf
Section 1
The first section of the Burgener Warm-up is the simplest but likely the most critical as the second pull. Instruct the athlete to stand with the feet in the pulling position with his or her PVC held with a snatch grip hanging at arm's length. As he or she did during the power position drills, the athlete will simply dip by bending only the knees and drive up again, following with a shrug of the shoulders. At this stage, the arms remain straight, but do not allow the athlete to lock them forcefully—they should simply be hanging. The elbows should be rotated outward so they face to each side—this will ensure that the bar remains close to the body during the third pull. You can also allow the athlete to drop the bar to around mid-thigh in order to include the scoop in the drill.
Section 1- Dip and Shrug
Section 2
The next section will begin with the first section and continue to a scarecrow position. After completing the dip and shrug of section 1, instruct the athlete to elevate the elbows, keeping the bar against the body. Ensure that the arms do not bend until the hip and knee extension and shrug have occurred. Do not allow the lifter to raise the hands higher than the elbows.
section 2: Scarecrow
Section 3
The third section is the muscle snatch exercise, essentially a snatch without the athlete pulling him- or herself under the bar—there is no re-bending of the knees as the bar arrives overhead. After successively performing the movements of sections 1 and 2, the athlete will finish the movement by bringing the PVC overhead. Again, the bar must remain close—keeping the elbows rotated outward will ensure this occurs.
Section 3: The muscle snatch
Section 4
After performing section 3, the athlete will keep the PVC overhead. Check for proper positioning. As the athlete did during the pulling and receiving drill, he or she will jump the feet from the pulling to the receiving position as quickly as possible, dropping into a deep of an overhead squat as he or she is capable of.
Section 5
The final section brings together all of the previous. Starting with the feet in the pulling position, the athlete will dip at the knees, extend the knees and hips, shrug, lift the elbows high and outside, and turn the PVC overhead as he or she pulls him or herself underneath it to catch in a full squat or one of limited depth if that is the current capacity of the athlete. As always, ensure the bar remains close to the lifter's body and he or she fully extends the knees and hips.
That's it for Now
The previous should provide a solid beginning progression for teaching the snatch to new lifters. Clearly the snatch is a remarkably technical lift and this is not a complete discussion of the movement and all of its finer details. Until the athlete has developed the fundamentals well, becoming concerned with said details will not be productive.
| Greg Everett is the owner of Catalyst Athletics, publisher of The Performance Menu Journal and author of Olympic Weightlifting: A Complete Guide for Athletes & Coaches, Olympic Weightlifting for Sports, and The Portable Greg Everett, and is the writer, director, producer, editor, etc of the independent documentary American Weightlifting. Follow him on Facebook here. |
Search Articles
Article Categories
Sort by Author
Sort by Issue & Date
Article Categories
Sort by Author
Sort by Issue & Date