

Programming Options: The Play Day

In last month's installment, we used the concept of the 'Bucket List' the help ensure that clients get a regular frequent exposure to foundational strength work in the context of a group fitness class, regardless of varying attendance patterns. This month, we’ll discuss another programming tool that will help enhance the programming and provide options to the gym owner looking to maximize results for clients in a group environment. It's called the Play Day and can be used to accomplish the following goals:
1. Provide a setting where clients have significant time to focus on developing higher quality of movements, and a broader variety of movements, than those potentially found in the execution of mixed-modal timed circuit.
2. Give gym members who train frequently (4 or more days in a row) a change of pace or a back off day, if you will, where they aren't racing against the clock and/or training to absolute and complete failure.
3. Provide an opportunity for members to potentially try a workout that they wanted to do earlier in the week, but for whatever reason, couldn't make it to class that day.
The idea of the Play Day came to me when I was pondering monthly programming for my box. First, a bit of background. At CrossFit Milwaukee, we are open Monday through Saturday. Although we promote the idea to clients of taking at least one out of every four days off (more if they are beginners), we don't program rest days into our schedule (unless you count Sunday, when we're closed) and there are cases where clients will come to the gym to train 4-5 days in a row--they want their weekends free, haven't been convinced of the value of a rest day, or whatever the case may be.
The problem that eventually pops up is that it's sometimes difficult to have a week's worth of programming without over-stressing certain areas of the body (shoulders, legs, etc.) for clients who come to class more than three days in a row. Running a business and having classes available for clients every day of the week doesn't always mesh well with some of the work/rest patterns of the templates that I have used to base my class programming off of (CrossFit Football, Westside, etc.) I occasionally tell my clients that they are supposed to take a Tuesday, Wednesday or Thursday off each week to account for that aspect, but not every client listens to that advice. Implementation of the Play Day caters to a person with this kind of attendance pattern by significantly changing the type of stimulus relative to that of a standard group class.
Another issue that I wanted to address with the Play Day was the nature of our typical class. I think it's fairly common for a box to follow a pattern when it comes to running a group class. With some exception ('Murph,' CrossFit Total, etc.) a class will generally consist of roughly 10 minutes of generalized warm-up time, roughly 10 minutes of skill work, maybe another 10 minutes working on a heavy lift and the rest of class time devoted towards a conditioning circuit, followed by a cool-down. I've seen similar patterns in workouts posted from other affiliates. While pretty sound in most aspects, one contention that I have with it is that clients would benefit from some more time devoted towards developing higher level skill movements and paying some attention to movements that might not pop up in the context of high intensity circuits. The Play Day works towards this goal.
Lastly, for our gym at least, the Play Day allows us to maximize the use of our gear. Through the years ,we've managed to acquire a full size and junior sized pommel horse, two sets of parallel bars, some panel mats and some crash pads) Play Day doesn't necessarily have to consist solely of gymnastics-based skills. That being said, given the gear we have available, the fact that we periodically offer a separate, dedicated Olympic Weightlifting program for months at a time at our facility, and that we already have strength training comprised largely of barbell work built into our monthly program (ala The Bucket List), the decision to focus on bodyweight training for this part of our schedule seems to make complete sense. Keep in mind that we also don't select our Play Day exercises solely from the realm of gymnastics either, but freely borrow from the basics of MovNat and Parkour as well.
That’s the background/genesis of the Play Day idea. But how exactly does it work? The Play Day class for our gym is generally divided into 10-15 minute segments. During each of these segments, clients focus on one skill area. In our case the stations consist of floor/tumbling, parallel bars/parallettes, pommel horse, rings and beam. A bucket for circles is coming soon. For the class structure, I borrowed from my (admittedly limited) background in coaching recreational gymnastics. At the facility I worked at, there could be anywhere from 5-8 coaches all working with different groups and different age levels at the same time. The facility owner created a intricate schedule so that all of the gear in the gym was utilized successfully and you didn't have three groups of gymnasts all waiting to use the same area at the same time. What this meant from a recreational coach's perspective was that your hour-long class was divided into ten to fifteen minute blocks of time at various stations. Usually after demonstrating what movement we wanted the kids to practice, they would go through conga line style and perform the drill. Depending on the number of kids and how hard we wanted to work them for a particular station we could add on 'extras' (i.e. after spotting them on a rings move a couple of times, have them go hold a hollow position for 30 seconds before jumping back in line). After a couple of turns, the skill would be changed to something else, the process repeating itself until the available time at that particular station was utilized.
This kind of structure needs modification to work optimally in the context of a group fitness class. I like idea of having small groups of athletes take turns on the different pieces of gear as it helps maintain some semblance of the group class, with the whole idea of the shared workout experience, and the nature of the conga line (have a turn and then go back to the end of the line) helps to automatically instill the high ratio of rest to work that we are looking for on Play Day. Another quality to strive for on the Play Day is perfection of exercise technique and body positioning, at least to a greater degree than is practiced in the context of a metcon--and especially when it concerns traditional gymnastics movments. Instead of going to complete failure, athletes should be encouraged to 'keep one in the tank' for their next turn in the cycle. The conga line structure helps to facilitate both of these goals.
Where it needs to be potentially modified is with the exercise prescription. Like most group-based workouts, we need to take the individual ability of each athlete into consideration. For example, a person who can't do a bent arm hang on the rings for more than five seconds might not be ready for an inverted hang just yet. In other words, people may be sharing turns on the same piece of gear during a 15-minute cycle, but they might not be doing exactly the same drills.
To help facilitate not only progress but the learning process when it comes to potentially new movements for our clients, I am developing a series of skill sheets for each of the areas that we work on. I'll present examples of a couple of skill sets and illustrate how a particular group of skills, once acquired, can be put into sequence to potentially make the training more fun. Consider the sequences a mini-routine if you will. Scoring and tights are optional. So is handing out gold star stickers when a client obtains competency in a certain skill (hey – it worked for the kiddies). Keep in mind the following when going over the information:
1. These sequences are based off my 2 years of coaching experience as at the recreational level and that I had no prior formal training in gymnastics prior to that position outside of what I garnered from CrossFit. I therefore make no claim at being an expert when it comes to gymnastics.
2. The first few moves of each sequence are intended to be fairly easily acquired by most of my clients, and the last few movements are meant to be somewhat challenging for even those with a decent fitness base. In other words, these progressions may be unsuitable for those severely challenged by bodyweight drills or for those who already have a really good base in gymnastics skills.
3. In no way are these progressions meant to be comprehensive of the vast array of possibilities for each station involved. They are merely a tiny sample. Covering all the possibilities is beyond the scope of this article and would likely entail several volumes of material.
4. I choose to present examples for stations that are reasonably easy for a micro-gym to procure/set-up (i.e. from my experience it's easier to find used pommel horses and/or make balance beams than it is to find parallel bars/tumble track floors for cheap) but that I haven't seen covered as much before (i.e. I've seen tons of stuff out there for rings)
5. Remember that scaling up is also always an option, especially in gymnastics-based training environment.
When it comes to floor/tumbling, here are two skills that immediately jump into my mind that I want each and every one of my clients to at some point develop: the forward shoulder roll and the handstand. I learned the forward shoulder roll during my college years when I started to explore martial arts outside of my original Karate roots like ninjitsu and Aikido, both of which used the shoulder roll. I consider it an essential skill and this roll has literally saved my life (which becomes potentially endangered when you hang out with Team Rollerblade-sponsored friends during your college years, drink with them and THEN decide to go out and try crazy stunts).
The handstand accomplishes several goals – balance, overhead strength, midline development, proprioceptive awareness, etc…not to mention the fact that developing your handstand prowess will carry directly over into your overhead lifting. Combining these skills into the handstand forward roll isn't a huge obstacle and makes training the handstand much safer as some coaches have expressed reservations about the idea of kicking up with back facing to the wall (i.e. if your arms fail, there really is no where for your head/neck to go – not good news, especially for adults who tend to be slightly less pliable and more weighty than their child counterparts).
Here's the progression set that I generally use to develop these skills:
Rock and rolls
These help to establish the basic body position for the forward roll that will follow and help the client to establish fluidity of movement. It also helps rid them of the habit of reaching out with an arm or elbow in the event of a fall, instead dispersing the energy over a broader surface area and reducing/eliminating injury potential in the process. As the client gets accustomed to the movement, have them start practicing 'pizza hands' to prepare them for the hand position they will eventually use for the forward roll (although the demo pic doesn't show this). Caution people new to this movement to avoid rolling too far up onto the head. They should aim to stop the backward momentum so that their upper back retains contact with the ground.
Additional cues for the movement include keeping the heels close to the glutes on the way forward and to reach in front of the center of gravity as far as possible with the hands. Mobility-challenged individuals will potentially benefit by initially practicing this move on an elevated surface, such as a folded panel mat, with their feet still coming to meet the ground at the end of the roll. Gradually reduce the height of the surface as their flexibility and familiarity with the movement improves.
Forward rolls
Once a client has demonstrated competency with the rock and roll, we will move them to the forward roll. Have the client start low to the ground, hands out in front of them. Strongly emphasize that as they begin their roll, they must tuck their chin towards their chest. The goal for them is that, as they roll forwards, they clear their head entirely and don't initiate contact until the top of their upper back has made its way over – basically the same place they'd place the barbell for a back squat. Pressure must be kept on the hands to support the bodyweight as it goes through this transition. A slight push off of the feet can help smooth the movement, provided that the client maintains the rounded back position that allowed them to roll smoothly out of the rock and roll drill. Once they make it over, performing the roll and combing back to a standing position is actually easier than in the rock and roll drill because of the additional momentum involved in the roll. Spotting the athlete by helping to lift the hip and tucking the head to increase rate of rotation will help some get acclimated to the move. Wedges can also be used to more gradually introduce the skill, should you have some available.
Shoulder rolls
Once a forward roll has been establish. I like to teach my clients a shoulder roll. Ultimately it's more practical and it also minimizes spinal contact with the ground, which can come in handy if you are forced to roll on concrete for some reason. (I did mention rollerblading, crazy college friends, and alcohol, right?). If I had to choose between the two as to which one a client would practice more, the shoulder roll would win hands down.
I usually start the shoulder roll the same way I start teaching the forward roll, with the client really close to the ground. I have them set one knee on the ground and the opposite hand on the ground so that the form a line that's perpendicular to the intended line of motion (in this case, the green tape line in the picture below). The distance between the hand and the knee should be well over a shoulder width. Let's pretend the client has their left knee and right hand on the ground. Have the client slowly lean forward and start to bring the left hand through the space between the right hand and left knee so that it is underneath the client's torso and pointing back towards the right foot. As the client continues to lean forward, making contact with the mat with their left shoulder, have them look up into their right armpit to help get the head out of the way of the roll. From here, a push off with the right foot will help move the hips up and over the left shoulder to help initiate the roll. The key is for the point of contact with the ground to start with the left shoulder and end with the right hip (second photo in the sequence – the grey line drawn across the shirt). Oftentimes a client won't commit to the roll enough, will lack a strong push-off with the back leg and the hips will travel out and around to the side, resulting in a 'side roll' type motion where the entire spine makes contact with the ground at the same time in the middle of the roll – not good. Once the proper line of contact is established for the roll, the client can start from a slightly higher position and begin to initiate the roll without first making knee contact. Eventually they can work to a standing start where the momentum of the upper body coming down to the ground will negate the requirement for a strong push with the rear leg that's required for the kneeling start.
Handstands
While a client is developing their rolling skills, they can simultaneously begin building up their handstand ability if they don't already possess the skill. One of the issues that seems to crop up fairly often, at least in my experience, are cases where an athlete has more than adequate shoulder strength to hold a handstand position, but lacks sufficient technique/experience to efficiently get to that position, especially when they are already in a partially fatigued state. Here's an ad hoc video I made when I had some time between classes one day. It describes how I progress people to help develop the skill of kicking up into a handstand. As you build competency kicking up onto the mats, you can gradually reduce the height and eventually eliminate the use of them altogether to where you can perform the kick up on the floor.
Besides working the handstand, we will occasionally through in some other balancing skills that can help prepare people for the idea of being upside down and balancing on their hands. So far we've played with tripods, headstands and frog stands for the most part, but there are other variations.
Integrating the Skills
As a client progresses with both their handstand and rolling ability we will start to integrate the skills. This forms the basis for our first mini-routine that we will talk about. It's nothing shocking to the gymnastics community and is often used as a warm-up sequence: Kick up to handstand, hold for a second or two, forward roll. Lather, rinse, repeat.
If used consistently as part of a warm-up routine, this sequence can quickly boost proficiency for those new to the movements. However, before someone attempts this make sure that, in addition to having competency in the component parts of the move, that they also have the ability to SLOWLY lower out of handstand position so they can make a smooth transition into the roll. Sometimes, in order to build up this movement we will have clients start in a pike position with their feet on an object at about waist level. When using this variation, it's important to remind the client to give themselves a little push off of their support so that when they start to lower in the roll they are coming down to the ground contacting with their upper back and not their head. An alternative to this is to use the spotter – who will stand to the side of the athlete while they kick up to the handstand. From there, the spotter will grab onto the calf/ankle in order to help the person with balance and to slow their descent into the roll if needed. Once competency in this move has been mastered, an additional challenge can be added by attempting to roll out and stand up using only one foot to balance on while the other is outstretched in front of you. It's great practice for developing a pistol.
POMMEL HORSE
Okay, I know. Your first thought might be, “What can one possibly accomplish by using a pommel horse?' Well, several things, actually. Besides the drills that I'm about to discuss, which will help to develop upper body stability, midline strength and flexibility, pommel horses can make a decent set-up for a GHD sit-up (stack a couple of boxes and/or bats and have your clients hook their feet UNDER the horse, in the hollow area). I've had up to four people performing the move at once on the pommel horse in our gym at the end of class for an ab finisher. 'Hug a Twinkie' AKA reverse leg raises are a great exercise for working the posterior chain. Lastly, for those of you inclined to play with Parkour, the pommel horse makes a great platform for vaulting off of, or over. Pommel horses aren't cheap if you buy them new. That being said, if you pay attention to Craigslist and cultivate some relationships with local gymnasts, you can usually score some for pretty cheap. Using those methods, our gym was able to acquire a full-size pommel horse for about $200 and a junior's sized one for free.
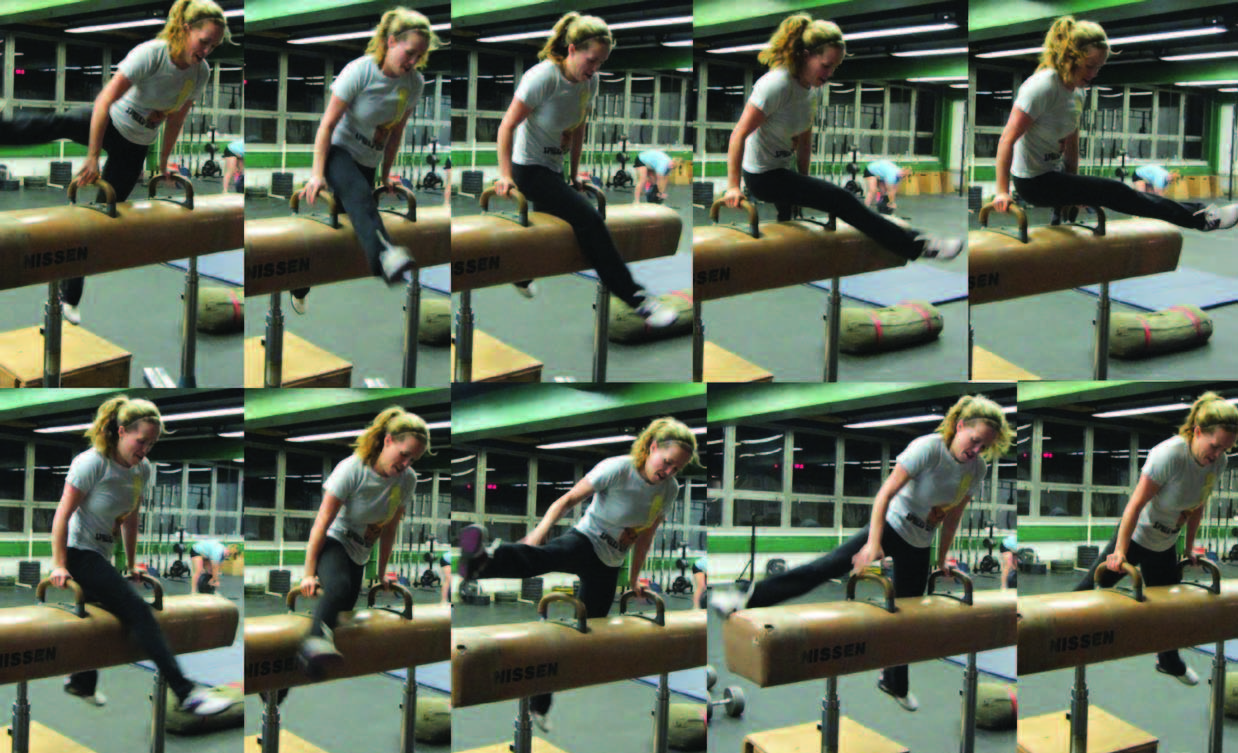
Onto the skills. We like to use a variety of static holds for our most basic starting point. The basic support is really no different than what you would see on rings, except it's more doable for some because of the stability of the pommels (handles) and there will be more of a forward lean of the hands being out in front the hips. Encourage people to avoid piking at the hip in this position. From here, a client can work leg raises, where one leg is lifted laterally as high as possible (try to keep the shoulders and hips facing towards the pommel horse on these). Normally, I'm not one to chide people for not keeping their toes pointed when practicing L-holds, skin-the-cats and such, but on the leg raises (and subsequent swings) it's actually functionally important – unless you like the idea of your toes clipping the underside of the pommel horse as they're accelerated upward. Once a person is used to the mechanics of the leg raise, have them alternate legs. From there, they can practice the straddle hold, basically the same hold but with the legs spread apart as far as possible. After both the leg raises and straddle hold have been practiced successfully, see if the client can do a straddle swing, where the feet are kept spread apart as the athlete shifts their hips from side to side. This will be the movement from which some basic leg cuts can be performed. Having the athlete build momentum and practice shifting weight from one hand to the other as the hips shift will prepare them for this next move. The leg cut occurs when a leg is swung high enough and the weight shift is significant enough to where the athlete is able to release the grip on one of the pommels of the horse. As this occurs, the leg that is swinging up is brought over and in front of the horse into what is known as a stride support. Practicing a swinging motion from the stride support will eventually allow an athlete to cut the leg back to a straddle position. A good beginner's routine is to start a straddle swing, cut the right leg over, stride swing to the left side and as the weight shifts back to the right side, cut the leg back to the straddle position. From here, the weight will begin to shift to the left. Use the momentum to initiate a left leg cut forward, stride swing, left leg cut back. Consistent practice will acclimate the athlete to the timing and rhythm used to smooth the transitions into a coherent whole. Pictured below are the forward and backward leg cuts for the right side.
A great beginner drill on the pommel horse is what I refer to as down and ups (no, not the Burgener warm-up kind). Start in a basic support. Drop one hand down from the pommel to the space between the two pommels, right in front of your abdomen. Then bring the other hand down from the pommel. Take your first hand and replace it back to its original pommel and then do the same with the second hand. Repeat this down/down/up/up pattern while trying to maintain good shoulder position and straight arms (mostly anyway – you'll be doing a partial dip in the middle of each sequence). Tabata down and ups should get the shoulders of most non-gymnasts pretty fried up in short order.
Another variation of this drill is called pommel walking. Start in a supported position on the end of the pommel horse. One hand at a time and while maintaining your support, walk towards the other end of the pommel horse, making sure to perform a down and up over each pommel with each hand. When you get to the other end of the pommel horse, walk/circle your way around the end of it and proceed back to your starting position using the other side of the horse. If you're in a competitive mood, see how many trips around the pommel horse you can make before breaking your support posture. Then have your buddy have a go at it.
BALANCE BEAM
Like the pommel horse, the balance beam is a piece of equipment that isn't hard for gym owners to get ahold of. If you can't find one used for cheap, construction isn't horribly complex. There are a lot of great conditioning exercises that it can be used for (bag over, body over anyone?) and, like the pommel horse, it's easily adapted to the various vaulting work associated with Parkour and Patch-like applications. There are some amazingly simple yet effective balance developing skills that can be worked on the beam – many of which I picked up at a recent MovNat workshop. I usually have clients start by getting comfortable walking forwards and backwards. Use spotters if necessary, and, when the client is moving backwards, make sure that someone is there to warn them when they're running out of beam (and have your clients cultivate the concept of maintaining balance while 'feeling' for support with the foot moving backwards). Sideways motion can come next. If it's too easy, start adding in pivots and squats. Another option is to start adding in drills where the base of balance isn't coming solely from the feet. One drill that I picked up at the MovNat workshop was to balance on one hand and the opposite foot and practice moving the free leg forward and backward between the two bases of support, swiveling the hips and you do so – kettlebell and Brazilian Jiu-Jitsu enthusiasts will find this drill vaguely familiar. Crawling on top of the beam, bear crawl style can be challenging for some, as jumping rope will also (do this on a low beam, please!). If one wants to play with some of the other skills, jumping onto the beam and off of it (with a possible shoulder roll) can be some relatively obvious add-ons.
Hopefully, the above examples have successfully presented some useful ideas as to what can be done on Play Day and will help contribute towards making the Play Day a welcome, option in the toolbox of the small gym owner. Since this article is hardly comprehensive in nature, any questions concerning it can be sent to me at ryan@crossfitmilwaukee.com.
1. Provide a setting where clients have significant time to focus on developing higher quality of movements, and a broader variety of movements, than those potentially found in the execution of mixed-modal timed circuit.
2. Give gym members who train frequently (4 or more days in a row) a change of pace or a back off day, if you will, where they aren't racing against the clock and/or training to absolute and complete failure.
3. Provide an opportunity for members to potentially try a workout that they wanted to do earlier in the week, but for whatever reason, couldn't make it to class that day.
The idea of the Play Day came to me when I was pondering monthly programming for my box. First, a bit of background. At CrossFit Milwaukee, we are open Monday through Saturday. Although we promote the idea to clients of taking at least one out of every four days off (more if they are beginners), we don't program rest days into our schedule (unless you count Sunday, when we're closed) and there are cases where clients will come to the gym to train 4-5 days in a row--they want their weekends free, haven't been convinced of the value of a rest day, or whatever the case may be.
The problem that eventually pops up is that it's sometimes difficult to have a week's worth of programming without over-stressing certain areas of the body (shoulders, legs, etc.) for clients who come to class more than three days in a row. Running a business and having classes available for clients every day of the week doesn't always mesh well with some of the work/rest patterns of the templates that I have used to base my class programming off of (CrossFit Football, Westside, etc.) I occasionally tell my clients that they are supposed to take a Tuesday, Wednesday or Thursday off each week to account for that aspect, but not every client listens to that advice. Implementation of the Play Day caters to a person with this kind of attendance pattern by significantly changing the type of stimulus relative to that of a standard group class.
Another issue that I wanted to address with the Play Day was the nature of our typical class. I think it's fairly common for a box to follow a pattern when it comes to running a group class. With some exception ('Murph,' CrossFit Total, etc.) a class will generally consist of roughly 10 minutes of generalized warm-up time, roughly 10 minutes of skill work, maybe another 10 minutes working on a heavy lift and the rest of class time devoted towards a conditioning circuit, followed by a cool-down. I've seen similar patterns in workouts posted from other affiliates. While pretty sound in most aspects, one contention that I have with it is that clients would benefit from some more time devoted towards developing higher level skill movements and paying some attention to movements that might not pop up in the context of high intensity circuits. The Play Day works towards this goal.
Lastly, for our gym at least, the Play Day allows us to maximize the use of our gear. Through the years ,we've managed to acquire a full size and junior sized pommel horse, two sets of parallel bars, some panel mats and some crash pads) Play Day doesn't necessarily have to consist solely of gymnastics-based skills. That being said, given the gear we have available, the fact that we periodically offer a separate, dedicated Olympic Weightlifting program for months at a time at our facility, and that we already have strength training comprised largely of barbell work built into our monthly program (ala The Bucket List), the decision to focus on bodyweight training for this part of our schedule seems to make complete sense. Keep in mind that we also don't select our Play Day exercises solely from the realm of gymnastics either, but freely borrow from the basics of MovNat and Parkour as well.
That’s the background/genesis of the Play Day idea. But how exactly does it work? The Play Day class for our gym is generally divided into 10-15 minute segments. During each of these segments, clients focus on one skill area. In our case the stations consist of floor/tumbling, parallel bars/parallettes, pommel horse, rings and beam. A bucket for circles is coming soon. For the class structure, I borrowed from my (admittedly limited) background in coaching recreational gymnastics. At the facility I worked at, there could be anywhere from 5-8 coaches all working with different groups and different age levels at the same time. The facility owner created a intricate schedule so that all of the gear in the gym was utilized successfully and you didn't have three groups of gymnasts all waiting to use the same area at the same time. What this meant from a recreational coach's perspective was that your hour-long class was divided into ten to fifteen minute blocks of time at various stations. Usually after demonstrating what movement we wanted the kids to practice, they would go through conga line style and perform the drill. Depending on the number of kids and how hard we wanted to work them for a particular station we could add on 'extras' (i.e. after spotting them on a rings move a couple of times, have them go hold a hollow position for 30 seconds before jumping back in line). After a couple of turns, the skill would be changed to something else, the process repeating itself until the available time at that particular station was utilized.
This kind of structure needs modification to work optimally in the context of a group fitness class. I like idea of having small groups of athletes take turns on the different pieces of gear as it helps maintain some semblance of the group class, with the whole idea of the shared workout experience, and the nature of the conga line (have a turn and then go back to the end of the line) helps to automatically instill the high ratio of rest to work that we are looking for on Play Day. Another quality to strive for on the Play Day is perfection of exercise technique and body positioning, at least to a greater degree than is practiced in the context of a metcon--and especially when it concerns traditional gymnastics movments. Instead of going to complete failure, athletes should be encouraged to 'keep one in the tank' for their next turn in the cycle. The conga line structure helps to facilitate both of these goals.
Where it needs to be potentially modified is with the exercise prescription. Like most group-based workouts, we need to take the individual ability of each athlete into consideration. For example, a person who can't do a bent arm hang on the rings for more than five seconds might not be ready for an inverted hang just yet. In other words, people may be sharing turns on the same piece of gear during a 15-minute cycle, but they might not be doing exactly the same drills.
To help facilitate not only progress but the learning process when it comes to potentially new movements for our clients, I am developing a series of skill sheets for each of the areas that we work on. I'll present examples of a couple of skill sets and illustrate how a particular group of skills, once acquired, can be put into sequence to potentially make the training more fun. Consider the sequences a mini-routine if you will. Scoring and tights are optional. So is handing out gold star stickers when a client obtains competency in a certain skill (hey – it worked for the kiddies). Keep in mind the following when going over the information:
1. These sequences are based off my 2 years of coaching experience as at the recreational level and that I had no prior formal training in gymnastics prior to that position outside of what I garnered from CrossFit. I therefore make no claim at being an expert when it comes to gymnastics.
2. The first few moves of each sequence are intended to be fairly easily acquired by most of my clients, and the last few movements are meant to be somewhat challenging for even those with a decent fitness base. In other words, these progressions may be unsuitable for those severely challenged by bodyweight drills or for those who already have a really good base in gymnastics skills.
3. In no way are these progressions meant to be comprehensive of the vast array of possibilities for each station involved. They are merely a tiny sample. Covering all the possibilities is beyond the scope of this article and would likely entail several volumes of material.
4. I choose to present examples for stations that are reasonably easy for a micro-gym to procure/set-up (i.e. from my experience it's easier to find used pommel horses and/or make balance beams than it is to find parallel bars/tumble track floors for cheap) but that I haven't seen covered as much before (i.e. I've seen tons of stuff out there for rings)
5. Remember that scaling up is also always an option, especially in gymnastics-based training environment.
When it comes to floor/tumbling, here are two skills that immediately jump into my mind that I want each and every one of my clients to at some point develop: the forward shoulder roll and the handstand. I learned the forward shoulder roll during my college years when I started to explore martial arts outside of my original Karate roots like ninjitsu and Aikido, both of which used the shoulder roll. I consider it an essential skill and this roll has literally saved my life (which becomes potentially endangered when you hang out with Team Rollerblade-sponsored friends during your college years, drink with them and THEN decide to go out and try crazy stunts).
The handstand accomplishes several goals – balance, overhead strength, midline development, proprioceptive awareness, etc…not to mention the fact that developing your handstand prowess will carry directly over into your overhead lifting. Combining these skills into the handstand forward roll isn't a huge obstacle and makes training the handstand much safer as some coaches have expressed reservations about the idea of kicking up with back facing to the wall (i.e. if your arms fail, there really is no where for your head/neck to go – not good news, especially for adults who tend to be slightly less pliable and more weighty than their child counterparts).
Here's the progression set that I generally use to develop these skills:
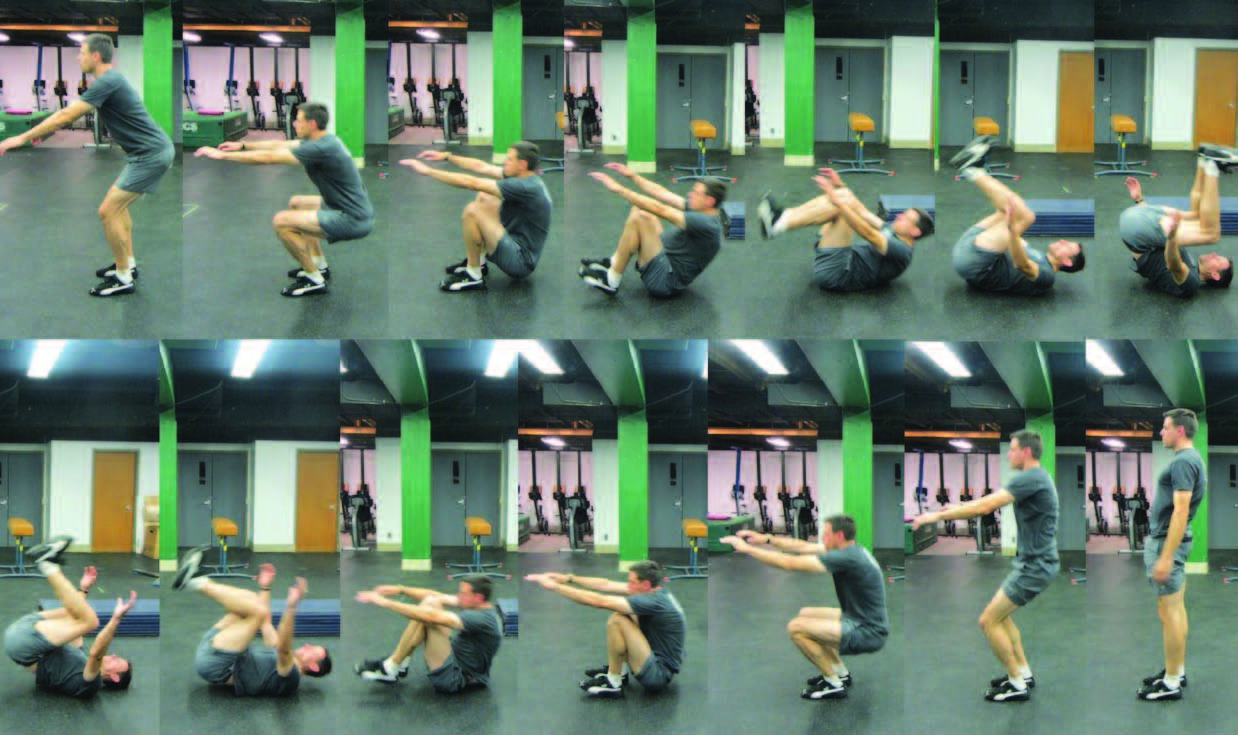
Rock and rolls
These help to establish the basic body position for the forward roll that will follow and help the client to establish fluidity of movement. It also helps rid them of the habit of reaching out with an arm or elbow in the event of a fall, instead dispersing the energy over a broader surface area and reducing/eliminating injury potential in the process. As the client gets accustomed to the movement, have them start practicing 'pizza hands' to prepare them for the hand position they will eventually use for the forward roll (although the demo pic doesn't show this). Caution people new to this movement to avoid rolling too far up onto the head. They should aim to stop the backward momentum so that their upper back retains contact with the ground.
Additional cues for the movement include keeping the heels close to the glutes on the way forward and to reach in front of the center of gravity as far as possible with the hands. Mobility-challenged individuals will potentially benefit by initially practicing this move on an elevated surface, such as a folded panel mat, with their feet still coming to meet the ground at the end of the roll. Gradually reduce the height of the surface as their flexibility and familiarity with the movement improves.
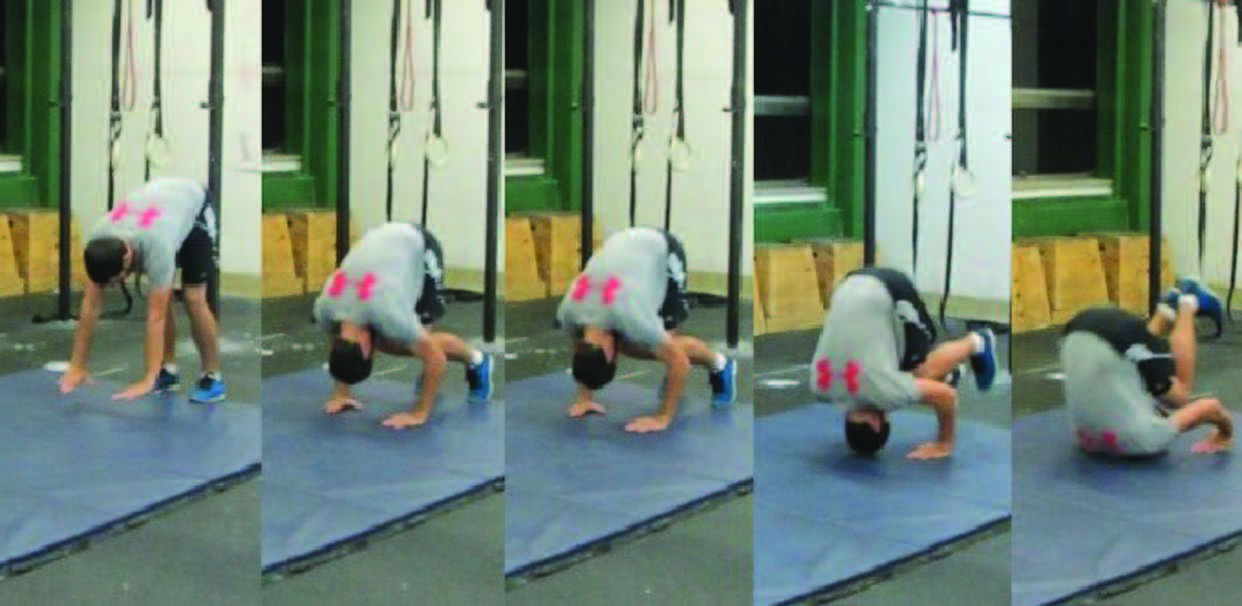
Forward rolls
Once a client has demonstrated competency with the rock and roll, we will move them to the forward roll. Have the client start low to the ground, hands out in front of them. Strongly emphasize that as they begin their roll, they must tuck their chin towards their chest. The goal for them is that, as they roll forwards, they clear their head entirely and don't initiate contact until the top of their upper back has made its way over – basically the same place they'd place the barbell for a back squat. Pressure must be kept on the hands to support the bodyweight as it goes through this transition. A slight push off of the feet can help smooth the movement, provided that the client maintains the rounded back position that allowed them to roll smoothly out of the rock and roll drill. Once they make it over, performing the roll and combing back to a standing position is actually easier than in the rock and roll drill because of the additional momentum involved in the roll. Spotting the athlete by helping to lift the hip and tucking the head to increase rate of rotation will help some get acclimated to the move. Wedges can also be used to more gradually introduce the skill, should you have some available.
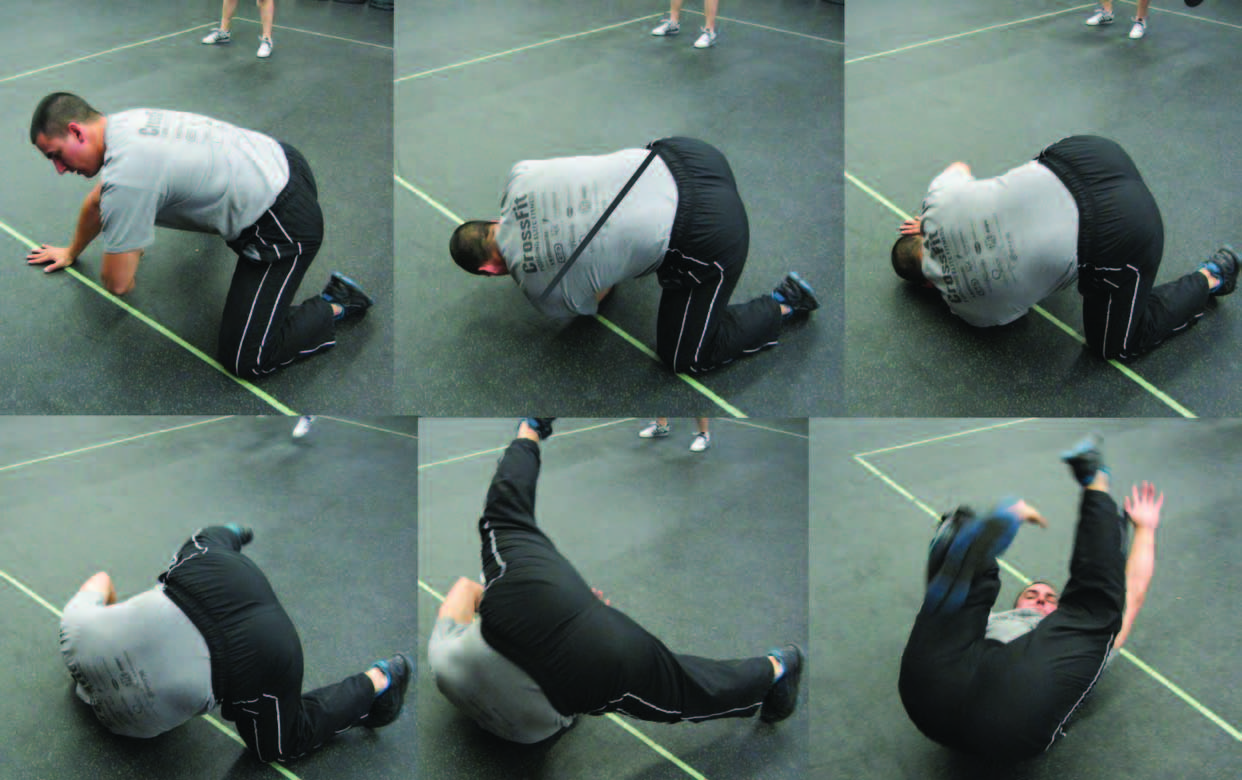
Shoulder rolls
Once a forward roll has been establish. I like to teach my clients a shoulder roll. Ultimately it's more practical and it also minimizes spinal contact with the ground, which can come in handy if you are forced to roll on concrete for some reason. (I did mention rollerblading, crazy college friends, and alcohol, right?). If I had to choose between the two as to which one a client would practice more, the shoulder roll would win hands down.
I usually start the shoulder roll the same way I start teaching the forward roll, with the client really close to the ground. I have them set one knee on the ground and the opposite hand on the ground so that the form a line that's perpendicular to the intended line of motion (in this case, the green tape line in the picture below). The distance between the hand and the knee should be well over a shoulder width. Let's pretend the client has their left knee and right hand on the ground. Have the client slowly lean forward and start to bring the left hand through the space between the right hand and left knee so that it is underneath the client's torso and pointing back towards the right foot. As the client continues to lean forward, making contact with the mat with their left shoulder, have them look up into their right armpit to help get the head out of the way of the roll. From here, a push off with the right foot will help move the hips up and over the left shoulder to help initiate the roll. The key is for the point of contact with the ground to start with the left shoulder and end with the right hip (second photo in the sequence – the grey line drawn across the shirt). Oftentimes a client won't commit to the roll enough, will lack a strong push-off with the back leg and the hips will travel out and around to the side, resulting in a 'side roll' type motion where the entire spine makes contact with the ground at the same time in the middle of the roll – not good. Once the proper line of contact is established for the roll, the client can start from a slightly higher position and begin to initiate the roll without first making knee contact. Eventually they can work to a standing start where the momentum of the upper body coming down to the ground will negate the requirement for a strong push with the rear leg that's required for the kneeling start.
Handstands
While a client is developing their rolling skills, they can simultaneously begin building up their handstand ability if they don't already possess the skill. One of the issues that seems to crop up fairly often, at least in my experience, are cases where an athlete has more than adequate shoulder strength to hold a handstand position, but lacks sufficient technique/experience to efficiently get to that position, especially when they are already in a partially fatigued state. Here's an ad hoc video I made when I had some time between classes one day. It describes how I progress people to help develop the skill of kicking up into a handstand. As you build competency kicking up onto the mats, you can gradually reduce the height and eventually eliminate the use of them altogether to where you can perform the kick up on the floor.
Besides working the handstand, we will occasionally through in some other balancing skills that can help prepare people for the idea of being upside down and balancing on their hands. So far we've played with tripods, headstands and frog stands for the most part, but there are other variations.
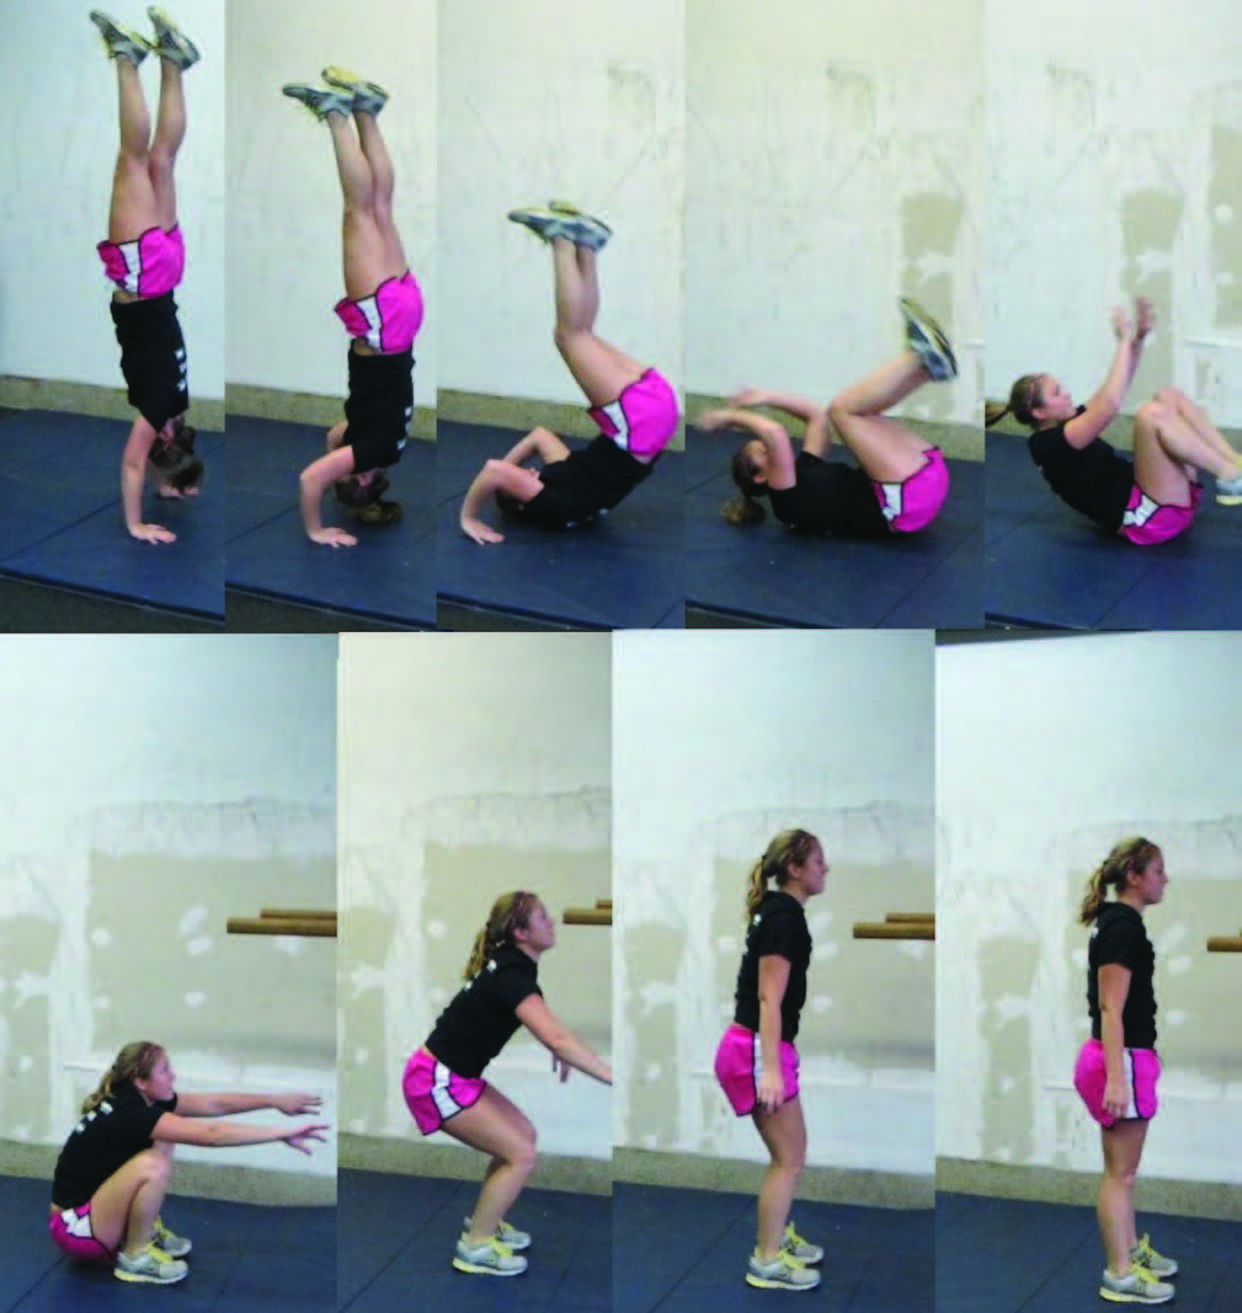
Integrating the Skills
As a client progresses with both their handstand and rolling ability we will start to integrate the skills. This forms the basis for our first mini-routine that we will talk about. It's nothing shocking to the gymnastics community and is often used as a warm-up sequence: Kick up to handstand, hold for a second or two, forward roll. Lather, rinse, repeat.
If used consistently as part of a warm-up routine, this sequence can quickly boost proficiency for those new to the movements. However, before someone attempts this make sure that, in addition to having competency in the component parts of the move, that they also have the ability to SLOWLY lower out of handstand position so they can make a smooth transition into the roll. Sometimes, in order to build up this movement we will have clients start in a pike position with their feet on an object at about waist level. When using this variation, it's important to remind the client to give themselves a little push off of their support so that when they start to lower in the roll they are coming down to the ground contacting with their upper back and not their head. An alternative to this is to use the spotter – who will stand to the side of the athlete while they kick up to the handstand. From there, the spotter will grab onto the calf/ankle in order to help the person with balance and to slow their descent into the roll if needed. Once competency in this move has been mastered, an additional challenge can be added by attempting to roll out and stand up using only one foot to balance on while the other is outstretched in front of you. It's great practice for developing a pistol.
POMMEL HORSE
Okay, I know. Your first thought might be, “What can one possibly accomplish by using a pommel horse?' Well, several things, actually. Besides the drills that I'm about to discuss, which will help to develop upper body stability, midline strength and flexibility, pommel horses can make a decent set-up for a GHD sit-up (stack a couple of boxes and/or bats and have your clients hook their feet UNDER the horse, in the hollow area). I've had up to four people performing the move at once on the pommel horse in our gym at the end of class for an ab finisher. 'Hug a Twinkie' AKA reverse leg raises are a great exercise for working the posterior chain. Lastly, for those of you inclined to play with Parkour, the pommel horse makes a great platform for vaulting off of, or over. Pommel horses aren't cheap if you buy them new. That being said, if you pay attention to Craigslist and cultivate some relationships with local gymnasts, you can usually score some for pretty cheap. Using those methods, our gym was able to acquire a full-size pommel horse for about $200 and a junior's sized one for free.
Onto the skills. We like to use a variety of static holds for our most basic starting point. The basic support is really no different than what you would see on rings, except it's more doable for some because of the stability of the pommels (handles) and there will be more of a forward lean of the hands being out in front the hips. Encourage people to avoid piking at the hip in this position. From here, a client can work leg raises, where one leg is lifted laterally as high as possible (try to keep the shoulders and hips facing towards the pommel horse on these). Normally, I'm not one to chide people for not keeping their toes pointed when practicing L-holds, skin-the-cats and such, but on the leg raises (and subsequent swings) it's actually functionally important – unless you like the idea of your toes clipping the underside of the pommel horse as they're accelerated upward. Once a person is used to the mechanics of the leg raise, have them alternate legs. From there, they can practice the straddle hold, basically the same hold but with the legs spread apart as far as possible. After both the leg raises and straddle hold have been practiced successfully, see if the client can do a straddle swing, where the feet are kept spread apart as the athlete shifts their hips from side to side. This will be the movement from which some basic leg cuts can be performed. Having the athlete build momentum and practice shifting weight from one hand to the other as the hips shift will prepare them for this next move. The leg cut occurs when a leg is swung high enough and the weight shift is significant enough to where the athlete is able to release the grip on one of the pommels of the horse. As this occurs, the leg that is swinging up is brought over and in front of the horse into what is known as a stride support. Practicing a swinging motion from the stride support will eventually allow an athlete to cut the leg back to a straddle position. A good beginner's routine is to start a straddle swing, cut the right leg over, stride swing to the left side and as the weight shifts back to the right side, cut the leg back to the straddle position. From here, the weight will begin to shift to the left. Use the momentum to initiate a left leg cut forward, stride swing, left leg cut back. Consistent practice will acclimate the athlete to the timing and rhythm used to smooth the transitions into a coherent whole. Pictured below are the forward and backward leg cuts for the right side.
A great beginner drill on the pommel horse is what I refer to as down and ups (no, not the Burgener warm-up kind). Start in a basic support. Drop one hand down from the pommel to the space between the two pommels, right in front of your abdomen. Then bring the other hand down from the pommel. Take your first hand and replace it back to its original pommel and then do the same with the second hand. Repeat this down/down/up/up pattern while trying to maintain good shoulder position and straight arms (mostly anyway – you'll be doing a partial dip in the middle of each sequence). Tabata down and ups should get the shoulders of most non-gymnasts pretty fried up in short order.
Another variation of this drill is called pommel walking. Start in a supported position on the end of the pommel horse. One hand at a time and while maintaining your support, walk towards the other end of the pommel horse, making sure to perform a down and up over each pommel with each hand. When you get to the other end of the pommel horse, walk/circle your way around the end of it and proceed back to your starting position using the other side of the horse. If you're in a competitive mood, see how many trips around the pommel horse you can make before breaking your support posture. Then have your buddy have a go at it.
BALANCE BEAM
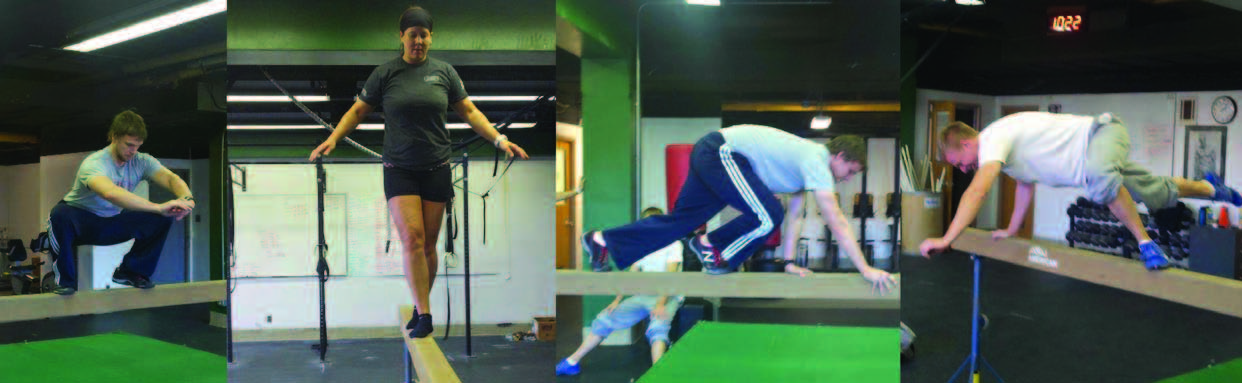
Like the pommel horse, the balance beam is a piece of equipment that isn't hard for gym owners to get ahold of. If you can't find one used for cheap, construction isn't horribly complex. There are a lot of great conditioning exercises that it can be used for (bag over, body over anyone?) and, like the pommel horse, it's easily adapted to the various vaulting work associated with Parkour and Patch-like applications. There are some amazingly simple yet effective balance developing skills that can be worked on the beam – many of which I picked up at a recent MovNat workshop. I usually have clients start by getting comfortable walking forwards and backwards. Use spotters if necessary, and, when the client is moving backwards, make sure that someone is there to warn them when they're running out of beam (and have your clients cultivate the concept of maintaining balance while 'feeling' for support with the foot moving backwards). Sideways motion can come next. If it's too easy, start adding in pivots and squats. Another option is to start adding in drills where the base of balance isn't coming solely from the feet. One drill that I picked up at the MovNat workshop was to balance on one hand and the opposite foot and practice moving the free leg forward and backward between the two bases of support, swiveling the hips and you do so – kettlebell and Brazilian Jiu-Jitsu enthusiasts will find this drill vaguely familiar. Crawling on top of the beam, bear crawl style can be challenging for some, as jumping rope will also (do this on a low beam, please!). If one wants to play with some of the other skills, jumping onto the beam and off of it (with a possible shoulder roll) can be some relatively obvious add-ons.
Hopefully, the above examples have successfully presented some useful ideas as to what can be done on Play Day and will help contribute towards making the Play Day a welcome, option in the toolbox of the small gym owner. Since this article is hardly comprehensive in nature, any questions concerning it can be sent to me at ryan@crossfitmilwaukee.com.
|
Ryan Atkins is the owner CrossFit Milwaukee. He also serves as the Strength and Conditioning Coach for Dominican High School. He's a generalist when it comes to fitness (high school swimmer, hack gymnast, etc.) but has spent a good portion of his life studying various martial arts, briefly entering the competitive MMA arena in the late 90's. His chief motivation these days lies in refining his ability to help others to achieve their fitness/athletic pursuits. He's also recently begun dabbling in the realm of personal blogging (www.strongrealizations.blogspot.com), where he hopes to hone his writing skills and convey somewhat useful tidbits regarding health and fitness. |
Search Articles
Article Categories
Sort by Author
Sort by Issue & Date
Article Categories
Sort by Author
Sort by Issue & Date