

Hitting a Wall In Your Training: Sometimes It's A Good Thing
A couple of weeks ago, I was going over material for a squat workshop I had planned for my trainers. We were going to review--in some cases, introduce--various teaching aids designed to help trainers quickly get clients moving with proper mechanics. During the time I spent reviewing information that I wanted to cover for the workshop, I came across a technique designed to encourage posterior chain recruitment in an air squat. It involved having the client stand about a foot or so away from a wall. Facing away from the wall, they were instructed to draw their butt down and back to the point where it made contact with the wall, thereby correcting some of the common faults associated with squatting among beginners (lack of glute/ham/hip flexor activation, overly pronounced knee bend beyond the toes, loss of heel contact with the ground, etc.) It was also illustrated how this drill helped to acclimate the client's fears of falling backwards, which is normally associated with them getting accustomed to drawing their butt down and back in the squat movement. In this case, if a client lost their balance, all they had to do was lean against the wall.
As I demonstrated this drill, it occurred to me just how much I encouraged new clients to use “Coach Wall” when they didn't have another set of eyes around or (shudder the thought) a mirror in which to check their form. My recommendations regarding the use of the wall weren’t limited to squatting, but applied to several other movements introduced in the OnRamp program: presses, push presses, overhead squats and deadlifts. There are probably applications other than the ones in this article, but I'm hoping this will serve as a good starting point. Although wall drills aren’t the only ones we use to groom good movement, it’s worth noting that when boxes, dumbbells, trained eyes and other tools aren’t readily available, these can be used pretty much anywhere with man-made structures and a stick on hand.
The wall, a doorway within a wall and a broomstick or piece of PVC (take your pick) not only represent a minimal equipment demand on a client when self coaching, but can go a long way towards helping to correct primarily two movement faults – improper path of bar travel and lack of posterior chain activation. A third fault, valgus knee position in the squat (where the knee points inside the line created by the heel/big toe, oftentimes near the bottom of the range of motion), is also addressed by one of the drills. Here’s some detail on how these goals can be accomplished.
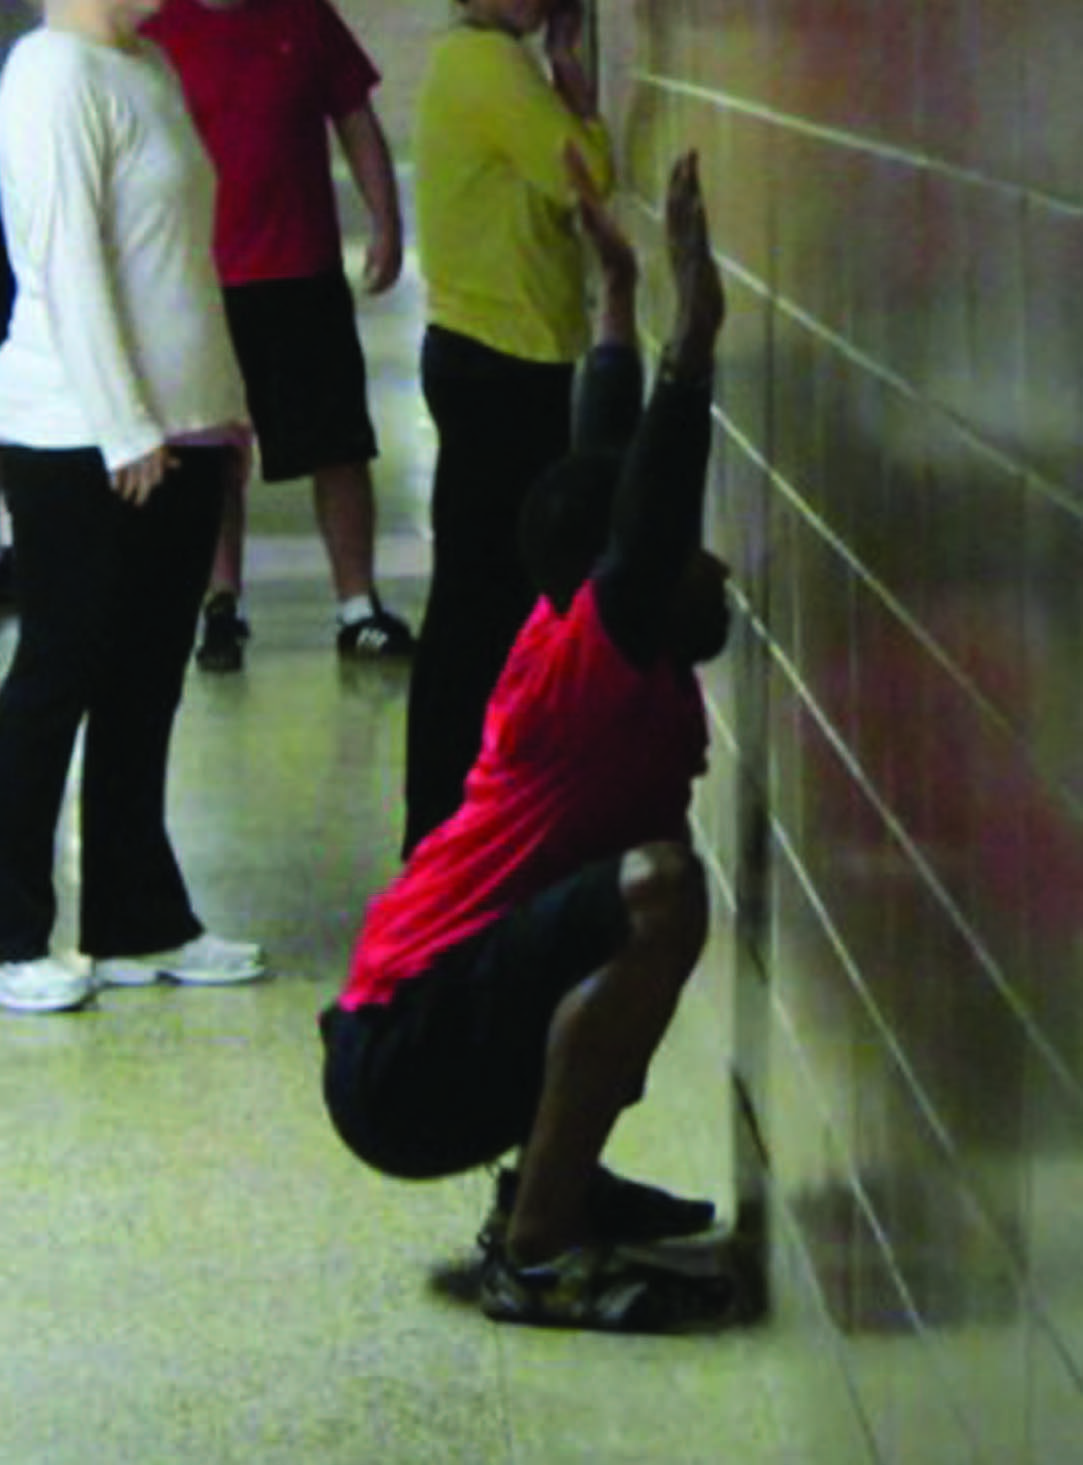
Front-Facing Wall Squat
My first CrossFit certification was in October of 2004. If I remember correctly, it was at this event that someone introduced me to this drill, although I believe he learned it from the RKC crowd. Regardless of the origin, this drill is wonderful for encouraging clients to avoid some common faults. Coach Wall prevents a quad dominant squat, prevents clients from looking at their toes (unless they like headbutting a wall...) and, in doing so, helps to keep the client's chest high and the back in a solid position. Here's how it's done:
1. Stand in facing a wall. In the beginning you'll want to be about 18-24 inches away from it. Shift the weight on your feet so that you can wiggle your toes. People new to training may want to place a chair behind them as a safety measure, or position themselves so that an arm can wrap around the edge of the wall through a doorway. This way they can catch themselves in the event of a loss of balance.
2. For right now, the arms can stay folded across the chest or simply hang straight down between the legs, unless you also want to test scapular retraction/shoulder mobility--in that case, put the arms up overhead and keep them from touching the wall. (Good luck! If you can do it, I envy you!)
3. Perform a squat – slowly if you're new to all of this. Pay attention to the knees--but don't LOOK at them--and attempt to keep the shins as vertical as possible as the butt drops down and back.
4. If you do a good job, you will avoid scraping both your forehead and your knees. If that's the case, scoot closer to the wall by about 2-3 inches and try the squat again.
5. Continue this process. The goal of a flexible trainee with good balance is to start with the toes up against the wall, squat until the hips break parallel and have the hands overhead without having them contact the wall.
.jpg)
Hip Hinge
Here's another drill I picked up sometime around 2003 or 2004. I was spending a massive amount of time on the internet reading about all things fitness related. If I recall correctly, Dan John wrote about this in one of his first ten issues of Get Up!
This time, we take the wall squat described above but start out by having the trainee face away from the wall. The primary goal is to initiate any squat-based movement (or deadlift-based movement, for that matter) with hip flexion being initiated before knee flexion. Starting out by practicing the hip hinge is a great way to get people used to working with their glutes and hamstrings:
1. Stand facing away from the wall, with your heels about six inches from it.
2. Reinforce proper posture and work to extend the spine, lengthening from the top of the skull through the perineum. Keep your shoulders down and back and brace through your midline.
3. With little to no bend in your knees, push your butt back until it makes light contact with the wall. In order to do this correctly, your weight should shift towards the heels and you should be able to maintain the upper body posture described in the point above. All of the motion should be centered on the hip joint in this phase – your upper body will lean slightly forward, but the chest and shoulders shouldn't collapse and the spine should remain rigid.
4. If you've been able to maintain the above body cues and shift your weight properly to achieve the butt touch, come back to a stand, scoot your feet away from the wall by an inch or two and do the drill again.
5. As you continue moving away from the wall, a point will eventually be reached where the only way a butt-to-wall touch is being achieved is if you end up leaning into the wall at the end of the movement. Make a slight adjustment so that you can get the touch, but reverse the motion to the start position without pushing off the wall. At that point you can try the....
.jpg)
Rear-Facing Wall Squat
We're going to start this drill from the last position described in the Hip Hinge drill above. Instead of keeping the knees relatively straight, though, we are going to initiate a deeper knee bend after the hip hinge has been started. The goal is to achieve the butt touch against the wall at a point where the hips are slightly below knee level while eliminating any pressure against the wall. People new to squatting may have to use the wall to lean against until they figure out how to fire the proper muscles and find the right balance point. It may be insightful for the athlete to start with the hinge hip move and once their butt makes contact with the wall, bend the knees from there, sliding down the wall and using it to balance if need be. It's not a perfect approximation of the movement pattern, but it does serve as a good starting point and encourages a good feel for appropriate position of the hips, shins, knees and feet in the bottom position of the squat. Keep in mind that it may not be the best option for obese clients or for those with compromised knee function. Sure, they might end up leaning against the wall instead of falling on their rear, but if they can't get out of the position until help from others arrives, they likely won't be nearly as enthusiastic about self-coaching or getting in extra practice as they were originally.
.jpg)
The Doorway Squat Drill
This is the only drill of this series that actually requires a door. One of the most common errors when squatting is valgus knee position. Draw a line using the inside edge of your heel and your big toe as guide points. If your knee crosses this line towards the center of your body while you squat, you're falling into valgus knee position. It's usually accompanied by the outer edge of the foot coming off the ground, a potential lack of glute activation and some nasty sheer forces on the knee and ankle. Oftentimes, simple cues from a coach can help to correct this fault. If the athlete is alone, they can try this drill instead:
1. Open a door so that it's the same distance away from the wall as the width of your squat stance.
2. With your back facing the hinge of the door, position yourself so that one foot is in contact with the wall and the other with the door. Align your feet so that the outside edges are flush with the surfaces they are in contact with. Because of the angle between the door and the wall, you'll have a toed out stance for this drill.
3. Push your knees apart so that they also come into contact with the wall and door.
4. While keeping the above contact, perform a squat. You might actually find yourself pushing the door a little further open as you squat. That's okay. I'd rather see slightly outward rotation than the valgus position.
.jpg)
Wall-based Push Press Drill
The dip-drive phase is an important point for people new to barbell based lifting to absorb. It introduces the concept of utilizing the entire body as one piece to move weights quickly and explosively. It goes beyond the normal strength requirements of lifting and brings elements of power, speed and coordination to the training sessions in which it is utilized. It has the potential to add an aspect of conditioning not to be found in lifts that focus only on half of the body.
All of these benefits come at a cost, though. Mastering the positions and transitions involved in the movement can be challenging for some but are required if we expect optimization of power generation, efficiency and safety. A lot can go wrong. One common problem among athletes new to the lift is the maintenance of an upright body position. The recruitment of the glutes, hamstrings and hip flexors must be present to keep a tight, vertically oriented body posture, but not so overpowering as to pull the chest forward and make the barbell difficult to support on the shoulders. Practicing the wall-based push press drill can help groom the pattern we are looking for.
1. Stand with your feet shoulder width apart with your heels up against the wall.
2. Facing away from the wall, ensure that your posture is erect and that your upper back and buttocks are also in contact with the wall.
3. Initiate a slight dip of the knees, but focus on keeping your heels, buttocks, upper back and the back of your head against the wall as you do so. Interior walls are probably best for this. Avoiding stucco is also wise.
4. Return to the starting position keeping the same parts of the body in contact with the wall. Develop the ability to 'graze' the wall, meaning you can keep the body position described without actually leaning any weight onto the wall itself.
.jpg)
The wall-based push press drill is great. It works at keeping the torso vertical, forces the proper muscles to fire and encourages a retracted scapular position. That being said, it does have a disadvantage - we can't really practice going overhead with a stick or bar. The fact that the back of our head is against the wall means that we can't pull our head back out of the way of the barbell. This means we are forced to move it out away from our body and circle it around the chin and nose. Even without the wall present, this faulty movement pattern is common in people just learning the lifts. Our next drill - the doorway push press drill - addresses and works to correct that error.
The Doorway Push Press Drill
When pressing (or push pressing, or jerking) the bar overhead, it's imperative to keep a straight path of motion with regards to the bar. Not only is it the shortest path to completion of the lift, but having the weight positioned directly over a (hopefully) stabilized spinal column and hip girdle will maximize safety in addition to improving performance for the lifter involved. Here's how it works:
1. Line yourself up so that your shoelaces are even with the edge of the doorway.
2. Hold a bar or stick so that it is in contact with the chest and shoulders and also flush with the walls on either side of the doorway.
3. Perform the push press slowly at first, with the goal being for the stick to slide along the wall edge throughout the range of motion. To accomplish this, tuck your chin and pull your head back slightly ensure a straight vertical line of travel for the bar.
4. Once the bar clears your head, move your head forward so that it's under the bar and in a neutral position in relation to the spine. Check your posture--look for completely open shoulders, braced mid line, tightened glutes and open hip flexors
5. Work on maintaining the vertical torso position during the dip-drive phase that was covered in the wall drill for this movement.
.jpg)
Remember that each of these push press drills has their advantages, but they are both also limited in some way. Use them to help perfect technique. Another factor to keep in mind is that we don't want lifters actively pushing or pulling the bar horizontally in this movement. It's a good idea to have clients practice this doorway drill facing both towards and away from the wall. The goal is to use the wall as a guide to get the feel for proper movement, not as a crutch for sloppy efforts in body control. The idea of using the wall as a guide for vertical bar movement applies not only for pressing and jerking movements, but for deadlifting as well....
The Doorway Deadlift Drill
In the push press, we helped the trainee get the feel for moving a body part (in this case, the head) out of the way of the barbell's ideal line of motion. We can take this same concept and apply it to the deadlift. This time, the common fault that new lifters make is to round the bar out around the forward bending, quad-dominant position of the knees. Doing so reduces leverage, places undo strain on the back, and ensures that you will impress no one with your lifting ability--except perhaps your chiropractor, as he'll appreciate the steady business you will supply him with.
As a prep for this drill, it will be hugely beneficial to practice the hip hinge drill we've already covered. Once you have that down...
1. Set up with your feet in pretty much the same position as the push-press version of this drill. The closer you can come to having your shoelaces (or velcro straps, or whatever) lined up with the edge of the doorway, the closer you'll be to mimicking an optimal starting position for a conventional deadlift.
2. Bend over so that your stick is set at about missing level and in contact with your legs. The wall edge should line up with the back part of your arm at this point with your shoulders and chest jutting out from the doorway edge a bit. Your sternum should be directly over the stick.
3. Extend your spine by stretching your butt back and up, but, at the same time, fighting the tendency for your head and chest to collapse forward.
4. Flex your lats. Actively pull the bar against the wall in this drill. Try to connect your triceps to your lats--anybody remember World Class Coaching's tri-lat tuck cue? Flare the chest.
5. Once you have your set-up position, extend the knees, keeping your body angle to the ground constant until your knees are straight. From there, open the hip joint fully. Throughout these motions, the stick should be in contact with the doorway the whole time. Pulling your knees out of the way of the stick's path both on the way up and the way down will be necessary to accomplish this.
.jpg)
There are a couple of things to note with thus drill. First, it's not perfect. The ideal path of a deadlift is a straight line, but not necessarily a perfectly vertical one. This drill does a great job of having an athlete move the proper way to keep the knees out if the way. However, because of the hip hinging action, once the bar is at it above thigh level there will be a certain amount if space between the bar and the legs--more than I would like to see if the athlete was working with an actual weight. Another thing to keep in mind is that, unlike the push press variation of this drill, I will always have the client set up so they are facing away from the doorway, so that they are always conscious of the need to use the lats to pull the bar towards their center of gravity.
As I previously stated, this is far from a comprehensive list of drills. Additional jerk variations may come to mind, for example, and I've also used a variation of the door way deadlift drill to help athletes better understand the scoop in the pulling action of the snatch. The important point that I've hoped you drawn from this piece is that it's very doable for clients to perfect aspects of technique outside of the gym using minimal equipment and without supervision. Hopefully, by doing so, this will allow the trainer and client team to better maximize the value of their time spent together IN the gym when they have the full range of tools at their disposal.
As I demonstrated this drill, it occurred to me just how much I encouraged new clients to use “Coach Wall” when they didn't have another set of eyes around or (shudder the thought) a mirror in which to check their form. My recommendations regarding the use of the wall weren’t limited to squatting, but applied to several other movements introduced in the OnRamp program: presses, push presses, overhead squats and deadlifts. There are probably applications other than the ones in this article, but I'm hoping this will serve as a good starting point. Although wall drills aren’t the only ones we use to groom good movement, it’s worth noting that when boxes, dumbbells, trained eyes and other tools aren’t readily available, these can be used pretty much anywhere with man-made structures and a stick on hand.
The wall, a doorway within a wall and a broomstick or piece of PVC (take your pick) not only represent a minimal equipment demand on a client when self coaching, but can go a long way towards helping to correct primarily two movement faults – improper path of bar travel and lack of posterior chain activation. A third fault, valgus knee position in the squat (where the knee points inside the line created by the heel/big toe, oftentimes near the bottom of the range of motion), is also addressed by one of the drills. Here’s some detail on how these goals can be accomplished.
Front-Facing Wall Squat
My first CrossFit certification was in October of 2004. If I remember correctly, it was at this event that someone introduced me to this drill, although I believe he learned it from the RKC crowd. Regardless of the origin, this drill is wonderful for encouraging clients to avoid some common faults. Coach Wall prevents a quad dominant squat, prevents clients from looking at their toes (unless they like headbutting a wall...) and, in doing so, helps to keep the client's chest high and the back in a solid position. Here's how it's done:
1. Stand in facing a wall. In the beginning you'll want to be about 18-24 inches away from it. Shift the weight on your feet so that you can wiggle your toes. People new to training may want to place a chair behind them as a safety measure, or position themselves so that an arm can wrap around the edge of the wall through a doorway. This way they can catch themselves in the event of a loss of balance.
2. For right now, the arms can stay folded across the chest or simply hang straight down between the legs, unless you also want to test scapular retraction/shoulder mobility--in that case, put the arms up overhead and keep them from touching the wall. (Good luck! If you can do it, I envy you!)
3. Perform a squat – slowly if you're new to all of this. Pay attention to the knees--but don't LOOK at them--and attempt to keep the shins as vertical as possible as the butt drops down and back.
4. If you do a good job, you will avoid scraping both your forehead and your knees. If that's the case, scoot closer to the wall by about 2-3 inches and try the squat again.
5. Continue this process. The goal of a flexible trainee with good balance is to start with the toes up against the wall, squat until the hips break parallel and have the hands overhead without having them contact the wall.
Hip Hinge
Here's another drill I picked up sometime around 2003 or 2004. I was spending a massive amount of time on the internet reading about all things fitness related. If I recall correctly, Dan John wrote about this in one of his first ten issues of Get Up!
This time, we take the wall squat described above but start out by having the trainee face away from the wall. The primary goal is to initiate any squat-based movement (or deadlift-based movement, for that matter) with hip flexion being initiated before knee flexion. Starting out by practicing the hip hinge is a great way to get people used to working with their glutes and hamstrings:
1. Stand facing away from the wall, with your heels about six inches from it.
2. Reinforce proper posture and work to extend the spine, lengthening from the top of the skull through the perineum. Keep your shoulders down and back and brace through your midline.
3. With little to no bend in your knees, push your butt back until it makes light contact with the wall. In order to do this correctly, your weight should shift towards the heels and you should be able to maintain the upper body posture described in the point above. All of the motion should be centered on the hip joint in this phase – your upper body will lean slightly forward, but the chest and shoulders shouldn't collapse and the spine should remain rigid.
4. If you've been able to maintain the above body cues and shift your weight properly to achieve the butt touch, come back to a stand, scoot your feet away from the wall by an inch or two and do the drill again.
5. As you continue moving away from the wall, a point will eventually be reached where the only way a butt-to-wall touch is being achieved is if you end up leaning into the wall at the end of the movement. Make a slight adjustment so that you can get the touch, but reverse the motion to the start position without pushing off the wall. At that point you can try the....
Rear-Facing Wall Squat
We're going to start this drill from the last position described in the Hip Hinge drill above. Instead of keeping the knees relatively straight, though, we are going to initiate a deeper knee bend after the hip hinge has been started. The goal is to achieve the butt touch against the wall at a point where the hips are slightly below knee level while eliminating any pressure against the wall. People new to squatting may have to use the wall to lean against until they figure out how to fire the proper muscles and find the right balance point. It may be insightful for the athlete to start with the hinge hip move and once their butt makes contact with the wall, bend the knees from there, sliding down the wall and using it to balance if need be. It's not a perfect approximation of the movement pattern, but it does serve as a good starting point and encourages a good feel for appropriate position of the hips, shins, knees and feet in the bottom position of the squat. Keep in mind that it may not be the best option for obese clients or for those with compromised knee function. Sure, they might end up leaning against the wall instead of falling on their rear, but if they can't get out of the position until help from others arrives, they likely won't be nearly as enthusiastic about self-coaching or getting in extra practice as they were originally.
The Doorway Squat Drill
This is the only drill of this series that actually requires a door. One of the most common errors when squatting is valgus knee position. Draw a line using the inside edge of your heel and your big toe as guide points. If your knee crosses this line towards the center of your body while you squat, you're falling into valgus knee position. It's usually accompanied by the outer edge of the foot coming off the ground, a potential lack of glute activation and some nasty sheer forces on the knee and ankle. Oftentimes, simple cues from a coach can help to correct this fault. If the athlete is alone, they can try this drill instead:
1. Open a door so that it's the same distance away from the wall as the width of your squat stance.
2. With your back facing the hinge of the door, position yourself so that one foot is in contact with the wall and the other with the door. Align your feet so that the outside edges are flush with the surfaces they are in contact with. Because of the angle between the door and the wall, you'll have a toed out stance for this drill.
3. Push your knees apart so that they also come into contact with the wall and door.
4. While keeping the above contact, perform a squat. You might actually find yourself pushing the door a little further open as you squat. That's okay. I'd rather see slightly outward rotation than the valgus position.
Wall-based Push Press Drill
The dip-drive phase is an important point for people new to barbell based lifting to absorb. It introduces the concept of utilizing the entire body as one piece to move weights quickly and explosively. It goes beyond the normal strength requirements of lifting and brings elements of power, speed and coordination to the training sessions in which it is utilized. It has the potential to add an aspect of conditioning not to be found in lifts that focus only on half of the body.
All of these benefits come at a cost, though. Mastering the positions and transitions involved in the movement can be challenging for some but are required if we expect optimization of power generation, efficiency and safety. A lot can go wrong. One common problem among athletes new to the lift is the maintenance of an upright body position. The recruitment of the glutes, hamstrings and hip flexors must be present to keep a tight, vertically oriented body posture, but not so overpowering as to pull the chest forward and make the barbell difficult to support on the shoulders. Practicing the wall-based push press drill can help groom the pattern we are looking for.
1. Stand with your feet shoulder width apart with your heels up against the wall.
2. Facing away from the wall, ensure that your posture is erect and that your upper back and buttocks are also in contact with the wall.
3. Initiate a slight dip of the knees, but focus on keeping your heels, buttocks, upper back and the back of your head against the wall as you do so. Interior walls are probably best for this. Avoiding stucco is also wise.
4. Return to the starting position keeping the same parts of the body in contact with the wall. Develop the ability to 'graze' the wall, meaning you can keep the body position described without actually leaning any weight onto the wall itself.
The wall-based push press drill is great. It works at keeping the torso vertical, forces the proper muscles to fire and encourages a retracted scapular position. That being said, it does have a disadvantage - we can't really practice going overhead with a stick or bar. The fact that the back of our head is against the wall means that we can't pull our head back out of the way of the barbell. This means we are forced to move it out away from our body and circle it around the chin and nose. Even without the wall present, this faulty movement pattern is common in people just learning the lifts. Our next drill - the doorway push press drill - addresses and works to correct that error.
The Doorway Push Press Drill
When pressing (or push pressing, or jerking) the bar overhead, it's imperative to keep a straight path of motion with regards to the bar. Not only is it the shortest path to completion of the lift, but having the weight positioned directly over a (hopefully) stabilized spinal column and hip girdle will maximize safety in addition to improving performance for the lifter involved. Here's how it works:
1. Line yourself up so that your shoelaces are even with the edge of the doorway.
2. Hold a bar or stick so that it is in contact with the chest and shoulders and also flush with the walls on either side of the doorway.
3. Perform the push press slowly at first, with the goal being for the stick to slide along the wall edge throughout the range of motion. To accomplish this, tuck your chin and pull your head back slightly ensure a straight vertical line of travel for the bar.
4. Once the bar clears your head, move your head forward so that it's under the bar and in a neutral position in relation to the spine. Check your posture--look for completely open shoulders, braced mid line, tightened glutes and open hip flexors
5. Work on maintaining the vertical torso position during the dip-drive phase that was covered in the wall drill for this movement.
Remember that each of these push press drills has their advantages, but they are both also limited in some way. Use them to help perfect technique. Another factor to keep in mind is that we don't want lifters actively pushing or pulling the bar horizontally in this movement. It's a good idea to have clients practice this doorway drill facing both towards and away from the wall. The goal is to use the wall as a guide to get the feel for proper movement, not as a crutch for sloppy efforts in body control. The idea of using the wall as a guide for vertical bar movement applies not only for pressing and jerking movements, but for deadlifting as well....
The Doorway Deadlift Drill
In the push press, we helped the trainee get the feel for moving a body part (in this case, the head) out of the way of the barbell's ideal line of motion. We can take this same concept and apply it to the deadlift. This time, the common fault that new lifters make is to round the bar out around the forward bending, quad-dominant position of the knees. Doing so reduces leverage, places undo strain on the back, and ensures that you will impress no one with your lifting ability--except perhaps your chiropractor, as he'll appreciate the steady business you will supply him with.
As a prep for this drill, it will be hugely beneficial to practice the hip hinge drill we've already covered. Once you have that down...
1. Set up with your feet in pretty much the same position as the push-press version of this drill. The closer you can come to having your shoelaces (or velcro straps, or whatever) lined up with the edge of the doorway, the closer you'll be to mimicking an optimal starting position for a conventional deadlift.
2. Bend over so that your stick is set at about missing level and in contact with your legs. The wall edge should line up with the back part of your arm at this point with your shoulders and chest jutting out from the doorway edge a bit. Your sternum should be directly over the stick.
3. Extend your spine by stretching your butt back and up, but, at the same time, fighting the tendency for your head and chest to collapse forward.
4. Flex your lats. Actively pull the bar against the wall in this drill. Try to connect your triceps to your lats--anybody remember World Class Coaching's tri-lat tuck cue? Flare the chest.
5. Once you have your set-up position, extend the knees, keeping your body angle to the ground constant until your knees are straight. From there, open the hip joint fully. Throughout these motions, the stick should be in contact with the doorway the whole time. Pulling your knees out of the way of the stick's path both on the way up and the way down will be necessary to accomplish this.
There are a couple of things to note with thus drill. First, it's not perfect. The ideal path of a deadlift is a straight line, but not necessarily a perfectly vertical one. This drill does a great job of having an athlete move the proper way to keep the knees out if the way. However, because of the hip hinging action, once the bar is at it above thigh level there will be a certain amount if space between the bar and the legs--more than I would like to see if the athlete was working with an actual weight. Another thing to keep in mind is that, unlike the push press variation of this drill, I will always have the client set up so they are facing away from the doorway, so that they are always conscious of the need to use the lats to pull the bar towards their center of gravity.
As I previously stated, this is far from a comprehensive list of drills. Additional jerk variations may come to mind, for example, and I've also used a variation of the door way deadlift drill to help athletes better understand the scoop in the pulling action of the snatch. The important point that I've hoped you drawn from this piece is that it's very doable for clients to perfect aspects of technique outside of the gym using minimal equipment and without supervision. Hopefully, by doing so, this will allow the trainer and client team to better maximize the value of their time spent together IN the gym when they have the full range of tools at their disposal.
|
Ryan Atkins is the owner CrossFit Milwaukee. He also serves as the Strength and Conditioning Coach for Dominican High School. He's a generalist when it comes to fitness (high school swimmer, hack gymnast, etc.) but has spent a good portion of his life studying various martial arts, briefly entering the competitive MMA arena in the late 90's. His chief motivation these days lies in refining his ability to help others to achieve their fitness/athletic pursuits. He's also recently begun dabbling in the realm of personal blogging (www.strongrealizations.blogspot.com), where he hopes to hone his writing skills and convey somewhat useful tidbits regarding health and fitness. |
Search Articles
Article Categories
Sort by Author
Sort by Issue & Date
Article Categories
Sort by Author
Sort by Issue & Date